
Laplace Operator#
Goal#
In this tutorial you will learn how to:
Use the OpenCV function Laplacian() to implement a discrete analog of the Laplacian operator.
Theory#
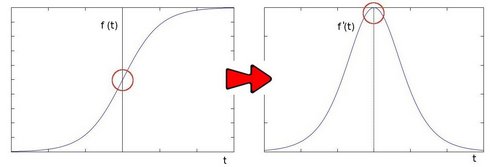
In the previous tutorial we learned how to use the Sobel Operator. It was based on the fact that in the edge area, the pixel intensity shows a “jump” or a high variation of intensity. Getting the first derivative of the intensity, we observed that an edge is characterized by a maximum, as it can be seen in the figure:
And…what happens if we take the second derivative?
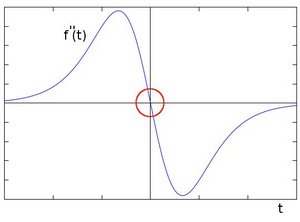
You can observe that the second derivative is zero! So, we can also use this criterion to attempt to detect edges in an image. However, note that zeros will not only appear in edges (they can actually appear in other meaningless locations); this can be solved by applying filtering where needed.
Laplacian Operator#
From the explanation above, we deduce that the second derivative can be used to detect edges. Since images are “2D”, we would need to take the derivative in both dimensions. Here, the Laplacian operator comes handy.
The Laplacian operator is defined by:
The Laplacian operator is implemented in OpenCV by the function Laplacian() . In fact, since the Laplacian uses the gradient of images, it calls internally the Sobel operator to perform its computation.
Code#
What does this program do?
Loads an image
Remove noise by applying a Gaussian blur and then convert the original image to grayscale
Applies a Laplacian operator to the grayscale image and stores the output image
Display the result in a window
The tutorial code’s is shown lines below. You can also download it from here
#include "opencv2/imgproc.hpp"
#include "opencv2/imgcodecs.hpp"
#include "opencv2/highgui.hpp"

using namespace cv;

int main( int argc, char** argv )
{
    // Declare the variables we are going to use
    Mat src, src_gray, dst;
    int kernel_size = 3;
    int scale = 1;
    int delta = 0;
    int ddepth = CV_16S;
    const char* window_name = "Laplace Demo";

    const char* imageName = argc >=2 ? argv[1] : "lena.jpg";

    src = imread( samples::findFile( imageName ), IMREAD_COLOR ); // Load an image

    // Check if image is loaded fine
    if(src.empty()){
        printf(" Error opening image\n");
        printf(" Program Arguments: [image_name -- default lena.jpg] \n");
        return -1;
    }

    // Reduce noise by blurring with a Gaussian filter ( kernel size = 3 )
    GaussianBlur( src, src, Size(3, 3), 0, 0, BORDER_DEFAULT );

    cvtColor( src, src_gray, COLOR_BGR2GRAY ); // Convert the image to grayscale

    /// Apply Laplace function
    Mat abs_dst;
    Laplacian( src_gray, dst, ddepth, kernel_size, scale, delta, BORDER_DEFAULT );

    // converting back to CV_8U
    convertScaleAbs( dst, abs_dst );

    imshow( window_name, abs_dst );
    waitKey(0);

    return 0;
}
The tutorial code’s is shown lines below. You can also download it from here
import org.opencv.core.*;
import org.opencv.highgui.HighGui;
import org.opencv.imgcodecs.Imgcodecs;
import org.opencv.imgproc.Imgproc;

class LaplaceDemoRun {

    public void run(String[] args) {
        // Declare the variables we are going to use
        Mat src, src_gray = new Mat(), dst = new Mat();
        int kernel_size = 3;
        int scale = 1;
        int delta = 0;
        int ddepth = CvType.CV_16S;
        String window_name = "Laplace Demo";

        String imageName = ((args.length > 0) ? args[0] : "../data/lena.jpg");

        src = Imgcodecs.imread(imageName, Imgcodecs.IMREAD_COLOR); // Load an image

        // Check if image is loaded fine
        if( src.empty() ) {
            System.out.println("Error opening image");
            System.out.println("Program Arguments: [image_name -- default ../data/lena.jpg] \n");
            System.exit(-1);
        }

        // Reduce noise by blurring with a Gaussian filter ( kernel size = 3 )
        Imgproc.GaussianBlur( src, src, new Size(3, 3), 0, 0, Core.BORDER_DEFAULT );

        // Convert the image to grayscale
        Imgproc.cvtColor( src, src_gray, Imgproc.COLOR_RGB2GRAY );

        /// Apply Laplace function
        Mat abs_dst = new Mat();
        Imgproc.Laplacian( src_gray, dst, ddepth, kernel_size, scale, delta, Core.BORDER_DEFAULT );

        // converting back to CV_8U
        Core.convertScaleAbs( dst, abs_dst );

        HighGui.imshow( window_name, abs_dst );
        HighGui.waitKey(0);

        System.exit(0);
    }
}

public class LaplaceDemo {
    public static void main(String[] args) {
        // Load the native library.
        System.loadLibrary(Core.NATIVE_LIBRARY_NAME);
        new LaplaceDemoRun().run(args);
    }
}
The tutorial code’s is shown lines below. You can also download it from here
"""
@file laplace_demo.py
@brief Sample code showing how to detect edges using the Laplace operator
"""
import sys
import cv2 as cv

def main(argv):
    # Declare the variables we are going to use
    ddepth = cv.CV_16S
    kernel_size = 3
    window_name = "Laplace Demo"

    imageName = argv[0] if len(argv) > 0 else 'lena.jpg'

    src = cv.imread(cv.samples.findFile(imageName), cv.IMREAD_COLOR) # Load an image

    # Check if image is loaded fine
    if src is None:
        print ('Error opening image')
        print ('Program Arguments: [image_name -- default lena.jpg]')
        return -1

    # Remove noise by blurring with a Gaussian filter
    src = cv.GaussianBlur(src, (3, 3), 0)

    # Convert the image to grayscale
    src_gray = cv.cvtColor(src, cv.COLOR_BGR2GRAY)

    # Create Window
    cv.namedWindow(window_name, cv.WINDOW_AUTOSIZE)

    # Apply Laplace function
    dst = cv.Laplacian(src_gray, ddepth, ksize=kernel_size)

    # converting back to uint8
    abs_dst = cv.convertScaleAbs(dst)

    cv.imshow(window_name, abs_dst)
    cv.waitKey(0)

    return 0

if __name__ == "__main__":
    main(sys.argv[1:])
Explanation#
Declare variables#
// Declare the variables we are going to use
Mat src, src_gray, dst;
int kernel_size = 3;
int scale = 1;
int delta = 0;
int ddepth = CV_16S;
const char* window_name = "Laplace Demo";
# Declare the variables we are going to use
ddepth = cv.CV_16S
kernel_size = 3
window_name = "Laplace Demo"
Load source image#
const char* imageName = argc >=2 ? argv[1] : "lena.jpg";

src = imread( samples::findFile( imageName ), IMREAD_COLOR ); // Load an image

// Check if image is loaded fine
if(src.empty()){
    printf(" Error opening image\n");
    printf(" Program Arguments: [image_name -- default lena.jpg] \n");
    return -1;
}
String imageName = ((args.length > 0) ? args[0] : "../data/lena.jpg");

src = Imgcodecs.imread(imageName, Imgcodecs.IMREAD_COLOR); // Load an image

// Check if image is loaded fine
if( src.empty() ) {
    System.out.println("Error opening image");
    System.out.println("Program Arguments: [image_name -- default ../data/lena.jpg] \n");
    System.exit(-1);
}
imageName = argv[0] if len(argv) > 0 else 'lena.jpg'

src = cv.imread(cv.samples.findFile(imageName), cv.IMREAD_COLOR) # Load an image

# Check if image is loaded fine
if src is None:
    print ('Error opening image')
    print ('Program Arguments: [image_name -- default lena.jpg]')
    return -1
Reduce noise#
// Reduce noise by blurring with a Gaussian filter ( kernel size = 3 )
GaussianBlur( src, src, Size(3, 3), 0, 0, BORDER_DEFAULT );
// Reduce noise by blurring with a Gaussian filter ( kernel size = 3 )
Imgproc.GaussianBlur( src, src, new Size(3, 3), 0, 0, Core.BORDER_DEFAULT );
# Remove noise by blurring with a Gaussian filter
src = cv.GaussianBlur(src, (3, 3), 0)
Grayscale#
Laplacian operator#
Laplacian( src_gray, dst, ddepth, kernel_size, scale, delta, BORDER_DEFAULT );
Imgproc.Laplacian( src_gray, dst, ddepth, kernel_size, scale, delta, Core.BORDER_DEFAULT );
# Apply Laplace function
dst = cv.Laplacian(src_gray, ddepth, ksize=kernel_size)
The arguments are:
src_gray: The input image.
dst: Destination (output) image
ddepth: Depth of the destination image. Since our input is CV_8U we define ddepth = CV_16S to avoid overflow
kernel_size: The kernel size of the Sobel operator to be applied internally. We use 3 in this example.
scale, delta and BORDER_DEFAULT: We leave them as default values.
Convert output to a CV_8U image#
// converting back to CV_8U
convertScaleAbs( dst, abs_dst );
// converting back to CV_8U
Core.convertScaleAbs( dst, abs_dst );
# converting back to uint8
abs_dst = cv.convertScaleAbs(dst)
Display the result#
Results#
After compiling the code above, we can run it giving as argument the path to an image. For example, using as an input:
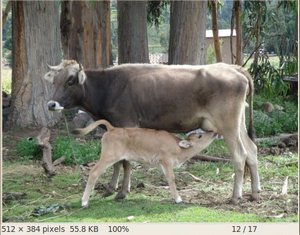
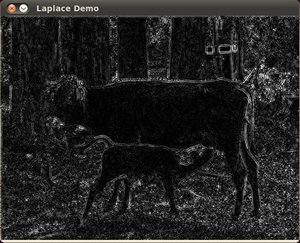
We obtain the following result. Notice how the trees and the silhouette of the cow are approximately well defined (except in areas in which the intensity are very similar, i.e. around the cow’s head). Also, note that the roof of the house behind the trees (right side) is notoriously marked. This is due to the fact that the contrast is higher in that region.