
Basic Drawing#
Goals#
In this tutorial you will learn how to:
Draw a line by using the OpenCV function line()
Draw an ellipse by using the OpenCV function ellipse()
Draw a rectangle by using the OpenCV function rectangle()
Draw a circle by using the OpenCV function circle()
Draw a filled polygon by using the OpenCV function fillPoly()
OpenCV Theory#
For this tutorial, we will heavily use two structures: [cv::Point](#cv::Point) and [cv::Scalar](#cv::Scalar) :
For this tutorial, we will heavily use two structures: [cv::Point](#cv::Point) and [cv::Scalar](#cv::Scalar) :
For this tutorial, we will heavily use tuples in Python instead of [cv::Point](#cv::Point) and [cv::Scalar](#cv::Scalar) :
Point#
It represents a 2D point, specified by its image coordinates \(x\) and \(y\). We can define it as:
Scalar#
Represents a 4-element vector. The type Scalar is widely used in OpenCV for passing pixel values.
In this tutorial, we will use it extensively to represent BGR color values (3 parameters). It is not necessary to define the last argument if it is not going to be used.
Let’s see an example, if we are asked for a color argument and we give:
We would be defining a BGR color such as: Blue = a, Green = b and Red = c
Code#
This code is in your OpenCV sample folder. Otherwise you can grab it from here
#include <opencv2/core.hpp>
#include <opencv2/imgproc.hpp>
#include <opencv2/highgui.hpp>

#define w 400

using namespace cv;

/// Function headers
void MyEllipse( Mat img, double angle );
void MyFilledCircle( Mat img, Point center );
void MyPolygon( Mat img );
void MyLine( Mat img, Point start, Point end );

int main( void ){

  /// Windows names
  char atom_window[] = "Drawing 1: Atom";
  char rook_window[] = "Drawing 2: Rook";

  /// Create black empty images
  Mat atom_image = Mat::zeros( w, w, CV_8UC3 );
  Mat rook_image = Mat::zeros( w, w, CV_8UC3 );

  /// 1. Draw a simple atom:
  /// -----------------------

  /// 1.a. Creating ellipses
  MyEllipse( atom_image, 90 );
  MyEllipse( atom_image, 0 );
  MyEllipse( atom_image, 45 );
  MyEllipse( atom_image, -45 );

  /// 1.b. Creating circles
  MyFilledCircle( atom_image, Point( w/2, w/2) );

  /// 2. Draw a rook
  /// ------------------

  /// 2.a. Create a convex polygon
  MyPolygon( rook_image );

  /// 2.b. Creating rectangles
  rectangle( rook_image,
         Point( 0, 7*w/8 ),
         Point( w, w),
         Scalar( 0, 255, 255 ),
         FILLED,
         LINE_8 );

  /// 2.c. Create a few lines
  MyLine( rook_image, Point( 0, 15*w/16 ), Point( w, 15*w/16 ) );
  MyLine( rook_image, Point( w/4, 7*w/8 ), Point( w/4, w ) );
  MyLine( rook_image, Point( w/2, 7*w/8 ), Point( w/2, w ) );
  MyLine( rook_image, Point( 3*w/4, 7*w/8 ), Point( 3*w/4, w ) );

  /// 3. Display your stuff!
  imshow( atom_window, atom_image );
  moveWindow( atom_window, 0, 200 );
  imshow( rook_window, rook_image );
  moveWindow( rook_window, w, 200 );

  waitKey( 0 );
  return(0);
}

/// Function Declaration

void MyEllipse( Mat img, double angle )
{
  int thickness = 2;
  int lineType = 8;

  ellipse( img,
       Point( w/2, w/2 ),
       Size( w/4, w/16 ),
       angle,
       0,
       360,
       Scalar( 255, 0, 0 ),
       thickness,
       lineType );
}

void MyFilledCircle( Mat img, Point center )
{
  circle( img,
      center,
      w/32,
      Scalar( 0, 0, 255 ),
      FILLED,
      LINE_8 );
}

void MyPolygon( Mat img )
{
  int lineType = LINE_8;

  Point rook_points[1][20];
  rook_points[0][0]  = Point(    w/4,   7*w/8 );
  rook_points[0][1]  = Point(  3*w/4,   7*w/8 );
  rook_points[0][2]  = Point(  3*w/4,  13*w/16 );
  rook_points[0][3]  = Point( 11*w/16, 13*w/16 );
  rook_points[0][4]  = Point( 19*w/32,  3*w/8 );
  rook_points[0][5]  = Point(  3*w/4,   3*w/8 );
  rook_points[0][6]  = Point(  3*w/4,     w/8 );
  rook_points[0][7]  = Point( 26*w/40,    w/8 );
  rook_points[0][8]  = Point( 26*w/40,    w/4 );
  rook_points[0][9]  = Point( 22*w/40,    w/4 );
  rook_points[0][10] = Point( 22*w/40,    w/8 );
  rook_points[0][11] = Point( 18*w/40,    w/8 );
  rook_points[0][12] = Point( 18*w/40,    w/4 );
  rook_points[0][13] = Point( 14*w/40,    w/4 );
  rook_points[0][14] = Point( 14*w/40,    w/8 );
  rook_points[0][15] = Point(    w/4,     w/8 );
  rook_points[0][16] = Point(    w/4,   3*w/8 );
  rook_points[0][17] = Point( 13*w/32,  3*w/8 );
  rook_points[0][18] = Point(  5*w/16, 13*w/16 );
  rook_points[0][19] = Point(    w/4,  13*w/16 );

  const Point* ppt[1] = { rook_points[0] };
  int npt[] = { 20 };

  fillPoly( img,
        ppt,
        npt,
        1,
        Scalar( 255, 255, 255 ),
        lineType );
}

void MyLine( Mat img, Point start, Point end )
{
  int thickness = 2;
  int lineType = LINE_8;

  line( img,
    start,
    end,
    Scalar( 0, 0, 0 ),
    thickness,
    lineType );
}
This code is in your OpenCV sample folder. Otherwise you can grab it from here
import org.opencv.core.*;
import org.opencv.core.Point;
import org.opencv.highgui.HighGui;
import org.opencv.imgproc.Imgproc;

import java.util.*;
import java.util.List;

class GeometricDrawingRun{

    private static final int W = 400;

    public void run(){
        /// Windows names
        String atom_window = "Drawing 1: Atom";
        String rook_window = "Drawing 2: Rook";

        /// Create black empty images
        Mat atom_image = Mat.zeros( W, W, CvType.CV_8UC3 );
        Mat rook_image = Mat.zeros( W, W, CvType.CV_8UC3 );

        /// 1. Draw a simple atom:
        /// -----------------------
        MyEllipse( atom_image, 90.0 );
        MyEllipse( atom_image, 0.0 );
        MyEllipse( atom_image, 45.0 );
        MyEllipse( atom_image, -45.0 );

        /// 1.b. Creating circles
        MyFilledCircle( atom_image, new Point( W/2, W/2) );

        /// 2. Draw a rook
        /// ------------------
        /// 2.a. Create a convex polygon
        MyPolygon( rook_image );

        /// 2.b. Creating rectangles
        Imgproc.rectangle( rook_image,
                new Point( 0, 7*W/8 ),
                new Point( W, W),
                new Scalar( 0, 255, 255 ),
                -1,
                8,
                0 );

        /// 2.c. Create a few lines
        MyLine( rook_image, new Point( 0, 15*W/16 ), new Point( W, 15*W/16 ) );
        MyLine( rook_image, new Point( W/4, 7*W/8 ), new Point( W/4, W ) );
        MyLine( rook_image, new Point( W/2, 7*W/8 ), new Point( W/2, W ) );
        MyLine( rook_image, new Point( 3*W/4, 7*W/8 ), new Point( 3*W/4, W ) );

        /// 3. Display your stuff!
        HighGui.imshow( atom_window, atom_image );
        HighGui.moveWindow( atom_window, 0, 200 );
        HighGui.imshow( rook_window, rook_image );
        HighGui.moveWindow( rook_window, W, 200 );

        HighGui.waitKey( 0 );
        System.exit(0);
    }

    /// Function Declaration

    private void MyEllipse( Mat img, double angle ) {
        int thickness = 2;
        int lineType = 8;
        int shift = 0;

        Imgproc.ellipse( img,
                new Point( W/2, W/2 ),
                new Size( W/4, W/16 ),
                angle,
                0.0,
                360.0,
                new Scalar( 255, 0, 0 ),
                thickness,
                lineType,
                shift );
    }
    private void MyFilledCircle( Mat img, Point center ) {
        int thickness = -1;
        int lineType = 8;
        int shift = 0;

        Imgproc.circle( img,
                center,
                W/32,
                new Scalar( 0, 0, 255 ),
                thickness,
                lineType,
                shift );
    }
    private void MyPolygon( Mat img ) {
        int lineType = 8;
        int shift = 0;

        Point[] rook_points = new Point[20];
        rook_points[0]  = new Point(     W/4, 7*W/8   );
        rook_points[1]  = new Point(   3*W/4, 7*W/8   );
        rook_points[2]  = new Point(   3*W/4, 13*W/16 );
        rook_points[3]  = new Point( 11*W/16, 13*W/16 );
        rook_points[4]  = new Point( 19*W/32, 3*W/8   );
        rook_points[5]  = new Point(   3*W/4, 3*W/8   );
        rook_points[6]  = new Point(   3*W/4, W/8     );
        rook_points[7]  = new Point( 26*W/40, W/8     );
        rook_points[8]  = new Point( 26*W/40, W/4     );
        rook_points[9]  = new Point( 22*W/40, W/4     );
        rook_points[10] = new Point( 22*W/40, W/8     );
        rook_points[11] = new Point( 18*W/40, W/8     );
        rook_points[12] = new Point( 18*W/40, W/4     );
        rook_points[13] = new Point( 14*W/40, W/4     );
        rook_points[14] = new Point( 14*W/40, W/8     );
        rook_points[15] = new Point(     W/4, W/8     );
        rook_points[16] = new Point(     W/4, 3*W/8   );
        rook_points[17] = new Point( 13*W/32, 3*W/8   );
        rook_points[18] = new Point(  5*W/16, 13*W/16 );
        rook_points[19] = new Point(     W/4, 13*W/16 );

        MatOfPoint matPt = new MatOfPoint();
        matPt.fromArray(rook_points);

        List<MatOfPoint> ppt = new ArrayList<MatOfPoint>();
        ppt.add(matPt);

        Imgproc.fillPoly(img,
                ppt,
                new Scalar( 255, 255, 255 ),
                lineType,
                shift,
                new Point(0,0) );
    }
    private void MyLine( Mat img, Point start, Point end ) {
        int thickness = 2;
        int lineType = 8;
        int shift = 0;

        Imgproc.line( img,
                start,
                end,
                new Scalar( 0, 0, 0 ),
                thickness,
                lineType,
                shift );
    }
}

public class BasicGeometricDrawing {
    public static void main(String[] args) {
        // Load the native library.
        System.loadLibrary(Core.NATIVE_LIBRARY_NAME);
        new GeometricDrawingRun().run();
    }
}
This code is in your OpenCV sample folder. Otherwise you can grab it from here
import cv2 as cv
import numpy as np

W = 400
def my_ellipse(img, angle):
    thickness = 2
    line_type = 8

    cv.ellipse(img,
                (W // 2, W // 2),
                (W // 4, W // 16),
                angle,
                0,
                360,
                (255, 0, 0),
                thickness,
                line_type)
def my_filled_circle(img, center):
    thickness = -1
    line_type = 8

    cv.circle(img,
               center,
               W // 32,
               (0, 0, 255),
               thickness,
               line_type)
def my_polygon(img):
    line_type = 8

    # Create some points
    ppt = np.array([[W / 4, 7 * W / 8], [3 * W / 4, 7 * W / 8],
                    [3 * W / 4, 13 * W / 16], [11 * W / 16, 13 * W / 16],
                    [19 * W / 32, 3 * W / 8], [3 * W / 4, 3 * W / 8],
                    [3 * W / 4, W / 8], [26 * W / 40, W / 8],
                    [26 * W / 40, W / 4], [22 * W / 40, W / 4],
                    [22 * W / 40, W / 8], [18 * W / 40, W / 8],
                    [18 * W / 40, W / 4], [14 * W / 40, W / 4],
                    [14 * W / 40, W / 8], [W / 4, W / 8],
                    [W / 4, 3 * W / 8], [13 * W / 32, 3 * W / 8],
                    [5 * W / 16, 13 * W / 16], [W / 4, 13 * W / 16]], np.int32)
    ppt = ppt.reshape((-1, 1, 2))
    cv.fillPoly(img, [ppt], (255, 255, 255), line_type)
    # Only drawind the lines would be:
    # cv.polylines(img, [ppt], True, (255, 0, 255), line_type)
def my_line(img, start, end):
    thickness = 2
    line_type = 8

    cv.line(img,
             start,
             end,
             (0, 0, 0),
             thickness,
             line_type)
# Windows names
atom_window = "Drawing 1: Atom"
rook_window = "Drawing 2: Rook"

# Create black empty images
size = W, W, 3
atom_image = np.zeros(size, dtype=np.uint8)
rook_image = np.zeros(size, dtype=np.uint8)
# 1. Draw a simple atom:
# -----------------------

# 1.a. Creating ellipses
my_ellipse(atom_image, 90)
my_ellipse(atom_image, 0)
my_ellipse(atom_image, 45)
my_ellipse(atom_image, -45)

# 1.b. Creating circles
my_filled_circle(atom_image, (W // 2, W // 2))

# 2. Draw a rook
# ------------------
# 2.a. Create a convex polygon
my_polygon(rook_image)
# 2.b. Creating rectangles
cv.rectangle(rook_image,
              (0, 7 * W // 8),
              (W, W),
              (0, 255, 255),
              -1,
              8)

#  2.c. Create a few lines
my_line(rook_image, (0, 15 * W // 16), (W, 15 * W // 16))
my_line(rook_image, (W // 4, 7 * W // 8), (W // 4, W))
my_line(rook_image, (W // 2, 7 * W // 8), (W // 2, W))
my_line(rook_image, (3 * W // 4, 7 * W // 8), (3 * W // 4, W))
cv.imshow(atom_window, atom_image)
cv.moveWindow(atom_window, 0, 200)
cv.imshow(rook_window, rook_image)
cv.moveWindow(rook_window, W, 200)

cv.waitKey(0)
cv.destroyAllWindows()
Explanation#
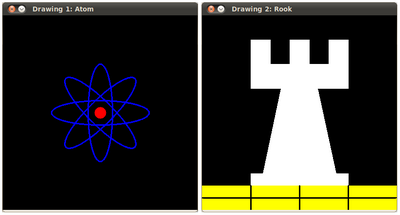
Since we plan to draw two examples (an atom and a rook), we have to create two images and two windows to display them.
# Windows names
atom_window = "Drawing 1: Atom"
rook_window = "Drawing 2: Rook"

# Create black empty images
size = W, W, 3
atom_image = np.zeros(size, dtype=np.uint8)
rook_image = np.zeros(size, dtype=np.uint8)
We created functions to draw different geometric shapes. For instance, to draw the atom we used MyEllipse and MyFilledCircle:
/// 1.a. Creating ellipses
MyEllipse( atom_image, 90 );
MyEllipse( atom_image, 0 );
MyEllipse( atom_image, 45 );
MyEllipse( atom_image, -45 );

/// 1.b. Creating circles
MyFilledCircle( atom_image, Point( w/2, w/2) );
/// 1. Draw a simple atom:
/// -----------------------
MyEllipse( atom_image, 90.0 );
MyEllipse( atom_image, 0.0 );
MyEllipse( atom_image, 45.0 );
MyEllipse( atom_image, -45.0 );

/// 1.b. Creating circles
MyFilledCircle( atom_image, new Point( W/2, W/2) );
# 1. Draw a simple atom:
# -----------------------

# 1.a. Creating ellipses
my_ellipse(atom_image, 90)
my_ellipse(atom_image, 0)
my_ellipse(atom_image, 45)
my_ellipse(atom_image, -45)

# 1.b. Creating circles
my_filled_circle(atom_image, (W // 2, W // 2))
And to draw the rook we employed MyLine, rectangle and a MyPolygon:
/// 2.a. Create a convex polygon
MyPolygon( rook_image );

/// 2.b. Creating rectangles
rectangle( rook_image,
       Point( 0, 7*w/8 ),
       Point( w, w),
       Scalar( 0, 255, 255 ),
       FILLED,
       LINE_8 );

/// 2.c. Create a few lines
MyLine( rook_image, Point( 0, 15*w/16 ), Point( w, 15*w/16 ) );
MyLine( rook_image, Point( w/4, 7*w/8 ), Point( w/4, w ) );
MyLine( rook_image, Point( w/2, 7*w/8 ), Point( w/2, w ) );
MyLine( rook_image, Point( 3*w/4, 7*w/8 ), Point( 3*w/4, w ) );
/// 2. Draw a rook
/// ------------------
/// 2.a. Create a convex polygon
MyPolygon( rook_image );

/// 2.b. Creating rectangles
Imgproc.rectangle( rook_image,
        new Point( 0, 7*W/8 ),
        new Point( W, W),
        new Scalar( 0, 255, 255 ),
        -1,
        8,
        0 );

/// 2.c. Create a few lines
MyLine( rook_image, new Point( 0, 15*W/16 ), new Point( W, 15*W/16 ) );
MyLine( rook_image, new Point( W/4, 7*W/8 ), new Point( W/4, W ) );
MyLine( rook_image, new Point( W/2, 7*W/8 ), new Point( W/2, W ) );
MyLine( rook_image, new Point( 3*W/4, 7*W/8 ), new Point( 3*W/4, W ) );
# 2. Draw a rook
# ------------------
# 2.a. Create a convex polygon
my_polygon(rook_image)
# 2.b. Creating rectangles
cv.rectangle(rook_image,
              (0, 7 * W // 8),
              (W, W),
              (0, 255, 255),
              -1,
              8)

#  2.c. Create a few lines
my_line(rook_image, (0, 15 * W // 16), (W, 15 * W // 16))
my_line(rook_image, (W // 4, 7 * W // 8), (W // 4, W))
my_line(rook_image, (W // 2, 7 * W // 8), (W // 2, W))
my_line(rook_image, (3 * W // 4, 7 * W // 8), (3 * W // 4, W))
Let’s check what is inside each of these functions:
@end_toggle
MyLine
@add_toggle_cppdef my_line(img, start, end):
thickness = 2
line_type = 8
cv.line(img,
start,
end,
(0, 0, 0),
thickness,
line_type)
As we can see, MyLine just call the function line() , which does the following:
Draw a line from Point start to Point end
The line is displayed in the image img
The line color is defined by ( 0, 0, 0 ) which is the RGB value correspondent to Black
The line thickness is set to thickness (in this case 2)
The line is a 8-connected one (lineType = 8)
MyEllipse
def my_ellipse(img, angle):
    thickness = 2
    line_type = 8

    cv.ellipse(img,
                (W // 2, W // 2),
                (W // 4, W // 16),
                angle,
                0,
                360,
                (255, 0, 0),
                thickness,
                line_type)
From the code above, we can observe that the function ellipse() draws an ellipse such that:
The ellipse is displayed in the image img
The ellipse center is located in the point (w/2, w/2) and is enclosed in a box of size (w/4, w/16)
The ellipse is rotated angle degrees
The ellipse extends an arc between 0 and 360 degrees
The color of the figure will be ( 255, 0, 0 ) which means blue in BGR value.
The ellipse’s thickness is 2.
MyFilledCircle
def my_filled_circle(img, center):
    thickness = -1
    line_type = 8

    cv.circle(img,
               center,
               W // 32,
               (0, 0, 255),
               thickness,
               line_type)
Similar to the ellipse function, we can observe that circle receives as arguments:
The image where the circle will be displayed (img)
The center of the circle denoted as the point center
The radius of the circle: w/32
The color of the circle: ( 0, 0, 255 ) which means Red in BGR
Since thickness = -1, the circle will be drawn filled.
MyPolygon
void MyPolygon( Mat img )
{
  int lineType = LINE_8;

  Point rook_points[1][20];
  rook_points[0][0]  = Point(    w/4,   7*w/8 );
  rook_points[0][1]  = Point(  3*w/4,   7*w/8 );
  rook_points[0][2]  = Point(  3*w/4,  13*w/16 );
  rook_points[0][3]  = Point( 11*w/16, 13*w/16 );
  rook_points[0][4]  = Point( 19*w/32,  3*w/8 );
  rook_points[0][5]  = Point(  3*w/4,   3*w/8 );
  rook_points[0][6]  = Point(  3*w/4,     w/8 );
  rook_points[0][7]  = Point( 26*w/40,    w/8 );
  rook_points[0][8]  = Point( 26*w/40,    w/4 );
  rook_points[0][9]  = Point( 22*w/40,    w/4 );
  rook_points[0][10] = Point( 22*w/40,    w/8 );
  rook_points[0][11] = Point( 18*w/40,    w/8 );
  rook_points[0][12] = Point( 18*w/40,    w/4 );
  rook_points[0][13] = Point( 14*w/40,    w/4 );
  rook_points[0][14] = Point( 14*w/40,    w/8 );
  rook_points[0][15] = Point(    w/4,     w/8 );
  rook_points[0][16] = Point(    w/4,   3*w/8 );
  rook_points[0][17] = Point( 13*w/32,  3*w/8 );
  rook_points[0][18] = Point(  5*w/16, 13*w/16 );
  rook_points[0][19] = Point(    w/4,  13*w/16 );

  const Point* ppt[1] = { rook_points[0] };
  int npt[] = { 20 };

  fillPoly( img,
        ppt,
        npt,
        1,
        Scalar( 255, 255, 255 ),
        lineType );
}
private void MyPolygon( Mat img ) {
    int lineType = 8;
    int shift = 0;

    Point[] rook_points = new Point[20];
    rook_points[0]  = new Point(     W/4, 7*W/8   );
    rook_points[1]  = new Point(   3*W/4, 7*W/8   );
    rook_points[2]  = new Point(   3*W/4, 13*W/16 );
    rook_points[3]  = new Point( 11*W/16, 13*W/16 );
    rook_points[4]  = new Point( 19*W/32, 3*W/8   );
    rook_points[5]  = new Point(   3*W/4, 3*W/8   );
    rook_points[6]  = new Point(   3*W/4, W/8     );
    rook_points[7]  = new Point( 26*W/40, W/8     );
    rook_points[8]  = new Point( 26*W/40, W/4     );
    rook_points[9]  = new Point( 22*W/40, W/4     );
    rook_points[10] = new Point( 22*W/40, W/8     );
    rook_points[11] = new Point( 18*W/40, W/8     );
    rook_points[12] = new Point( 18*W/40, W/4     );
    rook_points[13] = new Point( 14*W/40, W/4     );
    rook_points[14] = new Point( 14*W/40, W/8     );
    rook_points[15] = new Point(     W/4, W/8     );
    rook_points[16] = new Point(     W/4, 3*W/8   );
    rook_points[17] = new Point( 13*W/32, 3*W/8   );
    rook_points[18] = new Point(  5*W/16, 13*W/16 );
    rook_points[19] = new Point(     W/4, 13*W/16 );

    MatOfPoint matPt = new MatOfPoint();
    matPt.fromArray(rook_points);

    List<MatOfPoint> ppt = new ArrayList<MatOfPoint>();
    ppt.add(matPt);

    Imgproc.fillPoly(img,
            ppt,
            new Scalar( 255, 255, 255 ),
            lineType,
            shift,
            new Point(0,0) );
}
def my_polygon(img):
    line_type = 8

    # Create some points
    ppt = np.array([[W / 4, 7 * W / 8], [3 * W / 4, 7 * W / 8],
                    [3 * W / 4, 13 * W / 16], [11 * W / 16, 13 * W / 16],
                    [19 * W / 32, 3 * W / 8], [3 * W / 4, 3 * W / 8],
                    [3 * W / 4, W / 8], [26 * W / 40, W / 8],
                    [26 * W / 40, W / 4], [22 * W / 40, W / 4],
                    [22 * W / 40, W / 8], [18 * W / 40, W / 8],
                    [18 * W / 40, W / 4], [14 * W / 40, W / 4],
                    [14 * W / 40, W / 8], [W / 4, W / 8],
                    [W / 4, 3 * W / 8], [13 * W / 32, 3 * W / 8],
                    [5 * W / 16, 13 * W / 16], [W / 4, 13 * W / 16]], np.int32)
    ppt = ppt.reshape((-1, 1, 2))
    cv.fillPoly(img, [ppt], (255, 255, 255), line_type)
    # Only drawind the lines would be:
    # cv.polylines(img, [ppt], True, (255, 0, 255), line_type)
To draw a filled polygon we use the function fillPoly() . We note that:
The polygon will be drawn on img
The vertices of the polygon are the set of points in ppt
The color of the polygon is defined by ( 255, 255, 255 ), which is the BGR value for white
rectangle
Finally we have the cv::rectangle function (we did not create a special function for this guy). We note that:
The rectangle will be drawn on rook_image
Two opposite vertices of the rectangle are defined by ( 0, 7*w/8 ) and ( w, w )
The color of the rectangle is given by ( 0, 255, 255 ) which is the BGR value for yellow
Since the thickness value is given by FILLED (-1), the rectangle will be filled.
Result#
Compiling and running your program should give you a result like this: