
Hough Circle Transform#
Goal#
In this tutorial you will learn how to:
Use the OpenCV function HoughCircles() to detect circles in an image.
Theory#
Hough Circle Transform#
The Hough Circle Transform works in a roughly analogous way to the Hough Line Transform explained in the previous tutorial.
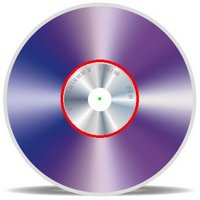
In the line detection case, a line was defined by two parameters \((r, \theta)\). In the circle case, we need three parameters to define a circle:
\[ C : ( x_{center}, y_{center}, r ) \]where \((x_{center}, y_{center})\) define the center position (green point) and \(r\) is the radius, which allows us to completely define a circle, as it can be seen below:
For sake of efficiency, OpenCV implements a detection method slightly trickier than the standard Hough Transform: The Hough gradient method, which is made up of two main stages. The first stage involves edge detection and finding the possible circle centers and the second stage finds the best radius for each candidate center. For more details, please check the book Learning OpenCV or your favorite Computer Vision bibliography
What does this program do?#
Loads an image and blur it to reduce the noise
Applies the Hough Circle Transform to the blurred image .
Display the detected circle in a window.
Code#
The sample code that we will explain can be downloaded from here. A slightly fancier version (which shows trackbars for changing the threshold values) can be found here.
#include "opencv2/imgcodecs.hpp"
#include "opencv2/highgui.hpp"
#include "opencv2/imgproc.hpp"

using namespace cv;
using namespace std;

int main(int argc, char** argv)
{
    const char* filename = argc >=2 ? argv[1] : "smarties.png";

    // Loads an image
    Mat src = imread( samples::findFile( filename ), IMREAD_COLOR );

    // Check if image is loaded fine
    if(src.empty()){
        printf(" Error opening image\n");
        printf(" Program Arguments: [image_name -- default %s] \n", filename);
        return EXIT_FAILURE;
    }

    Mat gray;
    cvtColor(src, gray, COLOR_BGR2GRAY);

    medianBlur(gray, gray, 5);

    vector<Vec3f> circles;
    HoughCircles(gray, circles, HOUGH_GRADIENT, 1,
                 gray.rows/16,  // change this value to detect circles with different distances to each other
                 100, 30, 1, 30 // change the last two parameters
            // (min_radius & max_radius) to detect larger circles
    );

    for( size_t i = 0; i < circles.size(); i++ )
    {
        Vec3i c = circles[i];
        Point center = Point(c[0], c[1]);
        // circle center
        circle( src, center, 1, Scalar(0,100,100), 3, LINE_AA);
        // circle outline
        int radius = c[2];
        circle( src, center, radius, Scalar(255,0,255), 3, LINE_AA);
    }

    imshow("detected circles", src);
    waitKey();

    return EXIT_SUCCESS;
}
The sample code that we will explain can be downloaded from here.
package sample;

import org.opencv.core.*;
import org.opencv.core.Point;
import org.opencv.highgui.HighGui;
import org.opencv.imgcodecs.Imgcodecs;
import org.opencv.imgproc.Imgproc;

class HoughCirclesRun {

    public void run(String[] args) {

        String default_file = "../../../../data/smarties.png";
        String filename = ((args.length > 0) ? args[0] : default_file);

        // Load an image
        Mat src = Imgcodecs.imread(filename, Imgcodecs.IMREAD_COLOR);

        // Check if image is loaded fine
        if( src.empty() ) {
            System.out.println("Error opening image!");
            System.out.println("Program Arguments: [image_name -- default "
                    + default_file +"] \n");
            System.exit(-1);
        }

        Mat gray = new Mat();
        Imgproc.cvtColor(src, gray, Imgproc.COLOR_BGR2GRAY);

        Imgproc.medianBlur(gray, gray, 5);

        Mat circles = new Mat();
        Imgproc.HoughCircles(gray, circles, Imgproc.HOUGH_GRADIENT, 1.0,
                (double)gray.rows()/16, // change this value to detect circles with different distances to each other
                100.0, 30.0, 1, 30); // change the last two parameters
                // (min_radius & max_radius) to detect larger circles

        for (int x = 0; x < circles.cols(); x++) {
            double[] c = circles.get(0, x);
            Point center = new Point(Math.round(c[0]), Math.round(c[1]));
            // circle center
            Imgproc.circle(src, center, 1, new Scalar(0,100,100), 3, 8, 0 );
            // circle outline
            int radius = (int) Math.round(c[2]);
            Imgproc.circle(src, center, radius, new Scalar(255,0,255), 3, 8, 0 );
        }

        HighGui.imshow("detected circles", src);
        HighGui.waitKey();

        System.exit(0);
    }
}

public class HoughCircles {
    public static void main(String[] args) {
        // Load the native library.
        System.loadLibrary(Core.NATIVE_LIBRARY_NAME);
        new HoughCirclesRun().run(args);
    }
}
The sample code that we will explain can be downloaded from here.
import sys
import cv2 as cv
import numpy as np

def main(argv):
    default_file = 'smarties.png'
    filename = argv[0] if len(argv) > 0 else default_file

    # Loads an image
    src = cv.imread(cv.samples.findFile(filename), cv.IMREAD_COLOR)

    # Check if image is loaded fine
    if src is None:
        print ('Error opening image!')
        print ('Usage: hough_circle.py [image_name -- default ' + default_file + '] \n')
        return -1

    # Convert it to gray
    gray = cv.cvtColor(src, cv.COLOR_BGR2GRAY)

    # Reduce the noise to avoid false circle detection
    gray = cv.medianBlur(gray, 5)

    rows = gray.shape[0]
    circles = cv.HoughCircles(gray, cv.HOUGH_GRADIENT, 1, rows / 8,
                               param1=100, param2=30,
                               minRadius=1, maxRadius=30)

    if circles is not None:
        circles = np.uint16(np.around(circles))
        for i in circles[0, :]:
            center = (i[0], i[1])
            # circle center
            cv.circle(src, center, 1, (0, 100, 100), 3)
            # circle outline
            radius = i[2]
            cv.circle(src, center, radius, (255, 0, 255), 3)

    cv.imshow("detected circles", src)
    cv.waitKey(0)

    return 0

if __name__ == "__main__":
    main(sys.argv[1:])
Explanation#
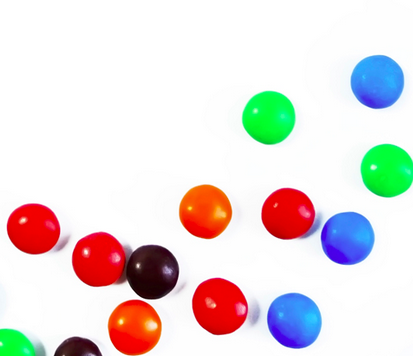
The image we used can be found here
Load an image:#
const char* filename = argc >=2 ? argv[1] : "smarties.png";

// Loads an image
Mat src = imread( samples::findFile( filename ), IMREAD_COLOR );

// Check if image is loaded fine
if(src.empty()){
    printf(" Error opening image\n");
    printf(" Program Arguments: [image_name -- default %s] \n", filename);
    return EXIT_FAILURE;
}
String default_file = "../../../../data/smarties.png";
String filename = ((args.length > 0) ? args[0] : default_file);

// Load an image
Mat src = Imgcodecs.imread(filename, Imgcodecs.IMREAD_COLOR);

// Check if image is loaded fine
if( src.empty() ) {
    System.out.println("Error opening image!");
    System.out.println("Program Arguments: [image_name -- default "
            + default_file +"] \n");
    System.exit(-1);
}
default_file = 'smarties.png'
filename = argv[0] if len(argv) > 0 else default_file

# Loads an image
src = cv.imread(cv.samples.findFile(filename), cv.IMREAD_COLOR)

# Check if image is loaded fine
if src is None:
    print ('Error opening image!')
    print ('Usage: hough_circle.py [image_name -- default ' + default_file + '] \n')
    return -1
Convert it to grayscale:#
Apply a Median blur to reduce noise and avoid false circle detection:#
medianBlur(gray, gray, 5);
Imgproc.medianBlur(gray, gray, 5);
# Reduce the noise to avoid false circle detection
gray = cv.medianBlur(gray, 5)
Proceed to apply Hough Circle Transform:#
vector<Vec3f> circles;
HoughCircles(gray, circles, HOUGH_GRADIENT, 1,
             gray.rows/16,  // change this value to detect circles with different distances to each other
             100, 30, 1, 30 // change the last two parameters
        // (min_radius & max_radius) to detect larger circles
);
Mat circles = new Mat();
Imgproc.HoughCircles(gray, circles, Imgproc.HOUGH_GRADIENT, 1.0,
        (double)gray.rows()/16, // change this value to detect circles with different distances to each other
        100.0, 30.0, 1, 30); // change the last two parameters
        // (min_radius & max_radius) to detect larger circles
rows = gray.shape[0]
circles = cv.HoughCircles(gray, cv.HOUGH_GRADIENT, 1, rows / 8,
                           param1=100, param2=30,
                           minRadius=1, maxRadius=30)
with the arguments:
gray: Input image (grayscale).
circles: A vector that stores sets of 3 values: \(x_{c}, y_{c}, r\) for each detected circle.
HOUGH_GRADIENT: Define the detection method. Currently this is the only one available in OpenCV.
dp = 1: The inverse ratio of resolution.
min_dist = gray.rows/16: Minimum distance between detected centers.
param_1 = 200: Upper threshold for the internal Canny edge detector.
param_2 = 100*: Threshold for center detection.
min_radius = 0: Minimum radius to be detected. If unknown, put zero as default.
max_radius = 0: Maximum radius to be detected. If unknown, put zero as default.
Draw the detected circles:#
for (int x = 0; x < circles.cols(); x++) {
    double[] c = circles.get(0, x);
    Point center = new Point(Math.round(c[0]), Math.round(c[1]));
    // circle center
    Imgproc.circle(src, center, 1, new Scalar(0,100,100), 3, 8, 0 );
    // circle outline
    int radius = (int) Math.round(c[2]);
    Imgproc.circle(src, center, radius, new Scalar(255,0,255), 3, 8, 0 );
}
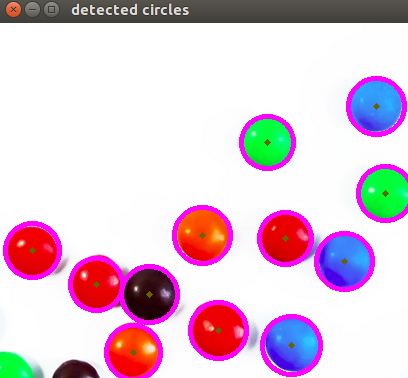
You can see that we will draw the circle(s) on red and the center(s) with a small green dot
Display the detected circle(s) and wait for the user to exit the program:#
Result#
The result of running the code above with a test image is shown below: