

Mask operations on matrices#
Mask operations on matrices are quite simple. The idea is that we recalculate each pixel’s value in an image according to a mask matrix (also known as kernel). This mask holds values that will adjust how much influence neighboring pixels (and the current pixel) have on the new pixel value. From a mathematical point of view we make a weighted average, with our specified values.
Our test case#
Let’s consider the issue of an image contrast enhancement method. Basically we want to apply for every pixel of the image the following formula:
The first notation is by using a formula, while the second is a compacted version of the first by using a mask. You use the mask by putting the center of the mask matrix (in the upper case noted by the zero-zero index) on the pixel you want to calculate and sum up the pixel values multiplied with the overlapped matrix values. It’s the same thing, however in case of large matrices the latter notation is a lot easier to look over.
Code#
You can download this source code from here
or look in the
OpenCV source code libraries sample directory at
samples/cpp/tutorial_code/core/mat_mask_operations/mat_mask_operations.cpp.
#include <opencv2/imgcodecs.hpp>
#include <opencv2/highgui.hpp>
#include <opencv2/imgproc.hpp>
#include <iostream>

using namespace std;
using namespace cv;

static void help(char* progName)
{
    cout << endl
        <<  "This program shows how to filter images with mask: the write it yourself and the"
        << "filter2d way. " << endl
        <<  "Usage:"                                                                        << endl
        << progName << " [image_path -- default lena.jpg] [G -- grayscale] "        << endl << endl;
}

void Sharpen(const Mat& myImage,Mat& Result);

int main( int argc, char* argv[])
{
    help(argv[0]);
    const char* filename = argc >=2 ? argv[1] : "lena.jpg";

    Mat src, dst0, dst1;

    if (argc >= 3 && !strcmp("G", argv[2]))
        src = imread( samples::findFile( filename ), IMREAD_GRAYSCALE);
    else
        src = imread( samples::findFile( filename ), IMREAD_COLOR);

    if (src.empty())
    {
        cerr << "Can't open image ["  << filename << "]" << endl;
        return EXIT_FAILURE;
    }

    namedWindow("Input", WINDOW_AUTOSIZE);
    namedWindow("Output", WINDOW_AUTOSIZE);

    imshow( "Input", src );
    double t = (double)getTickCount();

    Sharpen( src, dst0 );

    t = ((double)getTickCount() - t)/getTickFrequency();
    cout << "Hand written function time passed in seconds: " << t << endl;

    imshow( "Output", dst0 );
    waitKey();

    Mat kernel = Mat_<char>({3,3}, {
        0, -1,  0,
        -1,  5, -1,
        0, -1,  0
    });

    t = (double)getTickCount();

    filter2D( src, dst1, src.depth(), kernel );
    t = ((double)getTickCount() - t)/getTickFrequency();
    cout << "Built-in filter2D time passed in seconds:     " << t << endl;

    imshow( "Output", dst1 );

    waitKey();
    return EXIT_SUCCESS;
}
void Sharpen(const Mat& myImage,Mat& Result)
{
    CV_Assert(myImage.depth() == CV_8U);  // accept only uchar images

    const int nChannels = myImage.channels();
    Result.create(myImage.size(),myImage.type());

    for(int j = 1 ; j < myImage.rows-1; ++j)
    {
        const uchar* previous = myImage.ptr<uchar>(j - 1);
        const uchar* current  = myImage.ptr<uchar>(j    );
        const uchar* next     = myImage.ptr<uchar>(j + 1);

        uchar* output = Result.ptr<uchar>(j);

        for(int i= nChannels;i < nChannels*(myImage.cols-1); ++i)
        {
            output[i] = saturate_cast<uchar>(5*current[i]
                         -current[i-nChannels] - current[i+nChannels] - previous[i] - next[i]);
        }
    }

    Result.row(0).setTo(Scalar(0));
    Result.row(Result.rows-1).setTo(Scalar(0));
    Result.col(0).setTo(Scalar(0));
    Result.col(Result.cols-1).setTo(Scalar(0));
}
You can download this source code from here
or look in the
OpenCV source code libraries sample directory at
samples/java/tutorial_code/core/mat_mask_operations/MatMaskOperations.java.
import org.opencv.core.Core;
import org.opencv.core.CvType;
import org.opencv.core.Mat;
import org.opencv.core.Scalar;
import org.opencv.highgui.HighGui;
import org.opencv.imgcodecs.Imgcodecs;
import org.opencv.imgproc.Imgproc;

class MatMaskOperationsRun {

    public void run(String[] args) {

        String filename = "../data/lena.jpg";

        int img_codec = Imgcodecs.IMREAD_COLOR;
        if (args.length != 0) {
            filename = args[0];
            if (args.length >= 2 && args[1].equals("G"))
                img_codec = Imgcodecs.IMREAD_GRAYSCALE;
        }

        Mat src = Imgcodecs.imread(filename, img_codec);

        if (src.empty()) {
            System.out.println("Can't open image [" + filename + "]");
            System.out.println("Program Arguments: [image_path -- default ../data/lena.jpg] [G -- grayscale]");
            System.exit(-1);
        }

        HighGui.namedWindow("Input", HighGui.WINDOW_AUTOSIZE);
        HighGui.namedWindow("Output", HighGui.WINDOW_AUTOSIZE);

        HighGui.imshow( "Input", src );
        double t = System.currentTimeMillis();

        Mat dst0 = sharpen(src, new Mat());

        t = ((double) System.currentTimeMillis() - t) / 1000;
        System.out.println("Hand written function time passed in seconds: " + t);

        HighGui.imshow( "Output", dst0 );
        HighGui.moveWindow("Output", 400, 400);
        HighGui.waitKey();

        Mat kern = new Mat(3, 3, CvType.CV_8S);
        int row = 0, col = 0;
        kern.put(row, col, 0, -1, 0, -1, 5, -1, 0, -1, 0);

        t = System.currentTimeMillis();

        Mat dst1 = new Mat();
        Imgproc.filter2D(src, dst1, src.depth(), kern);
        t = ((double) System.currentTimeMillis() - t) / 1000;
        System.out.println("Built-in filter2D time passed in seconds:     " + t);

        HighGui.imshow( "Output", dst1 );

        HighGui.waitKey();
        System.exit(0);
    }

    public static double saturate(double x) {
        return x > 255.0 ? 255.0 : (x < 0.0 ? 0.0 : x);
    }

    public Mat sharpen(Mat myImage, Mat Result) {
        myImage.convertTo(myImage, CvType.CV_8U);

        int nChannels = myImage.channels();
        Result.create(myImage.size(), myImage.type());

        for (int j = 1; j < myImage.rows() - 1; ++j) {
            for (int i = 1; i < myImage.cols() - 1; ++i) {
                double sum[] = new double[nChannels];

                for (int k = 0; k < nChannels; ++k) {

                    double top = -myImage.get(j - 1, i)[k];
                    double bottom = -myImage.get(j + 1, i)[k];
                    double center = (5 * myImage.get(j, i)[k]);
                    double left = -myImage.get(j, i - 1)[k];
                    double right = -myImage.get(j, i + 1)[k];

                    sum[k] = saturate(top + bottom + center + left + right);
                }

                Result.put(j, i, sum);
            }
        }

        Result.row(0).setTo(new Scalar(0));
        Result.row(Result.rows() - 1).setTo(new Scalar(0));
        Result.col(0).setTo(new Scalar(0));
        Result.col(Result.cols() - 1).setTo(new Scalar(0));

        return Result;
    }
}

public class MatMaskOperations {
    public static void main(String[] args) {
        // Load the native library.
        System.loadLibrary(Core.NATIVE_LIBRARY_NAME);
        new MatMaskOperationsRun().run(args);
    }
}
You can download this source code from here
or look in the
OpenCV source code libraries sample directory at
samples/python/tutorial_code/core/mat_mask_operations/mat_mask_operations.py.
from __future__ import print_function
import sys
import time

import numpy as np
import cv2 as cv

def is_grayscale(my_image):
    return len(my_image.shape) < 3

def saturated(sum_value):
    if sum_value > 255:
        sum_value = 255
    if sum_value < 0:
        sum_value = 0

    return sum_value

def sharpen(my_image):
    if is_grayscale(my_image):
        height, width = my_image.shape
    else:
        my_image = cv.cvtColor(my_image, cv.CV_8U)
        height, width, n_channels = my_image.shape

    result = np.zeros(my_image.shape, my_image.dtype)
    for j in range(1, height - 1):
        for i in range(1, width - 1):
            if is_grayscale(my_image):
                sum_value = 5 * my_image[j, i] - my_image[j + 1, i] - my_image[j - 1, i] \
                            - my_image[j, i + 1] - my_image[j, i - 1]
                result[j, i] = saturated(sum_value)
            else:
                for k in range(0, n_channels):
                    sum_value = 5 * my_image[j, i, k] - my_image[j + 1, i, k]  \
                                - my_image[j - 1, i, k] - my_image[j, i + 1, k]\
                                - my_image[j, i - 1, k]
                    result[j, i, k] = saturated(sum_value)
    return result

def main(argv):
    filename = 'lena.jpg'

    img_codec = cv.IMREAD_COLOR
    if argv:
        filename = sys.argv[1]
        if len(argv) >= 2 and sys.argv[2] == "G":
            img_codec = cv.IMREAD_GRAYSCALE

    src = cv.imread(cv.samples.findFile(filename), img_codec)

    if src is None:
        print("Can't open image [" + filename + "]")
        print("Usage:")
        print("mat_mask_operations.py [image_path -- default lena.jpg] [G -- grayscale]")
        return -1

    cv.namedWindow("Input", cv.WINDOW_AUTOSIZE)
    cv.namedWindow("Output", cv.WINDOW_AUTOSIZE)

    cv.imshow("Input", src)
    t = round(time.time())

    dst0 = sharpen(src)

    t = (time.time() - t)
    print("Hand written function time passed in seconds: %s" % t)

    cv.imshow("Output", dst0)
    cv.waitKey()

    t = time.time()
    kernel = np.array([[0, -1, 0],
                       [-1, 5, -1],
                       [0, -1, 0]], np.float32)  # kernel should be floating point type
    dst1 = cv.filter2D(src, -1, kernel)
    # ddepth = -1, means destination image has depth same as input image

    t = (time.time() - t)
    print("Built-in filter2D time passed in seconds:     %s" % t)

    cv.imshow("Output", dst1)

    cv.waitKey(0)
    cv.destroyAllWindows()
    return 0

if __name__ == "__main__":
    main(sys.argv[1:])
The Basic Method#
Now let us see how we can make this happen by using the basic pixel access method or by using the filter2D() function.
Here’s a function that will do this:
void Sharpen(const Mat& myImage,Mat& Result)
{
    CV_Assert(myImage.depth() == CV_8U);  // accept only uchar images

    const int nChannels = myImage.channels();
    Result.create(myImage.size(),myImage.type());

    for(int j = 1 ; j < myImage.rows-1; ++j)
    {
        const uchar* previous = myImage.ptr<uchar>(j - 1);
        const uchar* current  = myImage.ptr<uchar>(j    );
        const uchar* next     = myImage.ptr<uchar>(j + 1);

        uchar* output = Result.ptr<uchar>(j);

        for(int i= nChannels;i < nChannels*(myImage.cols-1); ++i)
        {
            output[i] = saturate_cast<uchar>(5*current[i]
                         -current[i-nChannels] - current[i+nChannels] - previous[i] - next[i]);
        }
    }

    Result.row(0).setTo(Scalar(0));
    Result.row(Result.rows-1).setTo(Scalar(0));
    Result.col(0).setTo(Scalar(0));
    Result.col(Result.cols-1).setTo(Scalar(0));
}
At first we make sure that the input images data is in unsigned char format. For this we use the CV_Assert function (macro) that throws an error when the expression inside it is false.
CV_Assert(myImage.depth() == CV_8U); // accept only uchar images
public static double saturate(double x) {
    return x > 255.0 ? 255.0 : (x < 0.0 ? 0.0 : x);
}

public Mat sharpen(Mat myImage, Mat Result) {
    myImage.convertTo(myImage, CvType.CV_8U);

    int nChannels = myImage.channels();
    Result.create(myImage.size(), myImage.type());

    for (int j = 1; j < myImage.rows() - 1; ++j) {
        for (int i = 1; i < myImage.cols() - 1; ++i) {
            double sum[] = new double[nChannels];

            for (int k = 0; k < nChannels; ++k) {

                double top = -myImage.get(j - 1, i)[k];
                double bottom = -myImage.get(j + 1, i)[k];
                double center = (5 * myImage.get(j, i)[k]);
                double left = -myImage.get(j, i - 1)[k];
                double right = -myImage.get(j, i + 1)[k];

                sum[k] = saturate(top + bottom + center + left + right);
            }

            Result.put(j, i, sum);
        }
    }

    Result.row(0).setTo(new Scalar(0));
    Result.row(Result.rows() - 1).setTo(new Scalar(0));
    Result.col(0).setTo(new Scalar(0));
    Result.col(Result.cols() - 1).setTo(new Scalar(0));

    return Result;
}
At first we make sure that the input images data in unsigned 8 bit format.
myImage.convertTo(myImage, CvType.CV_8U);
def is_grayscale(my_image):
    return len(my_image.shape) < 3

def saturated(sum_value):
    if sum_value > 255:
        sum_value = 255
    if sum_value < 0:
        sum_value = 0

    return sum_value

def sharpen(my_image):
    if is_grayscale(my_image):
        height, width = my_image.shape
    else:
        my_image = cv.cvtColor(my_image, cv.CV_8U)
        height, width, n_channels = my_image.shape

    result = np.zeros(my_image.shape, my_image.dtype)
    for j in range(1, height - 1):
        for i in range(1, width - 1):
            if is_grayscale(my_image):
                sum_value = 5 * my_image[j, i] - my_image[j + 1, i] - my_image[j - 1, i] \
                            - my_image[j, i + 1] - my_image[j, i - 1]
                result[j, i] = saturated(sum_value)
            else:
                for k in range(0, n_channels):
                    sum_value = 5 * my_image[j, i, k] - my_image[j + 1, i, k]  \
                                - my_image[j - 1, i, k] - my_image[j, i + 1, k]\
                                - my_image[j, i - 1, k]
                    result[j, i, k] = saturated(sum_value)
    return result
At first we make sure that the input images data in unsigned 8 bit format.
my_image = cv.cvtColor(my_image, cv.CV_8U)
We create an output image with the same size and the same type as our input. As you can see in the storing section, depending on the number of channels we may have one or more subcolumns.
We will iterate through them via pointers so the total number of elements depends on this number.
height, width, n_channels = my_image.shape
result = np.zeros(my_image.shape, my_image.dtype)
We’ll use the plain C [] operator to access pixels. Because we need to access multiple rows at the same time we’ll acquire the pointers for each of them (a previous, a current and a next line). We need another pointer to where we’re going to save the calculation. Then simply access the right items with the [] operator. For moving the output pointer ahead we simply increase this (with one byte) after each operation:
for(int j = 1 ; j < myImage.rows-1; ++j)
{
    const uchar* previous = myImage.ptr<uchar>(j - 1);
    const uchar* current  = myImage.ptr<uchar>(j    );
    const uchar* next     = myImage.ptr<uchar>(j + 1);

    uchar* output = Result.ptr<uchar>(j);

    for(int i= nChannels;i < nChannels*(myImage.cols-1); ++i)
    {
        output[i] = saturate_cast<uchar>(5*current[i]
                     -current[i-nChannels] - current[i+nChannels] - previous[i] - next[i]);
    }
}
On the borders of the image the upper notation results inexistent pixel locations (like minus one - minus one). In these points our formula is undefined. A simple solution is to not apply the kernel in these points and, for example, set the pixels on the borders to zeros:
We need to access multiple rows and columns which can be done by adding or subtracting 1 to the current center (i,j). Then we apply the sum and put the new value in the Result matrix.
for (int j = 1; j < myImage.rows() - 1; ++j) {
    for (int i = 1; i < myImage.cols() - 1; ++i) {
        double sum[] = new double[nChannels];

        for (int k = 0; k < nChannels; ++k) {

            double top = -myImage.get(j - 1, i)[k];
            double bottom = -myImage.get(j + 1, i)[k];
            double center = (5 * myImage.get(j, i)[k]);
            double left = -myImage.get(j, i - 1)[k];
            double right = -myImage.get(j, i + 1)[k];

            sum[k] = saturate(top + bottom + center + left + right);
        }

        Result.put(j, i, sum);
    }
}
On the borders of the image the upper notation results in inexistent pixel locations (like (-1,-1)). In these points our formula is undefined. A simple solution is to not apply the kernel in these points and, for example, set the pixels on the borders to zeros:
We need to access multiple rows and columns which can be done by adding or subtracting 1 to the current center (i,j). Then we apply the sum and put the new value in the Result matrix.
for j in range(1, height - 1):
    for i in range(1, width - 1):
        if is_grayscale(my_image):
            sum_value = 5 * my_image[j, i] - my_image[j + 1, i] - my_image[j - 1, i] \
                        - my_image[j, i + 1] - my_image[j, i - 1]
            result[j, i] = saturated(sum_value)
        else:
            for k in range(0, n_channels):
                sum_value = 5 * my_image[j, i, k] - my_image[j + 1, i, k]  \
                            - my_image[j - 1, i, k] - my_image[j, i + 1, k]\
                            - my_image[j, i - 1, k]
                result[j, i, k] = saturated(sum_value)
The filter2D function#
Applying such filters are so common in image processing that in OpenCV there is a function that will take care of applying the mask (also called a kernel in some places). For this you first need to define an object that holds the mask:
kernel = np.array([[0, -1, 0],
                   [-1, 5, -1],
                   [0, -1, 0]], np.float32)  # kernel should be floating point type
Then call the filter2D() function specifying the input, the output image and the kernel to use:
filter2D( src, dst1, src.depth(), kernel );
Imgproc.filter2D(src, dst1, src.depth(), kern);
dst1 = cv.filter2D(src, -1, kernel)
# ddepth = -1, means destination image has depth same as input image
The function even has a fifth optional argument to specify the center of the kernel, a sixth for adding an optional value to the filtered pixels before storing them in K and a seventh one for determining what to do in the regions where the operation is undefined (borders).
This function is shorter, less verbose and, because there are some optimizations, it is usually faster than the hand-coded method. For example in my test while the second one took only 13 milliseconds the first took around 31 milliseconds. Quite some difference.
For example:
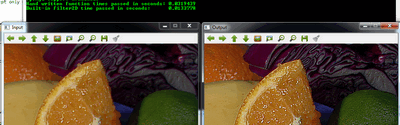
Check out an instance of running the program on our YouTube channel .