
Adding (blending) two images using OpenCV#
We will learn how to blend two images! Goal#
In this tutorial you will learn:
what is linear blending and why it is useful;
how to add two images using addWeighted()
Theory#
Note
The explanation below belongs to the book Computer Vision: Algorithms and Applications by Richard Szeliski
From our previous tutorial, we already know a bit of Pixel operators. An interesting dyadic (two-input) operator is the linear blend operator:
By varying \(\alpha\) from \(0 \rightarrow 1\), this operator can be used to perform a temporal cross-dissolve between two images or videos, as seen in slide shows and film productions (cool, eh?)
Source Code#
Download the source code from here.
#include "opencv2/imgcodecs.hpp"
#include "opencv2/highgui.hpp"
#include <iostream>

using namespace cv;

// we're NOT "using namespace std;" here, to avoid collisions between the beta variable and std::beta in c++17
using std::cin;
using std::cout;
using std::endl;

int main( void )
{
   double alpha = 0.5; double beta; double input;

   Mat src1, src2, dst;

   /// Ask the user enter alpha
   cout << " Simple Linear Blender " << endl;
   cout << "-----------------------" << endl;
   cout << "* Enter alpha [0.0-1.0]: ";
   cin >> input;

   // We use the alpha provided by the user if it is between 0 and 1
   if( input >= 0 && input <= 1 )
     { alpha = input; }

   /// Read images ( both have to be of the same size and type )
   src1 = imread( samples::findFile("LinuxLogo.jpg") );
   src2 = imread( samples::findFile("WindowsLogo.jpg") );

   if( src1.empty() ) { cout << "Error loading src1" << endl; return EXIT_FAILURE; }
   if( src2.empty() ) { cout << "Error loading src2" << endl; return EXIT_FAILURE; }

   beta = ( 1.0 - alpha );
   addWeighted( src1, alpha, src2, beta, 0.0, dst);

   imshow( "Linear Blend", dst );
   waitKey(0);

   return 0;
}
Download the source code from here.
import org.opencv.core.*;
import org.opencv.highgui.HighGui;
import org.opencv.imgcodecs.Imgcodecs;

import java.util.Locale;
import java.util.Scanner;

class AddingImagesRun{
    public void run() {
        double alpha = 0.5; double beta; double input;

        Mat src1, src2, dst = new Mat();

        System.out.println(" Simple Linear Blender ");
        System.out.println("-----------------------");
        System.out.println("* Enter alpha [0.0-1.0]: ");
        Scanner scan = new Scanner( System.in ).useLocale(Locale.US);
        input = scan.nextDouble();

        if( input >= 0.0 && input <= 1.0 )
            alpha = input;

        src1 = Imgcodecs.imread("../../images/LinuxLogo.jpg");
        src2 = Imgcodecs.imread("../../images/WindowsLogo.jpg");

        if( src1.empty() == true ){ System.out.println("Error loading src1"); return;}
        if( src2.empty() == true ){ System.out.println("Error loading src2"); return;}

        beta = ( 1.0 - alpha );
        Core.addWeighted( src1, alpha, src2, beta, 0.0, dst);

        HighGui.imshow("Linear Blend", dst);
        HighGui.waitKey(0);

        System.exit(0);
    }
}

public class AddingImages {
    public static void main(String[] args) {
        // Load the native library.
        System.loadLibrary(Core.NATIVE_LIBRARY_NAME);
        new AddingImagesRun().run();
    }
}
Download the source code from here.
from __future__ import print_function

import cv2 as cv

alpha = 0.5

try:
    raw_input          # Python 2
except NameError:
    raw_input = input  # Python 3

print(''' Simple Linear Blender
-----------------------
* Enter alpha [0.0-1.0]: ''')
input_alpha = float(raw_input().strip())
if 0 <= alpha <= 1:
    alpha = input_alpha
src1 = cv.imread(cv.samples.findFile('LinuxLogo.jpg'))
src2 = cv.imread(cv.samples.findFile('WindowsLogo.jpg'))
if src1 is None:
    print("Error loading src1")
    exit(-1)
elif src2 is None:
    print("Error loading src2")
    exit(-1)
beta = (1.0 - alpha)
dst = cv.addWeighted(src1, alpha, src2, beta, 0.0)
cv.imshow('dst', dst)
cv.waitKey(0)
cv.destroyAllWindows()
Explanation#
Since we are going to perform:
We need two source images (\(f_{0}(x)\) and \(f_{1}(x)\)). So, we load them in the usual way:
src1 = Imgcodecs.imread("../../images/LinuxLogo.jpg");
src2 = Imgcodecs.imread("../../images/WindowsLogo.jpg");
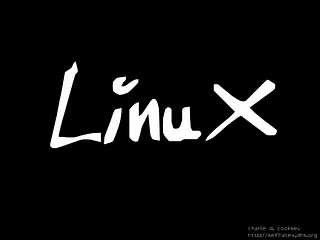
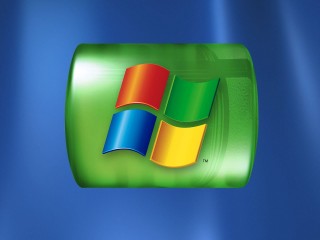
We used the following images: LinuxLogo.jpg and WindowsLogo.jpg
Warning
Since we are adding src1 and src2, they both have to be of the same size (width and height) and type.
Now we need to generate the g(x) image. For this, the function addWeighted() comes quite handy:
beta = ( 1.0 - alpha );
addWeighted( src1, alpha, src2, beta, 0.0, dst);
beta = ( 1.0 - alpha );
Core.addWeighted( src1, alpha, src2, beta, 0.0, dst);
beta = (1.0 - alpha)
dst = cv.addWeighted(src1, alpha, src2, beta, 0.0)
Numpy version of above line (but cv function is around 2x faster): \code{.py} dst = np.uint8(alpha*(img1)+beta*(img2)) \endcode
since addWeighted() produces:
In this case, gamma is the argument \(0.0\) in the code above.
Create windows, show the images and wait for the user to end the program.
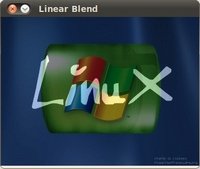
Result#