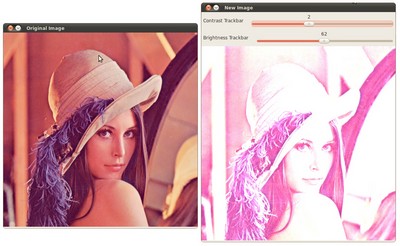

Adding a Trackbar to our applications!#
In the previous tutorials (about Adding (blending) two images using OpenCV and the Changing the contrast and brightness of an image!)
you might have noted that we needed to give some input to our programs, such as \(\alpha\) and \(beta\). We accomplished that by entering this data using the Terminal.
Well, it is time to use some fancy GUI tools. OpenCV provides some GUI utilities (highgui module) for you. An example of this is a Trackbar.

In this tutorial we will just modify our two previous programs so that they get the input information from the trackbar.
Goals#
In this tutorial you will learn how to:
Add a Trackbar in an OpenCV window by using cv::createTrackbar
Code#
Let’s modify the program made in the tutorial Adding (blending) two images using OpenCV. We will let the user enter the \(\alpha\) value by using the Trackbar.
This tutorial code’s is shown lines below. You can also download it from here
#include "opencv2/imgcodecs.hpp"
#include "opencv2/highgui.hpp"
#include <iostream>

using namespace cv;
using std::cout;

const int alpha_slider_max = 100;
int alpha_slider;
double alpha;
double beta;

Mat src1;
Mat src2;
Mat dst;

static void on_trackbar(int pos, void* userdata) {
    (void) userdata;
    alpha = (double)pos / alpha_slider_max;
    beta = (1.0 - alpha);
    addWeighted(src1, alpha, src2, beta, 0.0, dst);
    imshow("Linear Blend", dst);
}

int main(void)
{
    /// Read images (both must be of the same size and type)
    src1 = imread(samples::findFile("LinuxLogo.jpg"));
    src2 = imread(samples::findFile("WindowsLogo.jpg"));

    if (src1.empty()) { cout << "Error loading src1 \n"; return -1; }
    if (src2.empty()) { cout << "Error loading src2 \n"; return -1; }

    // Initialize trackbar value
    alpha_slider = 0;

    namedWindow("Linear Blend", WINDOW_AUTOSIZE); //Create Window

    char TrackbarName[50];
    snprintf(TrackbarName, sizeof(TrackbarName), "Alpha x %d", alpha_slider_max);
    // Example userdata: Pass a pointer to an integer as userdata
    createTrackbar(TrackbarName, "Linear Blend", &alpha_slider, alpha_slider_max, on_trackbar);

    /// Show initial result
    on_trackbar(alpha_slider, nullptr);

    /// Wait for user input
    waitKey(0);
    return 0;
}
This tutorial code’s is shown lines below. You can also download it from here
import java.awt.BorderLayout;
import java.awt.Container;
import java.awt.Image;

import javax.swing.BoxLayout;
import javax.swing.ImageIcon;
import javax.swing.JFrame;
import javax.swing.JLabel;
import javax.swing.JPanel;
import javax.swing.JSlider;
import javax.swing.event.ChangeEvent;
import javax.swing.event.ChangeListener;

import org.opencv.core.Core;
import org.opencv.core.Mat;
import org.opencv.highgui.HighGui;
import org.opencv.imgcodecs.Imgcodecs;

public class AddingImagesTrackbar {
    private static final int ALPHA_SLIDER_MAX = 100;
    private int alphaVal = 0;
    private Mat matImgSrc1;
    private Mat matImgSrc2;
    private Mat matImgDst = new Mat();
    private JFrame frame;
    private JLabel imgLabel;

    public AddingImagesTrackbar(String[] args) {
        String imagePath1 = "../data/LinuxLogo.jpg";
        String imagePath2 = "../data/WindowsLogo.jpg";
        if (args.length > 1) {
            imagePath1 = args[0];
            imagePath2 = args[1];
        }
        matImgSrc1 = Imgcodecs.imread(imagePath1);
        matImgSrc2 = Imgcodecs.imread(imagePath2);
        if (matImgSrc1.empty()) {
            System.out.println("Empty image: " + imagePath1);
            System.exit(0);
        }
        if (matImgSrc2.empty()) {
            System.out.println("Empty image: " + imagePath2);
            System.exit(0);
        }

        // Create and set up the window.
        frame = new JFrame("Linear Blend");
        frame.setDefaultCloseOperation(JFrame.EXIT_ON_CLOSE);
        // Set up the content pane.
        Image img = HighGui.toBufferedImage(matImgSrc2);
        addComponentsToPane(frame.getContentPane(), img);
        // Use the content pane's default BorderLayout. No need for
        // setLayout(new BorderLayout());
        // Display the window.
        frame.pack();
        frame.setVisible(true);
    }

    private void addComponentsToPane(Container pane, Image img) {
        if (!(pane.getLayout() instanceof BorderLayout)) {
            pane.add(new JLabel("Container doesn't use BorderLayout!"));
            return;
        }

        JPanel sliderPanel = new JPanel();
        sliderPanel.setLayout(new BoxLayout(sliderPanel, BoxLayout.PAGE_AXIS));

        sliderPanel.add(new JLabel(String.format("Alpha x %d", ALPHA_SLIDER_MAX)));
        JSlider slider = new JSlider(0, ALPHA_SLIDER_MAX, 0);
        slider.setMajorTickSpacing(20);
        slider.setMinorTickSpacing(5);
        slider.setPaintTicks(true);
        slider.setPaintLabels(true);
        slider.addChangeListener(new ChangeListener() {
            @Override
            public void stateChanged(ChangeEvent e) {
                JSlider source = (JSlider) e.getSource();
                alphaVal = source.getValue();
                update();
            }
        });
        sliderPanel.add(slider);

        pane.add(sliderPanel, BorderLayout.PAGE_START);
        imgLabel = new JLabel(new ImageIcon(img));
        pane.add(imgLabel, BorderLayout.CENTER);
    }

    private void update() {
        double alpha = alphaVal / (double) ALPHA_SLIDER_MAX;
        double beta = 1.0 - alpha;
        Core.addWeighted(matImgSrc1, alpha, matImgSrc2, beta, 0, matImgDst);
        Image img = HighGui.toBufferedImage(matImgDst);
        imgLabel.setIcon(new ImageIcon(img));
        frame.repaint();
    }

    public static void main(String[] args) {
        // Load the native OpenCV library
        System.loadLibrary(Core.NATIVE_LIBRARY_NAME);

        // Schedule a job for the event dispatch thread:
        // creating and showing this application's GUI.
        javax.swing.SwingUtilities.invokeLater(new Runnable() {
            @Override
            public void run() {
                new AddingImagesTrackbar(args);
            }
        });
    }
}
This tutorial code’s is shown lines below. You can also download it from here
from __future__ import print_function
from __future__ import division
import cv2 as cv
import argparse

alpha_slider_max = 100
title_window = 'Linear Blend'

def on_trackbar(val):
    alpha = val / alpha_slider_max
    beta = ( 1.0 - alpha )
    dst = cv.addWeighted(src1, alpha, src2, beta, 0.0)
    cv.imshow(title_window, dst)

parser = argparse.ArgumentParser(description='Code for Adding a Trackbar to our applications tutorial.')
parser.add_argument('--input1', help='Path to the first input image.', default='LinuxLogo.jpg')
parser.add_argument('--input2', help='Path to the second input image.', default='WindowsLogo.jpg')
args = parser.parse_args()

# Read images ( both have to be of the same size and type )
src1 = cv.imread(cv.samples.findFile(args.input1))
src2 = cv.imread(cv.samples.findFile(args.input2))
if src1 is None:
    print('Could not open or find the image: ', args.input1)
    exit(0)

if src2 is None:
    print('Could not open or find the image: ', args.input2)
    exit(0)

cv.namedWindow(title_window)

trackbar_name = 'Alpha x %d' % alpha_slider_max
cv.createTrackbar(trackbar_name, title_window , 0, alpha_slider_max, on_trackbar)

# Show some stuff
on_trackbar(0)

# Wait until user press some key
cv.waitKey()
Explanation#
We only analyze the code that is related to Trackbar:
First, we load two images, which are going to be blended.
To create a trackbar, first we have to create the window in which it is going to be located. So:
namedWindow("Linear Blend", WINDOW_AUTOSIZE); //Create Window
// Create and set up the window.
frame = new JFrame("Linear Blend");
frame.setDefaultCloseOperation(JFrame.EXIT_ON_CLOSE);
// Set up the content pane.
Image img = HighGui.toBufferedImage(matImgSrc2);
addComponentsToPane(frame.getContentPane(), img);
// Use the content pane's default BorderLayout. No need for
// setLayout(new BorderLayout());
// Display the window.
frame.pack();
frame.setVisible(true);
cv.namedWindow(title_window)
Now we can create the Trackbar:
char TrackbarName[50];
snprintf(TrackbarName, sizeof(TrackbarName), "Alpha x %d", alpha_slider_max);
// Example userdata: Pass a pointer to an integer as userdata
createTrackbar(TrackbarName, "Linear Blend", &alpha_slider, alpha_slider_max, on_trackbar);
sliderPanel.add(new JLabel(String.format("Alpha x %d", ALPHA_SLIDER_MAX)));
JSlider slider = new JSlider(0, ALPHA_SLIDER_MAX, 0);
slider.setMajorTickSpacing(20);
slider.setMinorTickSpacing(5);
slider.setPaintTicks(true);
slider.setPaintLabels(true);
trackbar_name = 'Alpha x %d' % alpha_slider_max
cv.createTrackbar(trackbar_name, title_window , 0, alpha_slider_max, on_trackbar)
Note the following (C++ code):
Our Trackbar has a label TrackbarName
The Trackbar is located in the window named Linear Blend
The Trackbar values will be in the range from \(0\) to alpha_slider_max (the minimum limit is always zero).
The numerical value of Trackbar is stored in alpha_slider
Whenever the user moves the Trackbar, the callback function on_trackbar is called
Finally, we have to define the callback function on_trackbar for C++ and Python code, using an anonymous inner class listener in Java
static void on_trackbar(int pos, void* userdata) {
    (void) userdata;
    alpha = (double)pos / alpha_slider_max;
    beta = (1.0 - alpha);
    addWeighted(src1, alpha, src2, beta, 0.0, dst);
    imshow("Linear Blend", dst);
}
slider.addChangeListener(new ChangeListener() {
    @Override
    public void stateChanged(ChangeEvent e) {
        JSlider source = (JSlider) e.getSource();
        alphaVal = source.getValue();
        update();
    }
});
def on_trackbar(val):
    alpha = val / alpha_slider_max
    beta = ( 1.0 - alpha )
    dst = cv.addWeighted(src1, alpha, src2, beta, 0.0)
    cv.imshow(title_window, dst)
Note that (C++ code):
We use the value of alpha_slider (integer) to get a double value for alpha.
alpha_slider is updated each time the trackbar is displaced by the user.
We define src1, src2, dist, alpha, alpha_slider and beta as global variables, so they can be used everywhere.
Result#
Our program produces the following output:
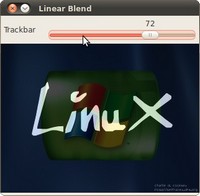
As a manner of practice, you can also add two trackbars for the program made in Changing the contrast and brightness of an image!. One trackbar to set \(\alpha\) and another for set \(\beta\). The output might look like: