Prev Tutorial: How to run deep networks in browser
Next Tutorial: How to run custom OCR model
| |
| Original author | Dmitry Kurtaev |
| Compatibility | OpenCV >= 3.4.1 |
Introduction
Deep learning is a fast-growing area. New approaches to building neural networks usually introduce new types of layers. These could be modifications of existing ones or implementation of outstanding research ideas.
OpenCV allows importing and running networks from different deep learning frameworks. There is a number of the most popular layers. However, you can face a problem that your network cannot be imported using OpenCV because some layers of your network can be not implemented in the deep learning engine of OpenCV.
The first solution is to create a feature request at https://github.com/opencv/opencv/issues mentioning details such as a source of a model and a type of new layer. The new layer could be implemented if the OpenCV community shares this need.
The second way is to define a custom layer so that OpenCV's deep learning engine will know how to use it. This tutorial is dedicated to show you a process of deep learning model's import customization.
Define a custom layer in C++
Deep learning layer is a building block of network's pipeline. It has connections to input blobs and produces results to output blobs. There are trained weights and hyper-parameters. Layers' names, types, weights and hyper-parameters are stored in files are generated by native frameworks during training. If OpenCV encounters unknown layer type it throws an exception while trying to read a model:
Unspecified error: Can't create layer "layer_name" of type "MyType" in function getLayerInstance
To import the model correctly you have to derive a class from cv::dnn::Layer with the following methods:
{
public:
const int requiredOutputs,
std::vector<std::vector<int> > &outputs,
std::vector<std::vector<int> > &internals)
const CV_OVERRIDE;
};
And register it before the import:
static inline void loadNet()
{
- Note
MyType is a type of unimplemented layer from the thrown exception.
Let's see what all the methods do:
Retrieves hyper-parameters from cv::dnn::LayerParams. If your layer has trainable weights they will be already stored in the Layer's member cv::dnn::Layer::blobs.
This method should create an instance of you layer and return cv::Ptr with it.
- Output blobs' shape computation
const int requiredOutputs,
std::vector<std::vector<int> > &outputs,
std::vector<std::vector<int> > &internals)
const CV_OVERRIDE;
Returns layer's output shapes depending on input shapes. You may request an extra memory using internals.
Implement a layer's logic here. Compute outputs for given inputs.
- Note
- OpenCV manages memory allocated for layers. In the most cases the same memory can be reused between layers. So your
forward implementation should not rely on that the second invocation of forward will have the same data at outputs and internals.
The chain of methods is the following: OpenCV deep learning engine calls create method once, then it calls getMemoryShapes for every created layer, then you can make some preparations depend on known input dimensions at cv::dnn::Layer::finalize. After network was initialized only forward method is called for every network's input.
- Note
- Varying input blobs' sizes such height, width or batch size make OpenCV reallocate all the internal memory. That leads to efficiency gaps. Try to initialize and deploy models using a fixed batch size and image's dimensions.
Example: custom layer from Caffe
Let's create a custom layer Interp from https://github.com/cdmh/deeplab-public. It's just a simple resize that takes an input blob of size N x C x Hi x Wi and returns an output blob of size N x C x Ho x Wo where N is a batch size, C is a number of channels, Hi x Wi and Ho x Wo are input and output height x width correspondingly. This layer has no trainable weights but it has hyper-parameters to specify an output size.
In example,
layer {
name: "output"
type: "Interp"
bottom: "input"
top: "output"
interp_param {
height: 9
width: 8
}
}
This way our implementation can look like:
{
public:
{
outWidth =
params.get<
int>(
"width", 0);
outHeight =
params.get<
int>(
"height", 0);
}
{
}
const int requiredOutputs,
std::vector<std::vector<int> > &outputs,
std::vector<std::vector<int> > &internals)
const CV_OVERRIDE {
CV_UNUSED(requiredOutputs); CV_UNUSED(internals);
std::vector<int> outShape(4);
outShape[0] = inputs[0][0];
outShape[1] = inputs[0][1];
outShape[2] = outHeight;
outShape[3] = outWidth;
outputs.assign(1, outShape);
return false;
}
{
if (inputs_arr.depth() ==
CV_16S)
{
return;
}
std::vector<cv::Mat> inputs, outputs;
inputs_arr.getMatVector(inputs);
outputs_arr.getMatVector(outputs);
const float* inpData = (
float*)inp.
data;
float* outData = (float*)out.data;
const int batchSize = inp.size[0];
const int numChannels = inp.size[1];
const int inpHeight = inp.size[2];
const int inpWidth = inp.size[3];
const float rheight = (outHeight > 1) ? static_cast<float>(inpHeight - 1) / (outHeight - 1) : 0.f;
const float rwidth = (outWidth > 1) ? static_cast<float>(inpWidth - 1) / (outWidth - 1) : 0.f;
for (int h2 = 0; h2 < outHeight; ++h2)
{
const float h1r = rheight * h2;
const int h1 = static_cast<int>(h1r);
const int h1p = (h1 < inpHeight - 1) ? 1 : 0;
const float h1lambda = h1r - h1;
const float h0lambda = 1.f - h1lambda;
for (int w2 = 0; w2 < outWidth; ++w2)
{
const float w1r = rwidth * w2;
const int w1 = static_cast<int>(w1r);
const int w1p = (w1 < inpWidth - 1) ? 1 : 0;
const float w1lambda = w1r - w1;
const float w0lambda = 1.f - w1lambda;
const float* pos1 = inpData + h1 * inpWidth + w1;
float* pos2 = outData + h2 * outWidth + w2;
for (int c = 0; c < batchSize * numChannels; ++c)
{
pos2[0] =
h0lambda * (w0lambda * pos1[0] + w1lambda * pos1[w1p]) +
h1lambda * (w0lambda * pos1[h1p * inpWidth] + w1lambda * pos1[h1p * inpWidth + w1p]);
pos1 += inpWidth * inpHeight;
pos2 += outWidth * outHeight;
}
}
}
}
private:
int outWidth, outHeight;
};
Next we need to register a new layer type and try to import the model.
Example: custom layer from TensorFlow
This is an example of how to import a network with tf.image.resize_bilinear operation. This is also a resize but with an implementation different from OpenCV's or Interp above.
Let's create a single layer network:
inp = tf.placeholder(tf.float32, [2, 3, 4, 5], 'input')
resized = tf.image.resize_bilinear(inp, size=[9, 8], name='resize_bilinear')
OpenCV sees that TensorFlow's graph in the following way:
node {
name: "input"
op: "Placeholder"
attr {
key: "dtype"
value {
type: DT_FLOAT
}
}
}
node {
name: "resize_bilinear/size"
op: "Const"
attr {
key: "dtype"
value {
type: DT_INT32
}
}
attr {
key: "value"
value {
tensor {
dtype: DT_INT32
tensor_shape {
dim {
size: 2
}
}
tensor_content: "\t\000\000\000\010\000\000\000"
}
}
}
}
node {
name: "resize_bilinear"
op: "ResizeBilinear"
input: "input:0"
input: "resize_bilinear/size"
attr {
key: "T"
value {
type: DT_FLOAT
}
}
attr {
key: "align_corners"
value {
b: false
}
}
}
library {
}
Custom layers import from TensorFlow is designed to put all layer's attr into cv::dnn::LayerParams but input Const blobs into cv::dnn::Layer::blobs. In our case resize's output shape will be stored in layer's blobs[0].
{
public:
{
for (size_t i = 0; i < blobs.size(); ++i)
if (blobs.size() == 1)
{
outHeight = blobs[0].at<int>(0, 0);
outWidth = blobs[0].at<int>(0, 1);
factorHeight = factorWidth = 0;
}
else
{
factorHeight = blobs[0].at<int>(0, 0);
factorWidth = blobs[1].at<int>(0, 0);
outHeight = outWidth = 0;
}
}
{
}
const int,
std::vector<std::vector<int> > &outputs,
{
std::vector<int> outShape(4);
outShape[0] = inputs[0][0];
outShape[1] = inputs[0][1];
outShape[2] = outHeight != 0 ? outHeight : (inputs[0][2] * factorHeight);
outShape[3] = outWidth != 0 ? outWidth : (inputs[0][3] * factorWidth);
outputs.assign(1, outShape);
return false;
}
{
std::vector<cv::Mat> outputs;
outputs_arr.getMatVector(outputs);
if (!outWidth && !outHeight)
{
outHeight = outputs[0].size[2];
outWidth = outputs[0].size[3];
}
}
{
if (inputs_arr.depth() ==
CV_16S)
{
return;
}
std::vector<cv::Mat> inputs, outputs;
inputs_arr.getMatVector(inputs);
outputs_arr.getMatVector(outputs);
const float* inpData = (
float*)inp.
data;
float* outData = (float*)out.data;
const int batchSize = inp.size[0];
const int numChannels = inp.size[1];
const int inpHeight = inp.size[2];
const int inpWidth = inp.size[3];
float heightScale = static_cast<float>(inpHeight) / outHeight;
float widthScale = static_cast<float>(inpWidth) / outWidth;
for (int b = 0; b < batchSize; ++b)
{
for (int y = 0; y < outHeight; ++y)
{
float input_y = y * heightScale;
int y0 = static_cast<int>(std::floor(input_y));
int y1 = std::min(y0 + 1, inpHeight - 1);
for (int x = 0; x < outWidth; ++x)
{
float input_x = x * widthScale;
int x0 = static_cast<int>(std::floor(input_x));
int x1 = std::min(x0 + 1, inpWidth - 1);
for (int c = 0; c < numChannels; ++c)
{
float interpolation =
inpData[offset(inp.size, c, x0, y0, b)] * (1 - (input_y - y0)) * (1 - (input_x - x0)) +
inpData[offset(inp.size, c, x0, y1, b)] * (input_y - y0) * (1 - (input_x - x0)) +
inpData[offset(inp.size, c, x1, y0, b)] * (1 - (input_y - y0)) * (input_x - x0) +
inpData[offset(inp.size, c, x1, y1, b)] * (input_y - y0) * (input_x - x0);
outData[offset(out.size, c, x, y, b)] = interpolation;
}
}
}
}
}
private:
static inline int offset(
const cv::MatSize& size,
int c,
int x,
int y,
int b)
{
}
int outWidth, outHeight, factorWidth, factorHeight;
};
Next we register a layer and try to import the model.
Define a custom layer in Python
The following example shows how to customize OpenCV's layers in Python.
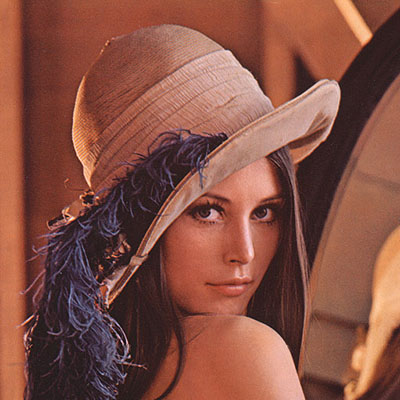
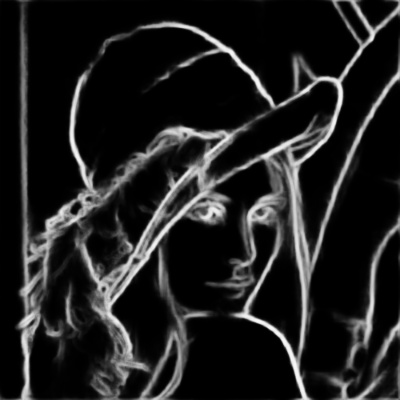
Let's consider Holistically-Nested Edge Detection deep learning model. That was trained with one and only difference comparing to a current version of Caffe framework. Crop layers that receive two input blobs and crop the first one to match spatial dimensions of the second one used to crop from the center. Nowadays Caffe's layer does it from the top-left corner. So using the latest version of Caffe or OpenCV you will get shifted results with filled borders.
Next we're going to replace OpenCV's Crop layer that makes top-left cropping by a centric one.
- Create a class with
getMemoryShapes and forward methods
class CropLayer(object):
def __init__(self, params, blobs):
self.xstart = 0
self.xend = 0
self.ystart = 0
self.yend = 0
def getMemoryShapes(self, inputs):
inputShape, targetShape = inputs[0], inputs[1]
batchSize, numChannels = inputShape[0], inputShape[1]
height, width = targetShape[2], targetShape[3]
self.ystart = (inputShape[2] - targetShape[2]) // 2
self.xstart = (inputShape[3] - targetShape[3]) // 2
self.yend = self.ystart + height
self.xend = self.xstart + width
return [[batchSize, numChannels, height, width]]
def forward(self, inputs):
return [inputs[0][:,:,self.ystart:self.yend,self.xstart:self.xend]]
- Note
- Both methods should return lists.
cv.dnn_registerLayer('Crop', CropLayer)
That's it! We have replaced an implemented OpenCV's layer to a custom one. You may find a full script in the source code.