OpenCV  4.9.0-dev
Open Source Computer Vision
Loading...
Searching...
No Matches
Adding borders to your images

Prev Tutorial: Making your own linear filters!
Next Tutorial: Sobel Derivatives

Original author Ana Huamán
Compatibility OpenCV >= 3.0

Goal

In this tutorial you will learn how to:

  • Use the OpenCV function copyMakeBorder() to set the borders (extra padding to your image).

Theory

Note
The explanation below belongs to the book Learning OpenCV by Bradski and Kaehler.
  1. In our previous tutorial we learned to use convolution to operate on images. One problem that naturally arises is how to handle the boundaries. How can we convolve them if the evaluated points are at the edge of the image?
  2. What most of OpenCV functions do is to copy a given image onto another slightly larger image and then automatically pads the boundary (by any of the methods explained in the sample code just below). This way, the convolution can be performed over the needed pixels without problems (the extra padding is cut after the operation is done).
  3. In this tutorial, we will briefly explore two ways of defining the extra padding (border) for an image:

    1. BORDER_CONSTANT: Pad the image with a constant value (i.e. black or \(0\)
    2. BORDER_REPLICATE: The row or column at the very edge of the original is replicated to the extra border.

    This will be seen more clearly in the Code section.

  • What does this program do?
    • Load an image
    • Let the user choose what kind of padding use in the input image. There are two options:

      1. Constant value border: Applies a padding of a constant value for the whole border. This value will be updated randomly each 0.5 seconds.
      2. Replicated border: The border will be replicated from the pixel values at the edges of the original image.

      The user chooses either option by pressing 'c' (constant) or 'r' (replicate)

    • The program finishes when the user presses 'ESC'

Code

The tutorial code's is shown lines below.

Explanation

Declare the variables

First we declare the variables we are going to use:

Especial attention deserves the variable rng which is a random number generator. We use it to generate the random border color, as we will see soon.

Load an image

As usual we load our source image src:

Create a window

After giving a short intro of how to use the program, we create a window:

Initialize arguments

Now we initialize the argument that defines the size of the borders (top, bottom, left and right). We give them a value of 5% the size of src.

Loop

The program runs in an infinite loop while the key ESC isn't pressed. If the user presses 'c' or 'r', the borderType variable takes the value of BORDER_CONSTANT or BORDER_REPLICATE respectively:

Random color

In each iteration (after 0.5 seconds), the random border color (value) is updated...

This value is a set of three numbers picked randomly in the range \([0,255]\).

Form a border around the image

Finally, we call the function copyMakeBorder() to apply the respective padding:

  • The arguments are:
    1. src: Source image
    2. dst: Destination image
    3. top, bottom, left, right: Length in pixels of the borders at each side of the image. We define them as being 5% of the original size of the image.
    4. borderType: Define what type of border is applied. It can be constant or replicate for this example.
    5. value: If borderType is BORDER_CONSTANT, this is the value used to fill the border pixels.

Display the results

We display our output image in the image created previously

Results

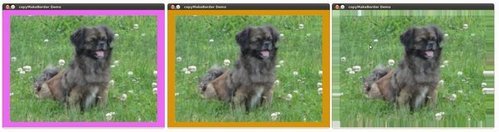
  1. After compiling the code above, you can execute it giving as argument the path of an image. The result should be:

    • By default, it begins with the border set to BORDER_CONSTANT. Hence, a succession of random colored borders will be shown.
    • If you press 'r', the border will become a replica of the edge pixels.
    • If you press 'c', the random colored borders will appear again
    • If you press 'ESC' the program will exit.

    Below some screenshot showing how the border changes color and how the BORDER_REPLICATE option looks: