|
OpenCV
4.7.0-dev
Open Source Computer Vision
|
|
OpenCV
4.7.0-dev
Open Source Computer Vision
|
Learn to:
Almost all the operations in this section are mainly related to Numpy rather than OpenCV. A good knowledge of Numpy is required to write better optimized code with OpenCV.
*( Examples will be shown in a Python terminal, since most of them are just single lines of code )*
Let's load a color image first:
You can access a pixel value by its row and column coordinates. For BGR image, it returns an array of Blue, Green, Red values. For grayscale image, just corresponding intensity is returned.
You can modify the pixel values the same way.
Warning
Numpy is an optimized library for fast array calculations. So simply accessing each and every pixel value and modifying it will be very slow and it is discouraged.
Better pixel accessing and editing method :
Image properties include number of rows, columns, and channels; type of image data; number of pixels; etc.
The shape of an image is accessed by img.shape. It returns a tuple of the number of rows, columns, and channels (if the image is color):
Total number of pixels is accessed by img.size:
Image datatype is obtained by `img.dtype`:
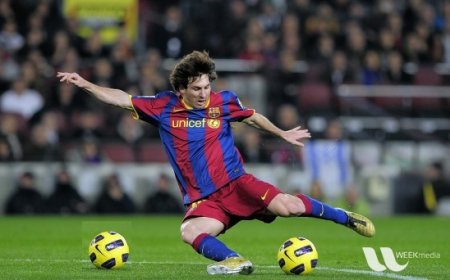
Sometimes, you will have to play with certain regions of images. For eye detection in images, first face detection is done over the entire image. When a face is obtained, we select the face region alone and search for eyes inside it instead of searching the whole image. It improves accuracy (because eyes are always on faces :D ) and performance (because we search in a small area).
ROI is again obtained using Numpy indexing. Here I am selecting the ball and copying it to another region in the image:
Check the results below:
Sometimes you will need to work separately on the B,G,R channels of an image. In this case, you need to split the BGR image into single channels. In other cases, you may need to join these individual channels to create a BGR image. You can do this simply by:
Or
Suppose you want to set all the red pixels to zero - you do not need to split the channels first. Numpy indexing is faster:
Warning
cv.split() is a costly operation (in terms of time). So use it only if necessary. Otherwise go for Numpy indexing.
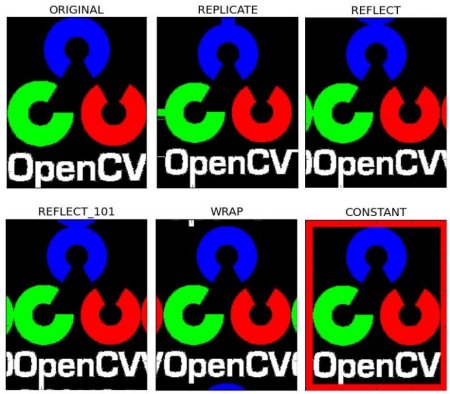
If you want to create a border around an image, something like a photo frame, you can use cv.copyMakeBorder(). But it has more applications for convolution operation, zero padding etc. This function takes following arguments:
Below is a sample code demonstrating all these border types for better understanding:
See the result below. (Image is displayed with matplotlib. So RED and BLUE channels will be interchanged):
 1.8.13