Goal
In this chapter, we will learn how to
- Calibrate your camera and get the coefficients to correct lateral chromatic aberration.
- Export these coefficients that model the red/blue channel misalignments.
- Correct images using functions in OpenCV.
Basics
Lateral chromatic aberration occurs when different wavelengths focus at slightly different image positions. This results in red/blue fringes at the high-contrast edges, and is particularly common in old or lower-quality cameras and lenses. It is a property of the lens and appears consistently in every image taken with that camera and lens.
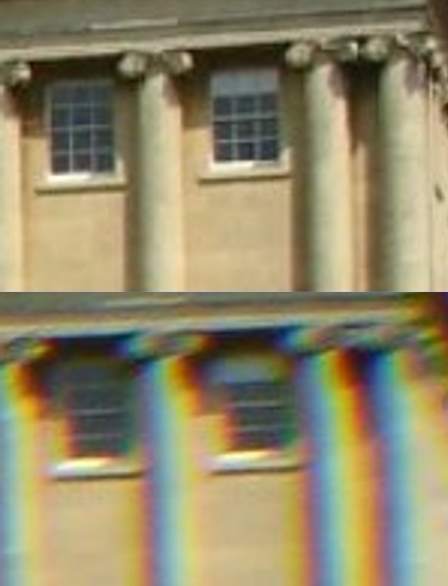
Chromatic Aberration Example
Image credit: PawełS, CC BY-SA 3.0 http://creativecommons.org/licenses/by-sa/3.0/, via Wikimedia Commons
We treat lateral chromatic aberration as a geometric distortion of red and blue channels relative to the reference green, and aim to estimate a mapping that aligns the red and blue channels to green.
The correction follows the paper of Rudakova et al. on the lateral chromatic aberration. The misalignment in each channel is modeled as a polynomial of some degree. The distance between the precise locations of centers in red/blue and green channels is minimized with a warp of these centers.
The paper also proposed to use the calibration pattern of black discs, many more than the polynomial model coefficients count to get a proper fit. Degree 11 is often used, but smaller degrees can achieve similar level of accuracy with much better performance.


Calibration
To create a model of the misalignments of the channels, we use the following calibration procedure:
- Print out the calibration photo available in opencv_extra/testdata/cv/cameracalibration/chromatic_aberration/chromatic_aberration_pattern_a3.png. The photo is a grid of black discs on a white background, and as the chromatic aberration fringes appear on the edges of objects in the photo, we will be able to see many different misalignments and model them precisely.
- Take one or more images of the printed out calibration grid using your camera. Make sure that all of the discs are in the photo, and that the grid fills as much place as possible, as the chromatic aberration is the strongest at the edges and corners of the photo. You should be able to see color fringes by eye.
- Run calibraion, see chromatic_calibration.py. The app can be used as follows:
chromatic_calibration.py calibrate [-h] [--degree DEGREE] --coeffs_file YAML image
chromatic_calibration.py correct [-h] --coeffs_file YAML [-o OUTPUT] image
chromatic_calibration.py full [-h] [--degree DEGREE] --coeffs_file YAML [-o OUTPUT] image
chromatic_calibration.py scan [-h] --degree_range k0 k1 image
Calibrate estimates polynomial coefficients and outputs them to a YAML file to be used with correction functions.
- Splits BGR, finds disk centers per channel at sub-pixel precision.
- Pairs centers to green via KD-tree.
- Builds monomial terms up to
--degree and solves least squares, then refines with another optimization algorithm.
- Saves a YAML with:
image_width, image_heightred_channel/blue_channel: coeffs_x, coeffs_y (length $M=(d+1)(d+2)/2$), and rms residuals.
Scan sweeps polynomial degree range and compares quality. Although higher degrees should almost always model the aberration better, lower degrees can be much faster.
- Runs calibration for each degree in k0,..,k1 inclusive to fit models for each degree.
- Extracts full disk contours per channel.
- Warps R/B contours toward G using each degree’s polynomials and measures nearest-neighbor distances.
- Prints a table of max / mean / std distances (in pixels) for red and blue.
- The user can then choose what degree works best and calibrate the camera with that specific degree.
Code
Minimal Python example for chromatic aberration correction:
import cv2 as cv
INPUT = "path/to/input.jpg"
CALIB_YAML = "path/to/ca_photo_calib.yaml"
OUTPUT = "corrected.png"
BAYER = -1
SHOW = True
FileStorage fs(parsed_args.coeffs_file, FileStorage::READ);
coeffMat, calib_size, degree = cv2.loadChromaticAberrationParams(fs.root())
corrected = cv.correctChromaticAberration(img, coeffMat, calib_size, degree, BAYER)
if SHOW:
cv.namedWindow("Original", cv.WINDOW_AUTOSIZE)
cv.namedWindow("Corrected", cv.WINDOW_AUTOSIZE)
cv.imshow("Original", img)
cv.imshow("Corrected", corrected)
print("Press any key to close...")
cv.waitKey(0)
cv.destroyAllWindows()
cv.imwrite(OUTPUT, corrected)
Additional Resources
[236]