In this tutorial you'll know how to run deep learning networks on Android device using OpenCV deep learning module. Tutorial was written for Android Studio 2022.2.1.
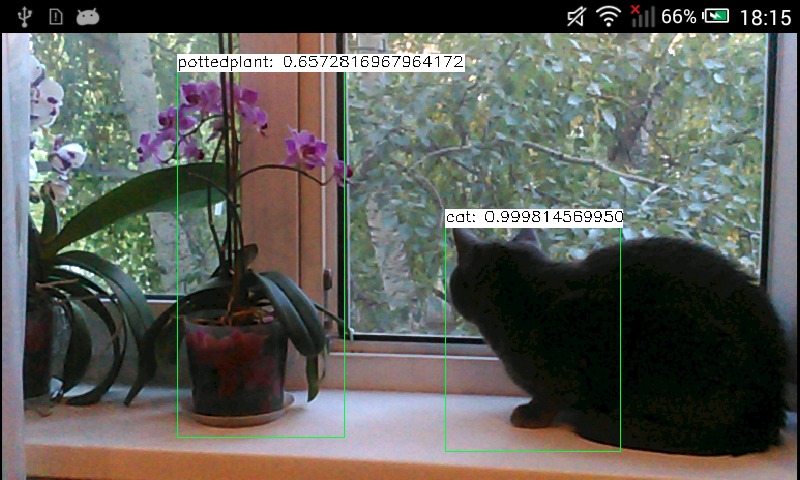
Our sample will takes pictures from a camera, forwards it into a deep network and receives a set of rectangles, class identifiers and confidence values in range [0, 1].
import android.content.Context;
import android.content.res.AssetManager;
import android.os.Bundle;
import android.util.Log;
import android.widget.Toast;
import org.opencv.android.CameraActivity;
import org.opencv.android.CameraBridgeViewBase;
import org.opencv.android.CameraBridgeViewBase.CvCameraViewFrame;
import org.opencv.android.CameraBridgeViewBase.CvCameraViewListener2;
import org.opencv.android.OpenCVLoader;
import org.opencv.core.Core;
import org.opencv.core.Mat;
import org.opencv.core.MatOfByte;
import org.opencv.core.Point;
import org.opencv.core.Scalar;
import org.opencv.core.Size;
import org.opencv.dnn.Net;
import org.opencv.dnn.Dnn;
import org.opencv.imgproc.Imgproc;
import java.io.InputStream;
import java.io.IOException;
import java.util.Collections;
import java.util.List;
public class MainActivity extends CameraActivity implements CvCameraViewListener2 {
@Override
public void onResume() {
super.onResume();
if (mOpenCvCameraView != null)
mOpenCvCameraView.enableView();
}
@Override
protected void onCreate(Bundle savedInstanceState) {
super.onCreate(savedInstanceState);
if (OpenCVLoader.initLocal()) {
Log.i(TAG, "OpenCV loaded successfully");
} else {
Log.e(TAG, "OpenCV initialization failed!");
(Toast.makeText(this, "OpenCV initialization failed!", Toast.LENGTH_LONG)).show();
return;
}
mModelBuffer = loadFileFromResource(R.raw.mobilenet_iter_73000);
mConfigBuffer = loadFileFromResource(R.raw.deploy);
if (mModelBuffer == null || mConfigBuffer == null) {
Log.e(TAG, "Failed to load model from resources");
} else
Log.i(TAG, "Model files loaded successfully");
net = Dnn.readNet("caffe", mModelBuffer, mConfigBuffer);
Log.i(TAG, "Network loaded successfully");
setContentView(R.layout.activity_main);
mOpenCvCameraView = (CameraBridgeViewBase)findViewById(R.id.CameraView);
mOpenCvCameraView.setVisibility(CameraBridgeViewBase.VISIBLE);
mOpenCvCameraView.setCvCameraViewListener(this);
}
@Override
public void onPause()
{
super.onPause();
if (mOpenCvCameraView != null)
mOpenCvCameraView.disableView();
}
@Override
protected List<? extends CameraBridgeViewBase> getCameraViewList() {
return Collections.singletonList(mOpenCvCameraView);
}
public void onDestroy() {
super.onDestroy();
if (mOpenCvCameraView != null)
mOpenCvCameraView.disableView();
mModelBuffer.release();
mConfigBuffer.release();
}
public void onCameraViewStarted(int width, int height) {
}
public Mat onCameraFrame(CvCameraViewFrame inputFrame) {
final int IN_WIDTH = 300;
final int IN_HEIGHT = 300;
final float WH_RATIO = (float)IN_WIDTH / IN_HEIGHT;
final double IN_SCALE_FACTOR = 0.007843;
final double MEAN_VAL = 127.5;
final double THRESHOLD = 0.2;
Log.d(TAG, "handle new frame!");
Mat frame = inputFrame.rgba();
Imgproc.cvtColor(frame, frame, Imgproc.COLOR_RGBA2RGB);
Mat blob = Dnn.blobFromImage(frame, IN_SCALE_FACTOR,
new Size(IN_WIDTH, IN_HEIGHT),
new Scalar(MEAN_VAL, MEAN_VAL, MEAN_VAL),
false,
false);
net.setInput(blob);
Mat detections = net.forward();
int cols = frame.cols();
int rows = frame.rows();
detections = detections.reshape(1, (int)detections.total() / 7);
for (int i = 0; i < detections.rows(); ++i) {
double confidence = detections.get(i, 2)[0];
if (confidence > THRESHOLD) {
int classId = (int)detections.get(i, 1)[0];
int left = (int)(detections.get(i, 3)[0] * cols);
int top = (int)(detections.get(i, 4)[0] * rows);
int right = (int)(detections.get(i, 5)[0] * cols);
int bottom = (int)(detections.get(i, 6)[0] * rows);
Imgproc.rectangle(frame,
new Point(left, top),
new Point(right, bottom),
String label = classNames[classId] +
": " + confidence;
int[] baseLine = new int[1];
Size labelSize = Imgproc.getTextSize(label, Imgproc.FONT_HERSHEY_SIMPLEX, 0.5, 1, baseLine);
Imgproc.rectangle(frame,
new Point(left, top - labelSize.height),
new Point(left + labelSize.width, top + baseLine[0]),
new Scalar(255, 255, 255), Imgproc.FILLED);
Imgproc.putText(frame, label,
new Point(left, top),
Imgproc.FONT_HERSHEY_SIMPLEX, 0.5,
new Scalar(0, 0, 0));
}
}
return frame;
}
public void onCameraViewStopped() {}
private MatOfByte loadFileFromResource(int id) {
byte[] buffer;
try {
InputStream is = getResources().openRawResource(id);
int size = is.available();
int bytesRead = is.read(buffer);
is.close();
} catch (IOException e) {
e.printStackTrace();
Log.e(TAG, "Failed to ONNX model from resources! Exception thrown: " + e);
(Toast.makeText(this, "Failed to ONNX model from resources!", Toast.LENGTH_LONG)).show();
return null;
}
return new MatOfByte(buffer);
}
private static final String TAG =
"OpenCV-MobileNet";
private static final String[] classNames = {
"background",
"aeroplane", "bicycle", "bird", "boat",
"bottle", "bus", "car", "cat", "chair",
"cow", "diningtable", "dog", "horse",
"motorbike", "person", "pottedplant",
"sheep", "sofa", "train", "tvmonitor"};
private MatOfByte mConfigBuffer;
private MatOfByte mModelBuffer;
private Net net;
private CameraBridgeViewBase mOpenCvCameraView;
}
Mat blob = Dnn.blobFromImage(frame, IN_SCALE_FACTOR,
new Size(IN_WIDTH, IN_HEIGHT),
new Scalar(MEAN_VAL, MEAN_VAL, MEAN_VAL),
false,
false);
net.setInput(blob);
Mat detections = net.forward();
int cols = frame.cols();
int rows = frame.rows();
detections = detections.reshape(1, (int)detections.total() / 7);
for (int i = 0; i < detections.rows(); ++i) {
double confidence = detections.get(i, 2)[0];
if (confidence > THRESHOLD) {
int classId = (int)detections.get(i, 1)[0];
int left = (int)(detections.get(i, 3)[0] * cols);
int top = (int)(detections.get(i, 4)[0] * rows);
int right = (int)(detections.get(i, 5)[0] * cols);
int bottom = (int)(detections.get(i, 6)[0] * rows);
Imgproc.rectangle(frame,
new Point(left, top),
new Point(right, bottom),
String label = classNames[classId] +
": " + confidence;
int[] baseLine = new int[1];
Size labelSize = Imgproc.getTextSize(label, Imgproc.FONT_HERSHEY_SIMPLEX, 0.5, 1, baseLine);
Imgproc.rectangle(frame,
new Point(left, top - labelSize.height),
new Point(left + labelSize.width, top + baseLine[0]),
new Scalar(255, 255, 255), Imgproc.FILLED);
Imgproc.putText(frame, label,
new Point(left, top),
Imgproc.FONT_HERSHEY_SIMPLEX, 0.5,
new Scalar(0, 0, 0));
}
}