Goal
In this section,
- We will learn to exploit calib3d module to create some 3D effects in images.
Basics
This is going to be a small section. During the last session on camera calibration, you have found the camera matrix, distortion coefficients etc. Given a pattern image, we can utilize the above information to calculate its pose, or how the object is situated in space, like how it is rotated, how it is displaced etc. For a planar object, we can assume Z=0, such that, the problem now becomes how camera is placed in space to see our pattern image. So, if we know how the object lies in the space, we can draw some 2D diagrams in it to simulate the 3D effect. Let's see how to do it.
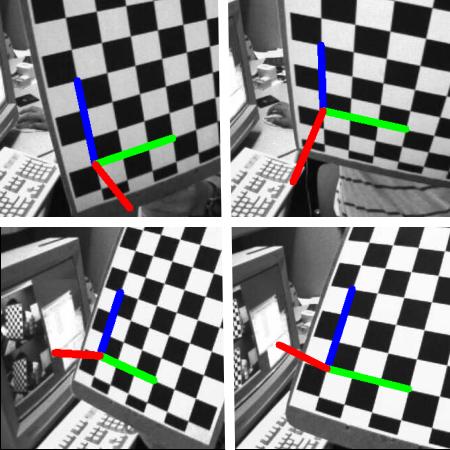
Our problem is, we want to draw our 3D coordinate axis (X, Y, Z axes) on our chessboard's first corner. X axis in blue color, Y axis in green color and Z axis in red color. So in-effect, Z axis should feel like it is perpendicular to our chessboard plane.
First, let's load the camera matrix and distortion coefficients from the previous calibration result.
import numpy as np
import cv2 as cv
import glob
with np.load('B.npz') as X:
mtx, dist, _, _ = [X[i] for i in ('mtx','dist','rvecs','tvecs')]
Now let's create a function, draw which takes the corners in the chessboard (obtained using cv.findChessboardCorners()) and axis points to draw a 3D axis.
def draw(img, corners, imgpts):
corner = tuple(corners[0].ravel().astype("int32"))
imgpts = imgpts.astype("int32")
img =
cv.line(img, corner, tuple(imgpts[0].ravel()), (255,0,0), 5)
img =
cv.line(img, corner, tuple(imgpts[1].ravel()), (0,255,0), 5)
img =
cv.line(img, corner, tuple(imgpts[2].ravel()), (0,0,255), 5)
return img
void line(InputOutputArray img, Point pt1, Point pt2, const Scalar &color, int thickness=1, int lineType=LINE_8, int shift=0)
Draws a line segment connecting two points.
Then as in previous case, we create termination criteria, object points (3D points of corners in chessboard) and axis points. Axis points are points in 3D space for drawing the axis. We draw axis of length 3 (units will be in terms of chess square size since we calibrated based on that size). So our X axis is drawn from (0,0,0) to (3,0,0), so for Y axis. For Z axis, it is drawn from (0,0,0) to (0,0,-3). Negative denotes it is drawn towards the camera.
criteria = (cv.TERM_CRITERIA_EPS + cv.TERM_CRITERIA_MAX_ITER, 30, 0.001)
objp = np.zeros((6*7,3), np.float32)
objp[:,:2] = np.mgrid[0:7,0:6].T.reshape(-1,2)
axis = np.float32([[3,0,0], [0,3,0], [0,0,-3]]).reshape(-1,3)
Now, as usual, we load each image. Search for 7x6 grid. If found, we refine it with subcorner pixels. Then to calculate the rotation and translation, we use the function, cv.solvePnPRansac(). Once we those transformation matrices, we use them to project our axis points to the image plane. In simple words, we find the points on image plane corresponding to each of (3,0,0),(0,3,0),(0,0,3) in 3D space. Once we get them, we draw lines from the first corner to each of these points using our generateImage() function. Done !!!
for fname in glob.glob('left*.jpg'):
if ret == True:
ret,rvecs, tvecs =
cv.solvePnP(objp, corners2, mtx, dist)
img = draw(img,corners2,imgpts)
if k == ord('s'):
void projectPoints(InputArray objectPoints, InputArray rvec, InputArray tvec, InputArray cameraMatrix, InputArray distCoeffs, OutputArray imagePoints, OutputArray jacobian=noArray(), double aspectRatio=0)
Projects 3D points to an image plane.
bool solvePnP(InputArray objectPoints, InputArray imagePoints, InputArray cameraMatrix, InputArray distCoeffs, OutputArray rvec, OutputArray tvec, bool useExtrinsicGuess=false, int flags=SOLVEPNP_ITERATIVE)
Finds an object pose from 3D-2D point correspondences:
bool findChessboardCorners(InputArray image, Size patternSize, OutputArray corners, int flags=CALIB_CB_ADAPTIVE_THRESH+CALIB_CB_NORMALIZE_IMAGE)
Finds the positions of internal corners of the chessboard.
void imshow(const String &winname, InputArray mat)
Displays an image in the specified window.
int waitKey(int delay=0)
Waits for a pressed key.
void destroyAllWindows()
Destroys all of the HighGUI windows.
bool imwrite(const String &filename, InputArray img, const std::vector< int > ¶ms=std::vector< int >())
Saves an image to a specified file.
Mat imread(const String &filename, int flags=IMREAD_COLOR_BGR)
Loads an image from a file.
void cvtColor(InputArray src, OutputArray dst, int code, int dstCn=0, AlgorithmHint hint=cv::ALGO_HINT_DEFAULT)
Converts an image from one color space to another.
void cornerSubPix(InputArray image, InputOutputArray corners, Size winSize, Size zeroZone, TermCriteria criteria)
Refines the corner locations.
See some results below. Notice that each axis is 3 squares long.:
image
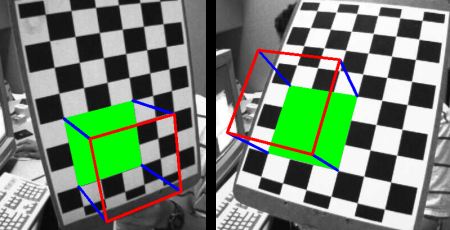
Render a Cube
If you want to draw a cube, modify the generateImage() function and axis points as follows.
Modified generateImage() function:
def draw(img, corners, imgpts):
imgpts = np.int32(imgpts).reshape(-1,2)
for i,j in zip(range(4),range(4,8)):
img =
cv.line(img, tuple(imgpts[i]), tuple(imgpts[j]),(255),3)
return img
void drawContours(InputOutputArray image, InputArrayOfArrays contours, int contourIdx, const Scalar &color, int thickness=1, int lineType=LINE_8, InputArray hierarchy=noArray(), int maxLevel=INT_MAX, Point offset=Point())
Draws contours outlines or filled contours.
Modified axis points. They are the 8 corners of a cube in 3D space:
axis = np.float32([[0,0,0], [0,3,0], [3,3,0], [3,0,0],
[0,0,-3],[0,3,-3],[3,3,-3],[3,0,-3] ])
And look at the result below:
image
If you are interested in graphics, augmented reality etc, you can use OpenGL to render more complicated figures.