OpenCV  4.5.5
Open Source Computer Vision
Using Orbbec Astra 3D cameras

Prev Tutorial: Using Kinect and other OpenNI compatible depth sensors

Next Tutorial: Using Creative Senz3D and other Intel RealSense SDK compatible depth sensors

Introduction

This tutorial is devoted to the Astra Series of Orbbec 3D cameras (https://orbbec3d.com/product-astra-pro/). That cameras have a depth sensor in addition to a common color sensor. The depth sensors can be read using the open source OpenNI API with cv::VideoCapture class. The video stream is provided through the regular camera interface.

Installation Instructions

In order to use the Astra camera's depth sensor with OpenCV you should do the following steps:

  1. Download the latest version of Orbbec OpenNI SDK (from here https://orbbec3d.com/develop/). Unzip the archive, choose the build according to your operating system and follow installation steps provided in the Readme file. For instance, if you use 64bit GNU/Linux run:
    $ cd Linux/OpenNI-Linux-x64-2.3.0.63/
    $ sudo ./install.sh
    When you are done with the installation, make sure to replug your device for udev rules to take effect. The camera should now work as a general camera device. Note that your current user should belong to group video to have access to the camera. Also, make sure to source OpenNIDevEnvironment file:
    $ source OpenNIDevEnvironment
  2. Run the following commands to verify that OpenNI library and header files can be found. You should see something similar in your terminal:
    $ echo $OPENNI2_INCLUDE
    /home/user/OpenNI_2.3.0.63/Linux/OpenNI-Linux-x64-2.3.0.63/Include
    $ echo $OPENNI2_REDIST
    /home/user/OpenNI_2.3.0.63/Linux/OpenNI-Linux-x64-2.3.0.63/Redist
    If the above two variables are empty, then you need to source OpenNIDevEnvironment again. Now you can configure OpenCV with OpenNI support enabled by setting the WITH_OPENNI2 flag in CMake. You may also like to enable the BUILD_EXAMPLES flag to get a code sample working with your Astra camera. Run the following commands in the directory containing OpenCV source code to enable OpenNI support:
    $ mkdir build
    $ cd build
    $ cmake -DWITH_OPENNI2=ON ..
    If the OpenNI library is found, OpenCV will be built with OpenNI2 support. You can see the status of OpenNI2 support in the CMake log:
    -- Video I/O:
    -- DC1394: YES (2.2.6)
    -- FFMPEG: YES
    -- avcodec: YES (58.91.100)
    -- avformat: YES (58.45.100)
    -- avutil: YES (56.51.100)
    -- swscale: YES (5.7.100)
    -- avresample: NO
    -- GStreamer: YES (1.18.1)
    -- OpenNI2: YES (2.3.0)
    -- v4l/v4l2: YES (linux/videodev2.h)
  3. Build OpenCV:
    $ make

Code

The Astra Pro camera has two sensors – a depth sensor and a color sensor. The depth sensor can be read using the OpenNI interface with cv::VideoCapture class. The video stream is not available through OpenNI API and is only provided via the regular camera interface. So, to get both depth and color frames, two cv::VideoCapture objects should be created:

39  // Open depth stream
40  VideoCapture depthStream(CAP_OPENNI2_ASTRA);
41  // Open color stream
42  VideoCapture colorStream(0, CAP_V4L2);
OpenNI2 (for Orbbec Astra)
Definition: videoio.hpp:116
Same as CAP_V4L.
Definition: videoio.hpp:94

The first object will use the OpenNI2 API to retrieve depth data. The second one uses the Video4Linux2 interface to access the color sensor. Note that the example above assumes that the Astra camera is the first camera in the system. If you have more than one camera connected, you may need to explicitly set the proper camera number.

Before using the created VideoCapture objects you may want to set up stream parameters by setting objects' properties. The most important parameters are frame width, frame height and fps. For this example, we’ll configure width and height of both streams to VGA resolution, which is the maximum resolution available for both sensors, and we’d like both stream parameters to be the same for easier color-to-depth data registration:

60  // Set color and depth stream parameters
61  colorStream.set(CAP_PROP_FRAME_WIDTH, 640);
62  colorStream.set(CAP_PROP_FRAME_HEIGHT, 480);
63  depthStream.set(CAP_PROP_FRAME_WIDTH, 640);
64  depthStream.set(CAP_PROP_FRAME_HEIGHT, 480);
65  depthStream.set(CAP_PROP_OPENNI2_MIRROR, 0);
Definition: videoio.hpp:302
Width of the frames in the video stream.
Definition: videoio.hpp:138
Height of the frames in the video stream.
Definition: videoio.hpp:139

For setting and retrieving some property of sensor data generators use cv::VideoCapture::set and cv::VideoCapture::get methods respectively, e.g. :

74  // Print depth stream parameters
75  cout << "Depth stream: "
76  << depthStream.get(CAP_PROP_FRAME_WIDTH) << "x" << depthStream.get(CAP_PROP_FRAME_HEIGHT)
77  << " @" << depthStream.get(CAP_PROP_FPS) << " fps" << endl;
Width of the frames in the video stream.
Definition: videoio.hpp:138
Height of the frames in the video stream.
Definition: videoio.hpp:139
Frame rate.
Definition: videoio.hpp:140

The following properties of cameras available through OpenNI interface are supported for the depth generator:

After the VideoCapture objects have been set up, you can start reading frames from them.

Note
OpenCV's VideoCapture provides synchronous API, so you have to grab frames in a new thread to avoid one stream blocking while another stream is being read. VideoCapture is not a thread-safe class, so you need to be careful to avoid any possible deadlocks or data races.

As there are two video sources that should be read simultaneously, it’s necessary to create two threads to avoid blocking. Example implementation that gets frames from each sensor in a new thread and stores them in a list along with their timestamps:

81  // Create two lists to store frames
82  std::list<Frame> depthFrames, colorFrames;
83  const std::size_t maxFrames = 64;
84 
85  // Synchronization objects
86  std::mutex mtx;
87  std::condition_variable dataReady;
88  std::atomic<bool> isFinish;
89 
90  isFinish = false;
91 
92  // Start depth reading thread
93  std::thread depthReader([&]
94  {
95  while (!isFinish)
96  {
97  // Grab and decode new frame
98  if (depthStream.grab())
99  {
100  Frame f;
101  f.timestamp = cv::getTickCount();
102  depthStream.retrieve(f.frame, CAP_OPENNI_DEPTH_MAP);
103  if (f.frame.empty())
104  {
105  cerr << "ERROR: Failed to decode frame from depth stream" << endl;
106  break;
107  }
108 
109  {
110  std::lock_guard<std::mutex> lk(mtx);
111  if (depthFrames.size() >= maxFrames)
112  depthFrames.pop_front();
113  depthFrames.push_back(f);
114  }
115  dataReady.notify_one();
116  }
117  }
118  });
119 
120  // Start color reading thread
121  std::thread colorReader([&]
122  {
123  while (!isFinish)
124  {
125  // Grab and decode new frame
126  if (colorStream.grab())
127  {
128  Frame f;
129  f.timestamp = cv::getTickCount();
130  colorStream.retrieve(f.frame);
131  if (f.frame.empty())
132  {
133  cerr << "ERROR: Failed to decode frame from color stream" << endl;
134  break;
135  }
136 
137  {
138  std::lock_guard<std::mutex> lk(mtx);
139  if (colorFrames.size() >= maxFrames)
140  colorFrames.pop_front();
141  colorFrames.push_back(f);
142  }
143  dataReady.notify_one();
144  }
145  }
146  });
Depth values in mm (CV_16UC1)
Definition: videoio.hpp:317
int64 getTickCount()
Returns the number of ticks.

VideoCapture can retrieve the following data:

  1. data given from the depth generator:
  2. data given from the color sensor is a regular BGR image (CV_8UC3).

When new data are available, each reading thread notifies the main thread using a condition variable. A frame is stored in the ordered list – the first frame in the list is the earliest captured, the last frame is the latest captured. As depth and color frames are read from independent sources two video streams may become out of sync even when both streams are set up for the same frame rate. A post-synchronization procedure can be applied to the streams to combine depth and color frames into pairs. The sample code below demonstrates this procedure:

150  // Pair depth and color frames
151  while (!isFinish)
152  {
153  std::unique_lock<std::mutex> lk(mtx);
154  while (!isFinish && (depthFrames.empty() || colorFrames.empty()))
155  dataReady.wait(lk);
156 
157  while (!depthFrames.empty() && !colorFrames.empty())
158  {
159  if (!lk.owns_lock())
160  lk.lock();
161 
162  // Get a frame from the list
163  Frame depthFrame = depthFrames.front();
164  int64 depthT = depthFrame.timestamp;
165 
166  // Get a frame from the list
167  Frame colorFrame = colorFrames.front();
168  int64 colorT = colorFrame.timestamp;
169 
170  // Half of frame period is a maximum time diff between frames
171  const int64 maxTdiff = int64(1000000000 / (2 * colorStream.get(CAP_PROP_FPS)));
172  if (depthT + maxTdiff < colorT)
173  {
174  depthFrames.pop_front();
175  continue;
176  }
177  else if (colorT + maxTdiff < depthT)
178  {
179  colorFrames.pop_front();
180  continue;
181  }
182  depthFrames.pop_front();
183  colorFrames.pop_front();
184  lk.unlock();
185 
187  // Show depth frame
188  Mat d8, dColor;
189  depthFrame.frame.convertTo(d8, CV_8U, 255.0 / 2500);
190  applyColorMap(d8, dColor, COLORMAP_OCEAN);
191  imshow("Depth (colored)", dColor);
192 
193  // Show color frame
194  imshow("Color", colorFrame.frame);
196 
197  // Exit on Esc key press
198  int key = waitKey(1);
199  if (key == 27) // ESC
200  {
201  isFinish = true;
202  break;
203  }
204  }
205  }
ocean
Definition: imgproc.hpp:4383
#define CV_8U
Definition: interface.h:73
void imshow(const String &winname, InputArray mat)
Displays an image in the specified window.
int64_t int64
Definition: interface.h:61
void applyColorMap(InputArray src, OutputArray dst, int colormap)
Applies a GNU Octave/MATLAB equivalent colormap on a given image.
Frame rate.
Definition: videoio.hpp:140
int waitKey(int delay=0)
Waits for a pressed key.

In the code snippet above the execution is blocked until there are some frames in both frame lists. When there are new frames, their timestamps are being checked – if they differ more than a half of the frame period then one of the frames is dropped. If timestamps are close enough, then two frames are paired. Now, we have two frames: one containing color information and another one – depth information. In the example above retrieved frames are simply shown with cv::imshow function, but you can insert any other processing code here.

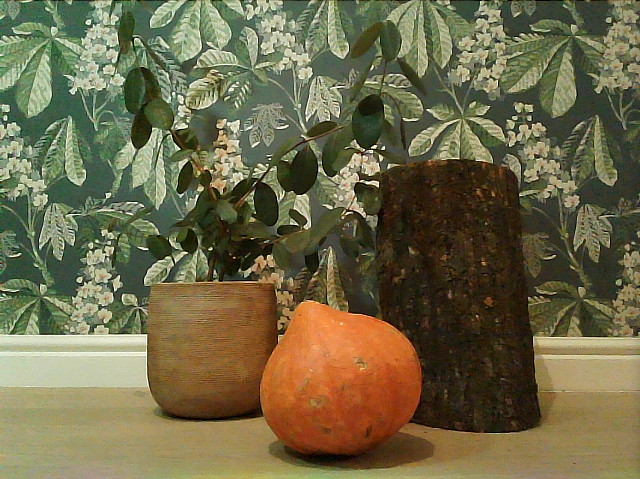
In the sample images below you can see the color frame and the depth frame representing the same scene. Looking at the color frame it's hard to distinguish plant leaves from leaves painted on a wall, but the depth data makes it easy.

astra_color.jpg
Color frame
astra_depth.png
Depth frame

The complete implementation can be found in orbbec_astra.cpp in samples/cpp/tutorial_code/videoio directory.