import java.awt.BorderLayout;
import java.awt.Container;
import java.awt.Image;
import java.util.Arrays;
import java.util.List;
import javax.swing.BoxLayout;
import javax.swing.ImageIcon;
import javax.swing.JFrame;
import javax.swing.JLabel;
import javax.swing.JPanel;
import javax.swing.JSlider;
import javax.swing.event.ChangeEvent;
import javax.swing.event.ChangeListener;
import org.opencv.core.Core;
import org.opencv.core.CvType;
import org.opencv.core.Mat;
import org.opencv.core.MatOfFloat;
import org.opencv.core.MatOfInt;
import org.opencv.core.Point;
import org.opencv.core.Scalar;
import org.opencv.highgui.HighGui;
import org.opencv.imgcodecs.Imgcodecs;
import org.opencv.imgproc.Imgproc;
class CalcBackProject1 {
private Mat hue;
private Mat histImg = new Mat();
private JFrame frame;
private JLabel imgLabel;
private JLabel backprojLabel;
private JLabel histImgLabel;
private static final int MAX_SLIDER = 180;
private int bins = 25;
public CalcBackProject1(
String[] args) {
if (args.length != 1) {
System.err.println("You must supply one argument that corresponds to the path to the image.");
System.exit(0);
}
Mat src = Imgcodecs.imread(args[0]);
if (src.empty()) {
System.err.println("Empty image: " + args[0]);
System.exit(0);
}
Mat hsv = new Mat();
Imgproc.cvtColor(src, hsv, Imgproc.COLOR_BGR2HSV);
hue = new Mat(hsv.size(), hsv.depth());
Core.mixChannels(Arrays.asList(hsv), Arrays.asList(hue), new MatOfInt(0, 0));
frame = new JFrame("Back Projection 1 demo");
frame.setDefaultCloseOperation(JFrame.EXIT_ON_CLOSE);
Image img = HighGui.toBufferedImage(src);
addComponentsToPane(frame.getContentPane(), img);
frame.pack();
frame.setVisible(true);
}
private void addComponentsToPane(Container pane, Image img) {
if (!(pane.getLayout() instanceof BorderLayout)) {
pane.add(new JLabel("Container doesn't use BorderLayout!"));
return;
}
JPanel sliderPanel = new JPanel();
sliderPanel.setLayout(new BoxLayout(sliderPanel, BoxLayout.PAGE_AXIS));
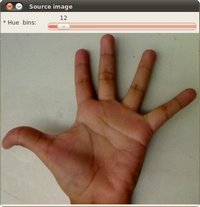
sliderPanel.add(new JLabel("* Hue bins: "));
JSlider slider = new JSlider(0, MAX_SLIDER, bins);
slider.setMajorTickSpacing(25);
slider.setMinorTickSpacing(5);
slider.setPaintTicks(true);
slider.setPaintLabels(true);
slider.addChangeListener(new ChangeListener() {
@Override
public void stateChanged(ChangeEvent e) {
JSlider source = (JSlider) e.getSource();
bins = source.getValue();
update();
}
});
sliderPanel.add(slider);
pane.add(sliderPanel, BorderLayout.PAGE_START);
JPanel imgPanel = new JPanel();
imgLabel = new JLabel(new ImageIcon(img));
imgPanel.add(imgLabel);
backprojLabel = new JLabel();
imgPanel.add(backprojLabel);
histImgLabel = new JLabel();
imgPanel.add(histImgLabel);
pane.add(imgPanel, BorderLayout.CENTER);
}
private void update() {
int histSize = Math.max(bins, 2);
float[] hueRange = {0, 180};
Mat hist = new Mat();
List<Mat> hueList = Arrays.asList(hue);
Imgproc.calcHist(hueList, new MatOfInt(0), new Mat(), hist, new MatOfInt(histSize), new MatOfFloat(hueRange), false);
Core.normalize(hist, hist, 0, 255, Core.NORM_MINMAX);
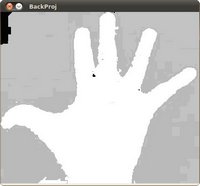
Mat backproj = new Mat();
Imgproc.calcBackProject(hueList, new MatOfInt(0), hist, backproj, new MatOfFloat(hueRange), 1);
Image backprojImg = HighGui.toBufferedImage(backproj);
backprojLabel.setIcon(new ImageIcon(backprojImg));
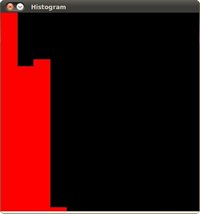
int w = 400, h = 400;
int binW = (int) Math.round((double) w / histSize);
histImg = Mat.zeros(h, w, CvType.CV_8UC3);
float[] histData = new float[(int) (hist.total() * hist.channels())];
hist.get(0, 0, histData);
for (int i = 0; i < bins; i++) {
Imgproc.rectangle(histImg,
new Point(i * binW, h),
new Point((i + 1) * binW, h - Math.round(histData[i] * h / 255.0)),
new Scalar(0, 0, 255), Imgproc.FILLED);
}
Image histImage = HighGui.toBufferedImage(histImg);
histImgLabel.setIcon(new ImageIcon(histImage));
frame.repaint();
frame.pack();
}
}
public class CalcBackProjectDemo1 {
public static void main(
String[] args) {
System.loadLibrary(Core.NATIVE_LIBRARY_NAME);
javax.swing.SwingUtilities.invokeLater(new Runnable() {
@Override
public void run() {
new CalcBackProject1(args);
}
});
}
}

 1.8.13