Prev Tutorial: Thresholding Operations using inRange
Next Tutorial: Adding borders to your images
Goal
In this tutorial you will learn how to:
- Use the OpenCV function filter2D() to create your own linear filters.
Theory
- Note
- The explanation below belongs to the book Learning OpenCV by Bradski and Kaehler.
Correlation
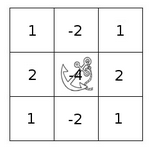
In a very general sense, correlation is an operation between every part of an image and an operator (kernel).
What is a kernel?
A kernel is essentially a fixed size array of numerical coefficients along with an anchor point in that array, which is typically located at the center.
How does correlation with a kernel work?
Assume you want to know the resulting value of a particular location in the image. The value of the correlation is calculated in the following way:
- Place the kernel anchor on top of a determined pixel, with the rest of the kernel overlaying the corresponding local pixels in the image.
- Multiply the kernel coefficients by the corresponding image pixel values and sum the result.
- Place the result to the location of the anchor in the input image.
- Repeat the process for all pixels by scanning the kernel over the entire image.
Expressing the procedure above in the form of an equation we would have:
\[H(x,y) = \sum_{i=0}^{M_{i} - 1} \sum_{j=0}^{M_{j}-1} I(x+i - a_{i}, y + j - a_{j})K(i,j)\]
Fortunately, OpenCV provides you with the function filter2D() so you do not have to code all these operations.
What does this program do?
- Loads an image
Performs a normalized box filter. For instance, for a kernel of size \(size = 3\), the kernel would be:
\[K = \dfrac{1}{3 \cdot 3} \begin{bmatrix} 1 & 1 & 1 \\ 1 & 1 & 1 \\ 1 & 1 & 1 \end{bmatrix}\]
The program will perform the filter operation with kernels of sizes 3, 5, 7, 9 and 11.
- The filter output (with each kernel) will be shown during 500 milliseconds
Code
The tutorial code's is shown in the lines below.
C++
You can also download it from here
int main ( int argc, char** argv )
{
double delta;
int ddepth;
int kernel_size;
const char* window_name = "filter2D Demo";
const char* imageName = argc >=2 ? argv[1] : "lena.jpg";
{
printf(" Error opening image\n");
printf(" Program Arguments: [image_name -- default lena.jpg] \n");
return EXIT_FAILURE;
}
anchor =
Point( -1, -1 );
delta = 0;
ddepth = -1;
int ind = 0;
for(;;)
{
kernel_size = 3 + 2*( ind%5 );
kernel =
Mat::ones( kernel_size, kernel_size,
CV_32F )/ (float)(kernel_size*kernel_size);
if( c == 27 )
{ break; }
ind++;
}
return EXIT_SUCCESS;
}
Java
You can also download it from here
import org.opencv.core.*;
import org.opencv.core.Point;
import org.opencv.highgui.HighGui;
import org.opencv.imgcodecs.Imgcodecs;
import org.opencv.imgproc.Imgproc;
class Filter2D_DemoRun {
public void run(
String[] args) {
Mat src, dst = new Mat();
Mat kernel = new Mat();
double delta;
int ddepth;
int kernel_size;
String window_name =
"filter2D Demo";
String imageName = ((args.length > 0) ? args[0] :
"../data/lena.jpg");
src = Imgcodecs.imread(imageName, Imgcodecs.IMREAD_COLOR);
if( src.empty() ) {
System.out.println("Error opening image!");
System.out.println("Program Arguments: [image_name -- default ../data/lena.jpg] \n");
System.exit(-1);
}
anchor =
new Point( -1, -1);
delta = 0.0;
ddepth = -1;
int ind = 0;
while( true )
{
kernel_size = 3 + 2*( ind%5 );
Mat ones = Mat.ones( kernel_size, kernel_size, CvType.CV_32F );
Core.multiply(ones,
new Scalar(1/(
double)(kernel_size*kernel_size)), kernel);
Imgproc.filter2D(src, dst, ddepth , kernel, anchor, delta, Core.BORDER_DEFAULT );
HighGui.imshow( window_name, dst );
int c = HighGui.waitKey(500);
if( c == 27 )
{ break; }
ind++;
}
System.exit(0);
}
}
public class Filter2D_Demo {
public static void main(
String[] args) {
System.loadLibrary(Core.NATIVE_LIBRARY_NAME);
new Filter2D_DemoRun().run(args);
}
}
Python
You can also download it from here
"""
@file filter2D.py
@brief Sample code that shows how to implement your own linear filters by using filter2D function
"""
import sys
import cv2 as cv
import numpy as np
def main(argv):
window_name = 'filter2D Demo'
imageName = argv[0] if len(argv) > 0 else 'lena.jpg'
if src is None:
print ('Error opening image!')
print ('Usage: filter2D.py [image_name -- default lena.jpg] \n')
return -1
ddepth = -1
ind = 0
while True:
kernel_size = 3 + 2 * (ind % 5)
kernel = np.ones((kernel_size, kernel_size), dtype=np.float32)
kernel /= (kernel_size * kernel_size)
if c == 27:
break
ind += 1
return 0
if __name__ == "__main__":
main(sys.argv[1:])
Explanation
Load an image
C++
const char* imageName = argc >=2 ? argv[1] : "lena.jpg";
if( src.empty() )
{
printf(" Error opening image\n");
printf(" Program Arguments: [image_name -- default lena.jpg] \n");
return EXIT_FAILURE;
}
Java
String imageName = ((args.length > 0) ? args[0] :
"../data/lena.jpg");
src = Imgcodecs.imread(imageName, Imgcodecs.IMREAD_COLOR);
if( src.empty() ) {
System.out.println("Error opening image!");
System.out.println("Program Arguments: [image_name -- default ../data/lena.jpg] \n");
System.exit(-1);
}
Python
imageName = argv[0] if len(argv) > 0 else 'lena.jpg'
if src is None:
print ('Error opening image!')
print ('Usage: filter2D.py [image_name -- default lena.jpg] \n')
return -1
Initialize the arguments
C++
anchor =
Point( -1, -1 );
delta = 0;
ddepth = -1;
Java
anchor =
new Point( -1, -1);
delta = 0.0;
ddepth = -1;
Python
Loop
Perform an infinite loop updating the kernel size and applying our linear filter to the input image. Let's analyze that more in detail:
- First we define the kernel our filter is going to use. Here it is:
C++
kernel_size = 3 + 2*( ind%5 );
kernel = Mat::ones( kernel_size, kernel_size,
CV_32F )/ (float)(kernel_size*kernel_size);
Java
kernel_size = 3 + 2*( ind%5 );
Mat ones = Mat.ones( kernel_size, kernel_size, CvType.CV_32F );
Core.multiply(ones,
new Scalar(1/(
double)(kernel_size*kernel_size)), kernel);
Python
kernel_size = 3 + 2 * (ind % 5)
kernel = np.ones((kernel_size, kernel_size), dtype=np.float32)
kernel /= (kernel_size * kernel_size)
The first line is to update the kernel_size to odd values in the range: \([3,11]\). The second line actually builds the kernel by setting its value to a matrix filled with \(1's\) and normalizing it by dividing it between the number of elements.
- After setting the kernel, we can generate the filter by using the function filter2D() :
C++
Java
Imgproc.filter2D(src, dst, ddepth , kernel, anchor, delta, Core.BORDER_DEFAULT );
Python
- The arguments denote:
- src: Source image
- dst: Destination image
- ddepth: The depth of dst. A negative value (such as \(-1\)) indicates that the depth is the same as the source.
- kernel: The kernel to be scanned through the image
- anchor: The position of the anchor relative to its kernel. The location Point(-1, -1) indicates the center by default.
- delta: A value to be added to each pixel during the correlation. By default it is \(0\)
- BORDER_DEFAULT: We let this value by default (more details in the following tutorial)
- Our program will effectuate a while loop, each 500 ms the kernel size of our filter will be updated in the range indicated.
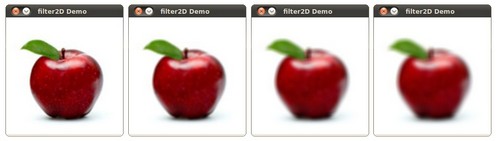
Results
- After compiling the code above, you can execute it giving as argument the path of an image. The result should be a window that shows an image blurred by a normalized filter. Each 0.5 seconds the kernel size should change, as can be seen in the series of snapshots below:
 1.8.12