|
OpenCV
3.4.9
Open Source Computer Vision
|
|
OpenCV
3.4.9
Open Source Computer Vision
|
I will show here how the bioinspired module can reproduce a well-known optical illusion that our eyes perceive in certain light condition: The Adelson checkerboard.
Looking at the checkerboard image below, human eyes perceive the "B" square lighter than the "A" square, although they are pictured in the very same RGB color. Of course in the physical world, checkerboard has a "B" square which is lighter than "A", but in this image the shadow of the green cylinder casting over the "B" square ends up in making the "A" and "B" squares actually having the same luminance.
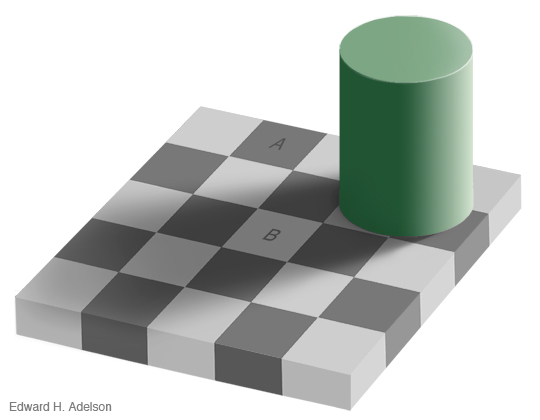
Our visual system does "compensate" for the shadow, making us perceive the "B" square lighter, as the shadow wouldn't be there. This is due to local adaptation process that is performed in the foveal area.
You may find the original Adelson's explanation here.
Proof: You can convince yourself by using an image manipulation program, cutting out a portion of the two squares, and looking at them without any background. You can also measure the RGB values of the two squares with the picker tool.
In this image I've cropped a little piece of the A and B squares and I've put them side-by-side. It should be quite evident they have the same luminance.

It's worth to know that this illusion works because the checkerboard image, as you may see it on your laptop, casts on your retina with dimensions that cause the retina local adaptation to take into account both the two squares at the same time.
The foveal vision area is something like one inch at one meter (and because your eye moves continuously, with the so called "saccades", your brain is able to reconstruct the entire color scene in real time). This means that one single letter, either A or B, can hit your fovea at any time.
The point is that, even if you can't see both letters at the same time in a single eye fixation, when looking at one letter your fovea also takes into account light information from what is around it. This means that the fovea actually perceives also the neighboring cells.
The net effect is that when looking at one area, your eye locally adapts to luminance, filters noise, enforces contours, etc. considering what surrounds this area, and this makes the illusion work. We say that the retina works in a "center surround" manner.
So, the "A" cell being surrounded by lighter cells can be perceived darker. As a comparison, cell "B" 's neighborhood is darker and the cell "B" is then perceived lighter.
Finally, since shadow edges are soft, retina eliminates this information. Then shadows do not disrupt the overall chessboard observation making possible to "confidently being fooled" by the perceived cells luminance.
The bioinspired module does mimic (also) the parvocellular retina process, that is our foveal vision, and it does reproduce our eyes' local adaptation.
This means we can expect the parvo channel output to really contain luminance values similar to those we perceive with our eyes. Specifically, in this case we expect the "B" square RGB values to be actually lighter than the "A" ones.
To correctly mimic what our eye does we need opencv to do the local adaptation on the right image portion. This means we have to ensure that the opencv's notion of "local" does match with our image's dimensions, otherwise the local adaptation wouldn't work as expected.
For this reason we may have to adjust the hcellsSpatialConstant parameter (that technically specifies the low spatial cut frequency, or slow luminance changes sensitivity) depending by the image resolution.
For the image in this tutorial, the default retina parameters should be fine.
In order to feed the image to the bioinspired module, you can use either your own code or the example_bioinspired_retinaDemo example that comes with the bioinspired module.
Running
will cause our image to be processed in both parvocellular and magnocellular channels (we are interested just in the first one).
If you choose to use your own code, please note that the parvocellular (and magnocellular) channel does require some iterations (frames to be processed) before actually getting steady.
Actually parvo (and magno) channel do cares about temporal information. That is, when you start feeding frames, it is similar to you with closed eyes; then you open them and you see the chessboard.
This is a static image but your retina just starts moving to a new context (eyes opening) and has to adapt.
While in this transient state the luminance information do matters, and you see more or less the absolute luminance values. Absolute luminance is exactly what you need not to look at in order to reproduce the illusion..
As soon as steady state is reached, you receive more contextual luminance information. Your eyes work in a center-surround manner and take into account the neighborhood luminance to evaluate the region of interest luminance level. And that's when our illusion comes out !
This is something that you don't need to worry about when you process videos, because you are naturally feeding the virtual retina with several frames, but you have to take care of it in order to process a single frame.
What you will actually need to do when processing a single frame, and you only need steady state response, is to repeatedly feed the retina with the same frame (this is what the example code does), as you would do with a still video. Alternatively you can set retina temporal parameters to 0 to get steady state immediately (photoreceptorsTemporalConstant and hcellsTemporalConstant parameters of the xml file); however in this case you should be aware that you are now making experiments with something that is deliberately less accurate in reproducing the behaviour of a real retina!
Here there is a small fragment of python code we used to process the image. It does 20 iterations. This is an arbitrary number that we found experimentally to be (more than) enough
Whatever method you used to process the image, you should end up with something like this:
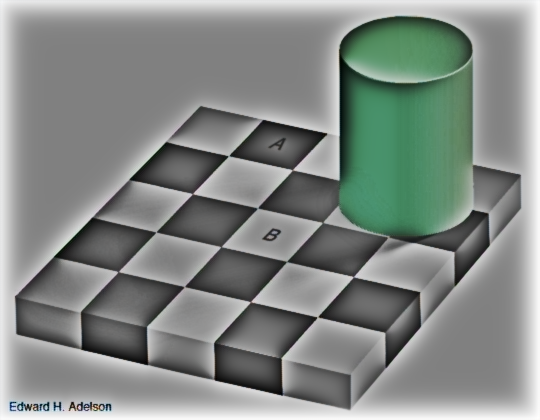
We expected that the "B" pixels in the parvo channel output are lighter than "A" ones.
.. And in fact that is!
Looking at the resulting image might not tell us so much at a first glance: the "B" square looks lighter than "A" to our eyes, as it did in the input image. The difference is that, contrarily to the input image, now the RGB values of the pixels are actually lighter; note that when looking at the output image, we are actually applying the parvocellular process two times: first in the bioinspired module, then in our eyes. We can convince ourselves that the illusion appeared in the computed image by measuring the squares' luminance with the image manipulation program and the picker tool, or by cropping pieces of the squares and putting them side-by-side.
In the following image I cropped a portion of square "A" and a portion of square "B", and I placed them side-by-side, as I did for the original Adelson image.

It should be quite evident that the "B" square is really lighter than the "A" square! Congratulations: you have just reproduced the Adelson illusion with the Bioinspired module!
I want to thank:
Alexandre Benoit - for being so kind of explaining me how this whole thing works, for giving me the opportunity of writing this tutorial, and for reviewing it.
Edward Adelson - for allowing me to freely use his checkerboard image.
Antonio Cuni - for reviewing this tutorial and for writing the Python code.
 1.8.13