Retina class overview
- Note
- do not forget that the retina model is included in the following namespace : cv::bioinspired with C++ and in cv.bioinspired with Python
Introduction
This class provides the main controls of the Gipsa/Listic labs human retina model. This is a non separable spatio-temporal filter modelling the two main retina information channels :
- foveal vision for detailed color vision : the parvocellular pathway.
- peripheral vision for sensitive transient signals detection (motion and events) : the magnocellular pathway.
This model originates from Jeanny Herault work [88] . It has been involved in Alexandre Benoit phd and his current research [13], [172] . He currently maintains this module within OpenCV. It includes the work of other Jeanny's phd student such as [40] and the log polar transformations of Barthelemy Durette described in Jeanny's book.
More into details here is an overview of the retina properties that are implemented here :
- regarding luminance and details enhancement :
- local logarithmic luminance compression (at the entry point by photoreceptors and at the output by ganglion cells).
- spectral whitening at the Outer Plexiform Layer level (photoreceptors and horizontal cells spatio-temporal filtering).
The former behavior compresses luminance range and allows very bright areas and very dark ones to be visible on the same picture with lots of details. The latter reduces low frequency luminance energy (mean luminance) and enhances mid-frequencies (details). Applied all together, retina well prepares visual signals prior high level analysis. Those properties are really interesting with videos where light changes are dramatically reduced with an interesting temporal consistency.
- regarding noise filtering :
- high frequency spatial and temporal noise is filtered out. Both outputs Parvo and Magno pathways benefit from this. Noise reduction benefits from the non separable spatio-temporal filtering.
- at the Parvo output, static textures are enhanced and noise is filtered (on videos, temporal noise is nicely removed). However, as human behaviors, moving textures are smoothed. Then, moving object details can be only enhanced if the retina tracks it and keeps it static from its point of view.
- at Magno output, it allows a cleaner detection of events (motion, changes) with reduced noise errors even in difficult lighting conditions. As a compromise, the Magno output is a low spatial frequency signal and allows events' blobs to be reliably extracted (check the TransientAreasSegmentationModule module for that).
Use
This model can be used as a preprocessing stage in the aim of :
- performing texture analysis with enhanced signal to noise ratio and enhanced details which are robust against input images luminance ranges (check out the parvocellular retina channel output, by using the provided getParvo methods)
- performing motion analysis that is also taking advantage of the previously cited properties (check out the magnocellular retina channel output, by using the provided getMagno methods)
- general image/video sequence description using either one or both channels. An example of the use of Retina in a Bag of Words approach is given in [172] .
- Note
- For ease of use in computer vision applications, the two retina channels are applied on all the input images. This does not follow the real retina topology but it is practical from an image processing point of view. If retina mapping (foveal and parafoveal vision) is required, use the log sampling capabilities proposed within the class.
- Please do not hesitate to contribute by extending the retina description, code, use cases for complementary explanations and demonstrations.
Use case illustrations
Image preprocessing using the Parvocellular pathway (parvo retina output)
As a preliminary presentation, let's start with a visual example. We propose to apply the filter on a low quality color jpeg image with backlight problems. Here is the considered input... *"Well,i could see more with my eyes than what i captured with my camera..."*
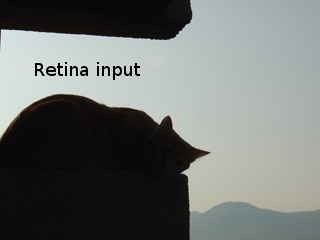
a low quality color jpeg image with backlight problems.
Below, the retina foveal model applied on the entire image with default parameters. Details are enforced whatever the local luminance is. Here there contours are strongly enforced but the noise level is kept low. Halo effects are voluntary visible with this configuration. See parameters discussion below and increase horizontalCellsGain near 1 to remove them.
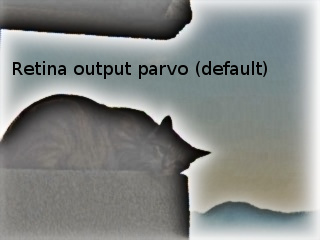
the retina foveal model applied on the entire image with default parameters. Here contours are enforced, luminance is corrected and halo effects are voluntary visible with this configuration, increase horizontalCellsGain near 1 to remove them.
Below, a second retina foveal model output applied on the entire image with a parameters setup focused on naturalness perception. *"Hey, i now recognize my cat, looking at the mountains at the
end of the day !"*. Here contours are enforced, luminance is corrected but halos are avoided with this configuration. The backlight effect is corrected and highlight details are still preserved. Then, even on a low quality jpeg image, if some luminance's information remains, the retina is able to reconstruct a proper visual signal. Such configuration is also useful for High Dynamic Range (HDR) images compression to 8bit images as discussed in [13] and in the demonstration codes discussed below. As shown at the end of the page, parameter changes from defaults are :
- horizontalCellsGain=0.3
- photoreceptorsLocalAdaptationSensitivity=ganglioncellsSensitivity=0.89.

the retina foveal model applied on the entire image with 'naturalness' parameters. Here contours are enforced but halo effects are avoided with this configuration, horizontalCellsGain is 0.3 and photoreceptorsLocalAdaptationSensitivity=ganglioncellsSensitivity=0.89.
As observed in this preliminary demo, the retina can be settled up with various parameters, by default, as shown on the figure above, the retina strongly reduces mean luminance energy and enforces all details of the visual scene. Luminance energy and halo effects can be modulated (exaggerated to cancelled as shown on the two examples). In order to use your own parameters, you can use at least one time the write(String fs) method which will write a proper XML file with all default parameters. Then, tweak it on your own and reload them at any time using method setup(String fs). These methods update a Retina::RetinaParameters member structure that is described hereafter. XML parameters file samples are shown at the end of the page.
Tone mapping processing capability using the Parvocellular pathway (parvo retina output)
This retina model naturally handles luminance range compression. Local adaptation stages and spectral whitening contribute to luminance range compression. In addition, high frequency noise that often corrupts tone mapped images is removed at early stages of the process thus leading to natural perception and noise free tone mapping.
Compared to the demos shown above, setup differences are the following ones: (see bioinspired/samples/OpenEXRimages_HDR_Retina_toneMapping.cpp for more details)
- load HDR images (OpenEXR format is supported by OpenCV) and cut histogram borders at ~5% and 95% to eliminate salt&pepper like pixel's corruption.
- apply retina with default parameters along with the following changes (generic parameters used for the presented illustrations of the section) :
- retina Hcells gain =0.4 (the main change compared to the default configuration : it strongly reduces halo effects)
- localAdaptation_photoreceptors=0.99 (a little higher than default value to enforce local adaptation)
- localAdaptation_Gcells=0.95 (also slightly higher than default for local adaptation enforcement)
- get the parvo output using the getParvo() method.
Have a look at the end of this page to see how to specify these parameters in a configuration file.
The following two illustrations show the effect of such configuration on 2 image samples.
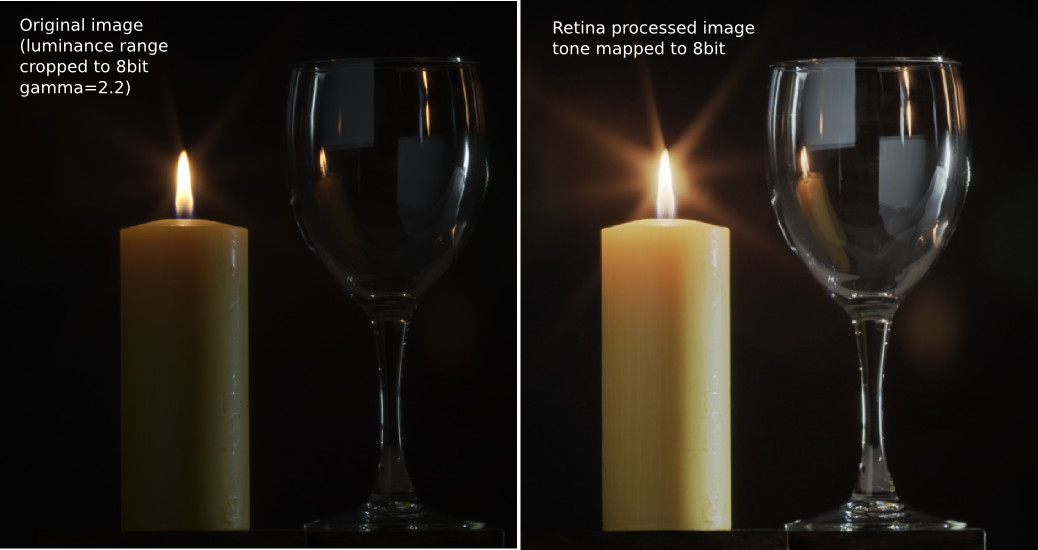
HDR image tone mapping example with generic parameters. Original image comes from http://openexr.com/ samples (openexr-images-1.7.0/ScanLines/CandleGlass.exr)
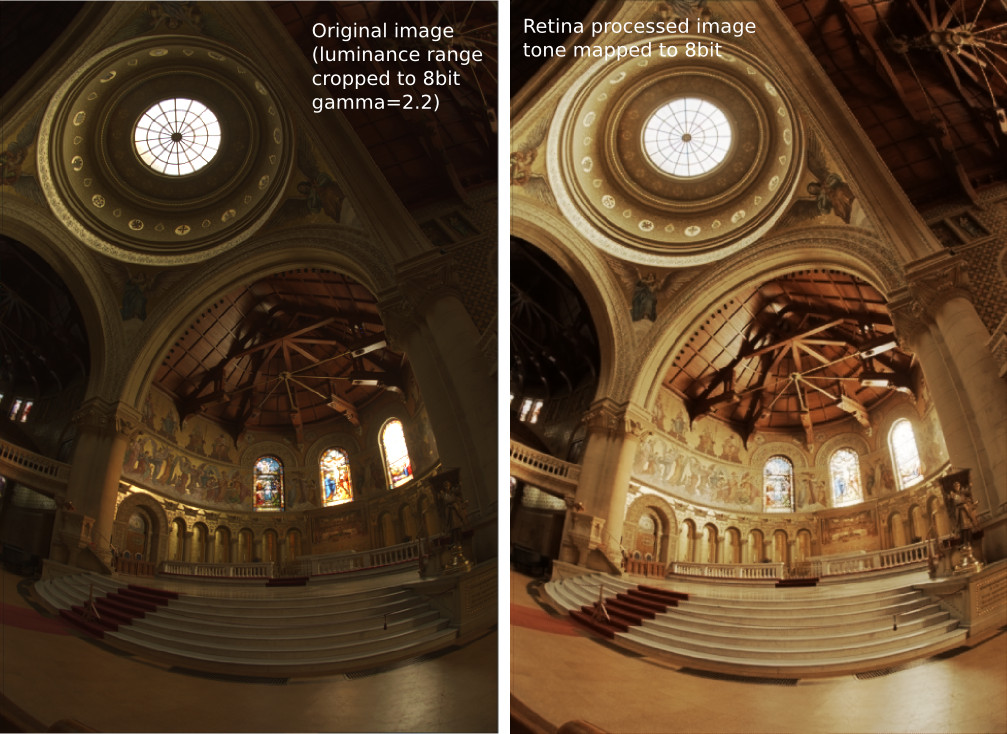
HDR image tone mapping example with the same generic parameters. Original image comes from http://www.pauldebevec.com/Research/HDR/memorial.exr)
Motion and event detection using the Magnocellular pathway (magno retina output)
Spatio-temporal events can be easily detected using magno output of the retina (use the getMagno() method). Its energy linearly increases with motion speed. An event blob detector is proposed with the TransientAreasSegmentationModule class also provided in the bioinspired module. The basic idea is to detect local energy drops with regard of the neighborhood and then to apply a threshold. Such process has been used in a bag of words description of videos on the TRECVid challenge [172] and only allows video frames description on transient areas.
We present here some illustrations of the retina outputs on some examples taken from http://changedetection.net/ with RGB and thermal videos.
- Note
- here, we use the default retina setup that generates halos around strong edges. Note that temporal constants allow a temporal effect to be visible on moting objects (useful for still image illustrations of a video). Halos can be removed by increasing retina Hcells gain while temporal effects can be reduced by decreasing temporal constant values. Also take into account that the two retina outputs are rescaled in range [0:255] such that magno output can show a lot of "noise" when nothing moves while drawing it. However, its energy remains low if you retrieve it using getMagnoRAW getter instead.
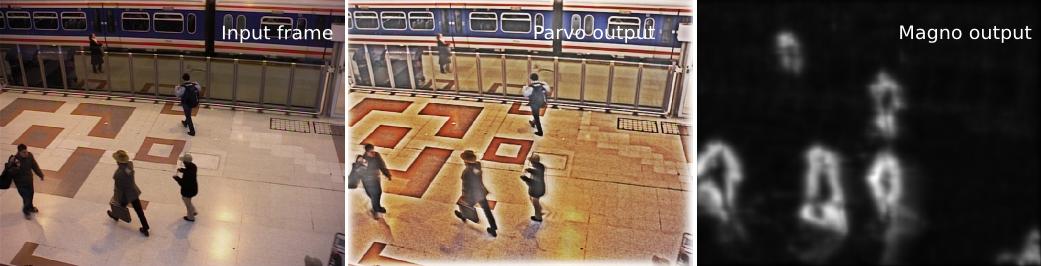
Retina processing on RGB image sequence : example from http://changedetection.net/ (baseline/PETS2006). Parvo enforces static signals but smooths moving persons since they do not remain static from its point of view. Magno channel highligths moving persons, observe the energy mapping on the one on top, partly behind a dark glass.
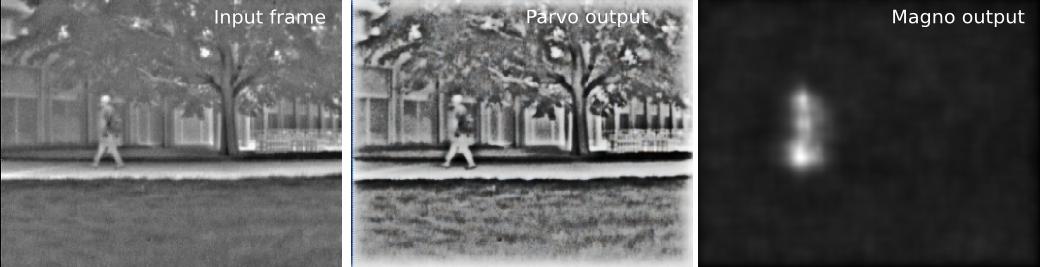
Retina processing on gray levels image sequence : example from http://changedetection.net/ (thermal/park). On such grayscale images, parvo channel enforces contrasts while magno strongly reacts on moving pedestrians
Literature
For more information, refer to the following papers :
- Model description : [13]
- Model use in a Bag of Words approach : [172]
- Please have a look at the reference work of Jeanny Herault that you can read in his book : [88]
This retina filter code includes the research contributions of phd/research collegues from which code has been redrawn by the author :
- take a look at the retinacolor.hpp module to discover Brice Chaix de Lavarene phD color mosaicing/demosaicing and his reference paper: [40]
- take a look at imagelogpolprojection.hpp to discover retina spatial log sampling which originates from Barthelemy Durette phd with Jeanny Herault. A Retina / V1 cortex projection is also proposed and originates from Jeanny's discussions. More informations in the above cited Jeanny Heraults's book.
- Meylan&al work on HDR tone mapping that is implemented as a specific method within the model : [130]
Retina programming interfaces
The proposed class allows the Gipsa (preliminary work) / Listic labs retina model to be used. It can be applied on still images, images sequences and video sequences.
Here is an overview of the Retina interface, allocate one instance with the createRetina functions (C++, Java, Python) :
namespace cv{
namespace bioinspired{
class Retina : public Algorithm
{
public:
struct RetinaParameters;
void setup (String retinaParameterFile=
"",
const bool applyDefaultSetupOnFailure=
true);
void setup (FileStorage &fs,
const bool applyDefaultSetupOnFailure=
true);
void setup (RetinaParameters newParameters);
virtual void write (String fs)
const;
virtual void write (FileStorage &fs)
const;
void setupOPLandIPLParvoChannel (
const bool colorMode=
true,
const bool normaliseOutput=
true,
const float photoreceptorsLocalAdaptationSensitivity=0.7,
const float photoreceptorsTemporalConstant=0.5,
const float photoreceptorsSpatialConstant=0.53,
const float horizontalCellsGain=0,
const float HcellsTemporalConstant=1,
const float HcellsSpatialConstant=7,
const float ganglionCellsSensitivity=0.7);
void setupIPLMagnoChannel (
const bool normaliseOutput=
true,
const float parasolCells_beta=0,
const float parasolCells_tau=0,
const float parasolCells_k=7,
const float amacrinCellsTemporalCutFrequency=1.2,
const float V0CompressionParameter=0.95,
const float localAdaptintegration_tau=0,
const float localAdaptintegration_k=7);
void setColorSaturation (
const bool saturateColors=
true,
const float colorSaturationValue=4.0);
};
cv::Ptr<Retina> createRetina (
Size inputSize,
const bool colorMode, RETINA_COLORSAMPLINGMETHOD colorSamplingMethod=
RETINA_COLOR_BAYER,
const bool useRetinaLogSampling=
false,
const double reductionFactor=1.0,
const double samplingStrenght=10.0);
}}
Setting up Retina
Managing the configuration file
When using the Retina::write and Retina::load methods, you create or load a XML file that stores Retina configuration.
The default configuration is presented below.
<?xml version="1.0"?>
<opencv_storage>
<OPLandIPLparvo>
<colorMode>1</colorMode>
<normaliseOutput>1</normaliseOutput>
<photoreceptorsLocalAdaptationSensitivity>7.5e-01</photoreceptorsLocalAdaptationSensitivity>
<photoreceptorsTemporalConstant>9.0e-01</photoreceptorsTemporalConstant>
<photoreceptorsSpatialConstant>5.7e-01</photoreceptorsSpatialConstant>
<horizontalCellsGain>0.01</horizontalCellsGain>
<hcellsTemporalConstant>0.5</hcellsTemporalConstant>
<hcellsSpatialConstant>7.</hcellsSpatialConstant>
<ganglionCellsSensitivity>7.5e-01</ganglionCellsSensitivity></OPLandIPLparvo>
<IPLmagno>
<normaliseOutput>1</normaliseOutput>
<parasolCells_beta>0.</parasolCells_beta>
<parasolCells_tau>0.</parasolCells_tau>
<parasolCells_k>7.</parasolCells_k>
<amacrinCellsTemporalCutFrequency>2.0e+00</amacrinCellsTemporalCutFrequency>
<V0CompressionParameter>9.5e-01</V0CompressionParameter>
<localAdaptintegration_tau>0.</localAdaptintegration_tau>
<localAdaptintegration_k>7.</localAdaptintegration_k></IPLmagno>
</opencv_storage>
Here are some words about all those parameters, tweak them as you wish to amplify or moderate retina effects (contours enforcement, halos effects, motion sensitivity, motion blurring, etc.)
Basic parameters
The simplest parameters are as follows :
- colorMode : let the retina process color information (if 1) or gray scale images (if 0). In that last case, only the first channels of the input will be processed.
- normaliseOutput : each channel has such parameter: if the value is set to 1, then the considered channel's output is rescaled between 0 and 255. Be aware at this case of the Magnocellular output level (motion/transient channel detection). Residual noise will also be rescaled !
Note : using color requires color channels multiplexing/demultipexing which also demands more processing. You can expect much faster processing using gray levels : it would require around 30 product per pixel for all of the retina processes and it has recently been parallelized for multicore architectures.
Photo-receptors parameters
The following parameters act on the entry point of the retina - photo-receptors - and has impact on all of the following processes. These sensors are low pass spatio-temporal filters that smooth temporal and spatial data and also adjust their sensitivity to local luminance,thus, leads to improving details extraction and high frequency noise canceling.
- photoreceptorsLocalAdaptationSensitivity between 0 and 1. Values close to 1 allow high luminance log compression's effect at the photo-receptors level. Values closer to 0 provide a more linear sensitivity. Increased alone, it can burn the Parvo (details channel) output image. If adjusted in collaboration with ganglionCellsSensitivity,images can be very contrasted whatever the local luminance there is... at the cost of a naturalness decrease.
- photoreceptorsTemporalConstant this setups the temporal constant of the low pass filter effect at the entry of the retina. High value leads to strong temporal smoothing effect : moving objects are blurred and can disappear while static object are favored. But when starting the retina processing, stable state is reached later.
- photoreceptorsSpatialConstant specifies the spatial constant related to photo-receptors' low pass filter's effect. Those parameters specify the minimum value of the spatial signal period allowed in what follows. Typically, this filter should cut high frequency noise. On the other hand, a 0 value cuts none of the noise while higher values start to cut high spatial frequencies, and progressively lower frequencies... Be aware to not go to high levels if you want to see some details of the input images ! A good compromise for color images is a 0.53 value since such choice won't affect too much the color spectrum. Higher values would lead to gray and blurred output images.
Horizontal cells parameters
This parameter set tunes the neural network connected to the photo-receptors, the horizontal cells. It modulates photo-receptors sensitivity and completes the processing for final spectral whitening (part of the spatial band pass effect thus favoring visual details enhancement).
- horizontalCellsGain here is a critical parameter ! If you are not interested with the mean luminance and want just to focus on details enhancement, then, set this parameterto zero. However, if you want to keep some environment luminance's data, let some low spatial frequencies pass into the system and set a higher value (<1).
- hcellsTemporalConstant similar to photo-receptors, this parameter acts on the temporal constant of a low pass temporal filter that smoothes input data. Here, a high value generates a high retina after effect while a lower value makes the retina more reactive. This value should be lower than photoreceptorsTemporalConstant to limit strong retina after effects.
- hcellsSpatialConstant is the spatial constant of these cells filter's low pass one. It specifies the lowest spatial frequency allowed in what follows. Visually, a high value leads to very low spatial frequencies processing and leads to salient halo effects. Lower values reduce this effect but has the limit of not go lower than the value of photoreceptorsSpatialConstant. Those 2 parameters actually specify the spatial band-pass of the retina.
NOTE Once the processing managed by the previous parameters is done, input data is cleaned from noise and luminance is already partly enhanced. The following parameters act on the last processing stages of the two outing retina signals.
Parvo (details channel) dedicated parameter
- ganglionCellsSensitivity specifies the strength of the final local adaptation occurring at the output of this details' dedicated channel. Parameter values remain between 0 and 1. Low value tend to give a linear response while higher values enforce the remaining low contrasted areas.
Note : this parameter can correct eventual burned images by favoring low energetic details of the visual scene, even in bright areas.
IPL Magno (motion/transient channel) parameters
Once image's information are cleaned, this channel acts as a high pass temporal filter that selects only the signals related to transient signals (events, motion, etc.). A low pass spatial filter smoothes extracted transient data while a final logarithmic compression enhances low transient events thus enhancing event sensitivity.
- parasolCells_beta generally set to zero, can be considered as an amplifier gain at the entry point of this processing stage. Generally set to 0.
- parasolCells_tau the temporal smoothing effect that can be added
- parasolCells_k the spatial constant of the spatial filtering effect, set it at a high value to favor low spatial frequency signals that are lower subject for residual noise.
- amacrinCellsTemporalCutFrequency specifies the temporal constant of the high pass filter. High values let slow transient events to be selected.
- V0CompressionParameter specifies the strength of the log compression. Similar behaviors to previous description but here enforces sensitivity of transient events.
- localAdaptintegration_tau generally set to 0, has no real use actually in here.
- localAdaptintegration_k specifies the size of the area on which local adaptation is performed. Low values lead to short range local adaptation (higher sensitivity to noise), high values secure log compression.
Demos and experiments !
First time experiments
Here are some code snippets to shortly show how to use Retina with default parameters (with halo effects). Next section redirects to more complete demos provided with the main retina class.
Here is presented how to process a webcam stream with the following steps :
- load a frist input image to get its size
- allocate a retina instance with appropriate input size
- loop over grabbed frames :
- grab a new frame
- run on a frame
- call the two output getters
- display retina outputs
C++ version (see bioinspired/samples/basicRetina.cpp) :
#include <iostream>
int main(int argc, char* argv[]) {
videoCapture>>inputFrame;
myRetina->
write(
"RetinaDefaultParameters.xml");
myRetina->
setup(
"RetinaSpecificParameters.xml");
while(true){
if (videoCapture.isOpened())
videoCapture>>inputFrame;
else
break;
imshow(
'input frame', inputImage)
myRetina->run(inputFrame);
myRetina->getParvo(retinaOutput_parvo);
myRetina->getMagno(retinaOutput_magno);
cv::
imshow("Retina Parvo", retinaOutput_parvo);
cv::
imshow("Retina Magno", retinaOutput_magno);
}
}
Compile this C++ code with the following command :
// compile
g++ basicRetina.cpp -o basicRetina -lopencv_core -lopencv_highgui -lopencv_bioinspired -lopencv_videoio -lopencv_imgcodecs
Python version
import cv2 as cv
succeed, inputImage=videoHandler.read()
retina = cv.bioinspired.createRetina((inputImage.shape[1], inputImage.shape[0]))
retina.write('retinaParams.xml')
retina.setup('retinaParams.xml')
stillProcess=True
while stillProcess is True:
stillProcess, inputImage=videoHandler.read()
retina.run(inputImage)
retinaOut_parvo=retina.getParvo()
retinaOut_magno=retina.getMagno()
cv.imshow(
'retina parvo out', retinaOut_parvo)
cv.imshow(
'retina magno out', retinaOut_magno)
More complete demos
- Note
- Complementary to the following examples, have a look at the Retina tutorial in the tutorial/contrib section for complementary explanations.**
Take a look at the provided C++ examples provided with OpenCV :
samples/cpp/retinademo.cpp shows how to use the retina module for details enhancement (Parvo channel output) and transient maps observation (Magno channel output). You can play with images, video sequences and webcam video. Typical uses are (provided your OpenCV installation is situated in folder OpenCVReleaseFolder)
- image processing : OpenCVReleaseFolder/bin/retinademo -image myPicture.jpg
- video processing : OpenCVReleaseFolder/bin/retinademo -video myMovie.avi
- webcam processing: OpenCVReleaseFolder/bin/retinademo -video
- Note
- This demo generates the file RetinaDefaultParameters.xml which contains the default parameters of the retina. Then, rename this as RetinaSpecificParameters.xml, adjust the parameters the way you want and reload the program to check the effect.
samples/cpp/OpenEXRimages_HDR_Retina_toneMapping.cpp shows how to use the retina to perform High Dynamic Range (HDR) luminance compression
Then, take a HDR image using bracketing with your camera and generate an OpenEXR image and then process it using the demo.
Typical use, assuming that you have the OpenEXR image such as memorial.exr (present in the samples/cpp/ folder)
OpenCVReleaseFolder/bin/OpenEXRimages_HDR_Retina_toneMapping memorial.exr [optional: 'fast']
Note that some sliders are made available to allow you to play with luminance compression.
If not using the 'fast' option, then, tone mapping is performed using the full retina model [13] . It includes spectral whitening that allows luminance energy to be reduced. When using the 'fast' option, a simpler method is used, it is an adaptation of the algorithm presented in [130] . This method also gives good results and it is faster to process but it sometimes requires some more parameters adjustement.
 1.8.12