Using Android binary package with Eclipse
This tutorial was tested using Ubuntu 10.04 and Windows 7 SP1 operating systems. Nevertheless, it should also work on any other OSes supported by Android SDK (including Mac OS X). If you encounter errors after following the steps described here, feel free to contact us via OpenCV4Android discussion group or OpenCV Q&A forum and we will try to help you.
Quick environment setup for Android development
If you are making a clean environment installation then you can try Tegra Android Development Pack (TADP) released by NVIDIA:
It will cover all of the environment set up automatically and you can go to the next step Get the OpenCV package for Android development right after automatic setup.
If you are a beginner in Android development then we recommend you to start with TADP.
Note
NVIDIA‘s Tegra Android Development Pack includes some special features for NVIDIA’s Tegra platform but it is not just for Tegra devices
- You need at least 1.6 Gb free disk space for installation.
- TADP will download Android SDK platforms and Android NDK from Google’s server, so you need an Internet connection for the installation.
- TADP can ask you to flash your development kit at the end of installation process. Just skip this step if you have no Tegra Ventana Development Kit.
- (UNIX) TADP will ask you for a root in the middle of installation, so you need to be a member of sudo group.
Manual environment setup for Android Development
You need the following tools to be installed:
Sun JDK 6
Visit Java SE Downloads page and download installer for your OS.
Here is a detailed JDK installation guide for Ubuntu and Mac OS (only JDK sections are applicable for OpenCV)
Note
OpenJDK is not usable for Android development because Android SDK supports only Sun JDK. If you use Ubuntu, after installation of Sun JDK you should run the following command to set Sun java environment:
sudo update-java-alternatives --set java-6-sun
Android SDK
Get the latest Android SDK from http://developer.android.com/sdk/index.html
Here is Google’s install guide for SDK.
Note
If you choose SDK packed into Windows installer, then you should have 32-bit JRE installed. It is not needed for Android development, but installer is x86 application and requires 32-bit Java runtime.
Note
If you are running x64 version of Ubuntu Linux, then you need ia32 shared libraries for use on amd64 and ia64 systems to be installed. You can install them with the following command:
sudo apt-get install ia32-libs
For Red Hat based systems the following command might be helpful:
sudo yum install libXtst.i386
Android SDK components
You need the following SDK components to be installed:
Android SDK Tools, revision14 or newer
Older revisions should also work, but they are not recommended.
SDK Platform Android 3.0, API 11 (also known as android-11)
The minimal platform supported by OpenCV Java API is Android 2.2 (API 8). This is also the minimum API Level required for the provided samples to run. See the <uses-sdk android:minSdkVersion="8"/> tag in their AndroidManifest.xml files. But for successful compilation of some samples the target platform should be set to Android 3.0 (API 11) or higher. It will not block them from running on Android 2.2+.
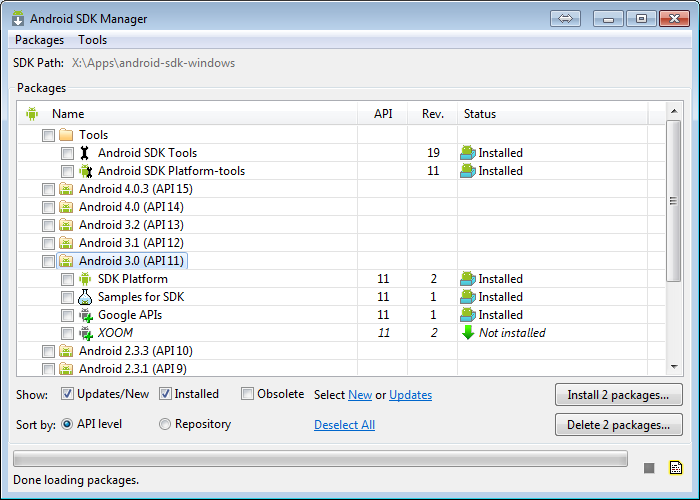
See Adding SDK Components for help with installing/updating SDK components.
Eclipse IDE
Check the Android SDK System Requirements document for a list of Eclipse versions that are compatible with the Android SDK. For OpenCV 2.4.x we recommend Eclipse 3.7 (Indigo) or later versions. They work well for OpenCV under both Windows and Linux.
If you have no Eclipse installed, you can get it from the download page.
ADT plugin for Eclipse
This instruction is copied from Android Developers site. Please, visit that page if you have any troubles with ADT plugin installation.
Assuming that you have Eclipse IDE installed, as described above, follow these steps to download and install the ADT plugin:
Start Eclipse, then select Help ‣ Install New Software...
Click Add (in the top-right corner).
In the Add Repository dialog that appears, enter “ADT Plugin” for the Name and the following URL for the Location:
Click OK
Note
If you have trouble acquiring the plugin, try using “http” in the Location URL, instead of “https” (https is preferred for security reasons).
In the Available Software dialog, select the checkbox next to Developer Tools and click Next.
In the next window, you’ll see a list of the tools to be downloaded. Click Next.
Read and accept the license agreements, then click Finish.
Note
If you get a security warning saying that the authenticity or validity of the software can’t be established, click OK.
When the installation completes, restart Eclipse.
Get the OpenCV package for Android development
Go to the OpenCV dowload page on SourceForge and download the latest available version. Currently it is OpenCV-2.4.2-android-sdk.zip
Create new folder for Android+OpenCV development. For this tutorial I have unpacked OpenCV to the C:\Work\android-opencv\ directory.
Note
Better to use a path without spaces in it. Otherwise you will probably have problems with ndk-build.
Unpack the OpenCV package into that dir.
You can unpack it using any popular archiver (for example with 7-Zip):

On Unix you can use the following command:
unzip ~/Downloads/OpenCV-2.4.2-android-sdk.zip
Open OpenCV library and samples in Eclipse
Start the Eclipse and choose your workspace location.
I recommend to start familiarizing yourself with OpenCV for Android from a new clean workspace. So I have chosen my OpenCV package directory for the new workspace:

Configure your ADT plugin (if needed)
Important
In most cases the ADT plugin finds Android SDK automatically, but sometimes it fails and shows the following prompt:
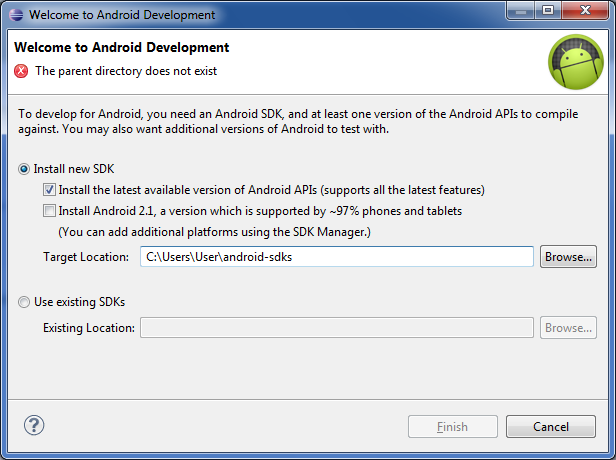
Select Use existing SDKs option, browse for Android SDK folder and click Finish.
To make sure the SDK folder is set correctly do the following step taken from Configuring the ADT Plugin document from Google:
Select Window ‣ Preferences... to open the Preferences panel (Mac OS X: Eclipse ‣ Preferences):

Select Android from the left panel.
You may see a dialog asking whether you want to send usage statistics to Google. If so, make your choice and click Proceed. You cannot continue with this procedure until you click Proceed.
If the SDK folder isn’t set you’ll see the following:

- For the SDK Location in the main panel, click Browse... and locate your Android SDK directory.
- Click Apply button at the bottom right corner of main panel.
If the SDK folder is already set correctly you’ll see something like this:

- Click OK to close preferences dialog.
Import OpenCV and samples into workspace.
OpenCV library is packed as a ready-for-use Android Library Project. You can simply reference it in your projects.
Each sample included into the OpenCV-2.4.2-android-sdk.zip is a regular Android project that already references OpenCV library. Follow the steps below to import OpenCV and samples into the workspace:
Right click on the Package Explorer window and choose Import... option from the context menu:

In the main panel select General ‣ Existing Projects into Workspace and press Next button:

For the Select root directory in the main panel locate your OpenCV package folder. (If you have created workspace in the package directory, then just click Browse... button and instantly close directory choosing dialog with OK button!) Eclipse should automatically locate OpenCV library and samples:

Click Finish button to complete the import operation.
After clicking Finish button Eclipse will load all selected projects into workspace. And... will indicate numerous errors:

However all these errors are only false-alarms!
To help Eclipse to understand that there are no any errors choose OpenCV library in Package Explorer (left mouse click) and press F5 button on your keyboard. Then choose any sample (except first samples in Tutorial Base and Tutorial Advanced) and also press F5.
In some cases these errors disappear after Project ‣ Clean... ‣ Clean all ‣ OK.
Sometimes more advanced manipulations are needed:
The provided projects are configured for android-11 target that can be missing platform in your Android SDK. After right click on any project select Properties and then Android on the left pane. Click some target with API Level 11 or higher:

After this manipulation Eclipse will rebuild your workspace and error icons will disappear one after another:

Once Eclipse completes build you will have the clean workspace without any build errors:

Running OpenCV Samples
At this point you should be able to build and run all samples except the last two (Tutorial 3 and 4). These samples include native code and require Android NDK to build working applications, see the next tutorial Using C++ OpenCV code with Android binary package to learn how to compile them.
Also I want to note that only Tutorial 0 - Android Camera and Tutorial 1 - Add OpenCV samples are able to run on Emulator from the Android SDK. Other samples are using OpenCV Native Camera which does not work with emulator.
Note
Latest Android SDK tools, revision 19 can run ARM v7a OS images but Google provides such image for Android 4.x only.
Well, running samples from Eclipse is very simple:
Connect your device with adb tool from Android SDK or create Emulator with camera support.
- See Managing Virtual Devices document for help with Android Emulator.
- See Using Hardware Devices for help with real devices (not emulators).
Select project you want to start in Package Explorer and just press Ctrl + F11 or select option Run ‣ Run from the main menu, or click Run button on the toolbar.
Note
Android Emulator can take several minutes to start. So, please, be patient.
On the first run Eclipse will ask you about the running mode for your application:

Select the Android Application option and click OK button. Eclipse will install and run the sample.
Here is Tutorial 1 - Add OpenCV sample detecting edges using Canny algorithm from OpenCV:

How to use OpenCV library project in your application
In this section we will explain how to make some existing application to use OpenCV. Starting from 2.4.2 release on Android so-called “OpenCV Manager” is used for providing applications with the best version of OpenCV. You can get more information here: Android OpenCV Manager.
Application development with async initialization
Using async initialization is a preferred way for application development. It uses OpenCV Manager Android service to get OpenCV libraries.
Add OpenCV library project to your workspace. Go to File –> Import –> Existing project in your workspace, push Browse button and select OpenCV SDK path.

In application project add reference to OpenCV Java SDK in Project –> Properties –> Android –> Library –> Add select OpenCV Library - 2.4.2;

If you want to use OpenCV Manager-based approach you need to install packages with the Service and OpenCV package for you platform. You can do it using Google Play service or manually with adb tool:
1 2 | adb install ./org.opencv.engine.apk
adb install ./org.opencv.lib_v24_<hardware version>.apk
|
There is a very base code snippet for Async init. It shows only basis principles of library Initiation. See the “15-puzzle” OpenCV sample for details.
1 2 3 4 5 6 7 8 9 10 11 12 13 14 15 16 17 18 19 20 21 22 23 24 25 26 27 28 29 30 31 32 33 34 35 36 37 | public class MyActivity extends Activity implements HelperCallbackInterface
{
private BaseLoaderCallback mOpenCVCallBack = new BaseLoaderCallback(this) {
@Override
public void onManagerConnected(int status) {
switch (status) {
case LoaderCallbackInterface.SUCCESS:
{
Log.i(TAG, "OpenCV loaded successfully");
// Create and set View
mView = new puzzle15View(mAppContext);
setContentView(mView);
} break;
default:
{
super.onManagerConnected(status);
} break;
}
}
};
/** Called when the activity is first created. */
@Override
public void onCreate(Bundle savedInstanceState)
{
Log.i(TAG, "onCreate");
super.onCreate(savedInstanceState);
Log.i(TAG, "Trying to load OpenCV library");
if (!OpenCVLoader.initAsync(OpenCVLoader.OPENCV_VERSION_2_4_2, this, mOpenCVCallBack))
{
Log.e(TAG, "Cannot connect to OpenCV Manager");
}
}
// ...
}
|
It this case application works with OpenCV Manager in asynchronous fashion. OnManagerConnected callback will be called in UI thread, when initialization finishes. Please note, that it is not allowed to use OpenCV calls or load OpenCV-dependent native libs before invoking this callback. Load your own native libraries after OpenCV initialization.
Application development with static initialization
According to this approach all OpenCV binaries are linked and put to your application package. It is designed mostly for development purposes. This way is deprecated for the production code, release package should communicate with OpenCV Manager, use the async initialization described above.
Add OpenCV library project to your workspace. Go to File –> Import –> Existing project in your workspace, push Browse button and select OpenCV SDK path.
In application project add reference to OpenCV Java SDK in Project –> Properties –> Android –> Library –> Add select OpenCV Library - 2.4.2;
Copy native libs to your project directory to folder libs/target_arch/.
After adding depedency from OpenCV library project, Eclipse will automatically copy all needed libraries to the application package. To use OpenCV functionality you need to add OpenCV library initialization code before using any OpenCV specific code, for example, to the static section of Activity class.
1 2 3 4 5 | static {
if (!OpenCVLoader.initDebug()) {
// Report initialization error
}
}
|
If you application includes other OpenCV-dependent native libraries you need to init OpenCV before them.
1 2 3 4 5 6 7 8 | static {
if (OpenCVLoader.initDebug()) {
System.loadLibrary("my_super_lib1");
System.loadLibrary("my_super_lib2");
} else {
// Report initialization error
}
}
|
Whats next?
Read the Using C++ OpenCV code with Android binary package tutorial to learn how to add native OpenCV code to your Android project.
Help and Feedback
You did not find what you were looking for?- Ask a question in the user group/mailing list.
- If you think something is missing or wrong in the documentation, please file a bug report.
![]()
Table Of Contents
- Using Android binary package with Eclipse
Previous topic
How to build applications with OpenCV inside the Microsoft Visual Studio
Next topic
Using C++ OpenCV code with Android binary package