Goal
In this tutorial you will learn how to:
- Access pixel values
- Initialize a matrix with zeros
- Learn what cv::saturate_cast does and why it is useful
- Get some cool info about pixel transformations
Theory
- Note
- The explanation below belongs to the book Computer Vision: Algorithms and Applications by Richard Szeliski
Image Processing
- A general image processing operator is a function that takes one or more input images and produces an output image.
- Image transforms can be seen as:
- Point operators (pixel transforms)
- Neighborhood (area-based) operators
Pixel Transforms
- In this kind of image processing transform, each output pixel's value depends on only the corresponding input pixel value (plus, potentially, some globally collected information or parameters).
- Examples of such operators include brightness and contrast adjustments as well as color correction and transformations.
Brightness and contrast adjustments
Two commonly used point processes are multiplication and addition with a constant:
\[g(x) = \alpha f(x) + \beta\]
- The parameters \(\alpha > 0\) and \(\beta\) are often called the gain and bias parameters; sometimes these parameters are said to control contrast and brightness respectively.
You can think of \(f(x)\) as the source image pixels and \(g(x)\) as the output image pixels. Then, more conveniently we can write the expression as:
\[g(i,j) = \alpha \cdot f(i,j) + \beta\]
where \(i\) and \(j\) indicates that the pixel is located in the i-th row and j-th column.
Code
- The following code performs the operation \(g(i,j) = \alpha \cdot f(i,j) + \beta\) :
#include <opencv2/opencv.hpp>
#include <iostream>
using namespace cv;
double alpha;
int beta;
int main(
int argc,
char** argv )
{
std::cout<<" Basic Linear Transforms "<<std::endl;
std::cout<<"-------------------------"<<std::endl;
std::cout<<"* Enter the alpha value [1.0-3.0]: ";std::cin>>alpha;
std::cout<<"* Enter the beta value [0-100]: "; std::cin>>beta;
for(
int y = 0; y < image.
rows; y++ ) {
for(
int x = 0; x < image.
cols; x++ ) {
for( int c = 0; c < 3; c++ ) {
}
}
}
imshow(
"Original Image", image);
imshow(
"New Image", new_image);
return 0;
}
Explanation
- We begin by creating parameters to save \(\alpha\) and \(\beta\) to be entered by the user:
- We load an image using cv::imread and save it in a Mat object:
Mat image =
imread( argv[1] );
- Now, since we will make some transformations to this image, we need a new Mat object to store it. Also, we want this to have the following features:
- Initial pixel values equal to zero
- Same size and type as the original image
Mat new_image = Mat::zeros( image.size(), image.type() );
- Now, to perform the operation \(g(i,j) = \alpha \cdot f(i,j) + \beta\) we will access to each pixel in image. Since we are operating with RGB images, we will have three values per pixel (R, G and B), so we will also access them separately. Here is the piece of code:
for( int y = 0; y < image.rows; y++ ) {
for( int x = 0; x < image.cols; x++ ) {
for( int c = 0; c < 3; c++ ) {
new_image.at<
Vec3b>(y,x)[c] =
}
}
}
- To access each pixel in the images we are using this syntax: image.at<Vec3b>(y,x)[c] where y is the row, x is the column and c is R, G or B (0, 1 or 2).
- Since the operation \(\alpha \cdot p(i,j) + \beta\) can give values out of range or not integers (if \(\alpha\) is float), we use cv::saturate_cast to make sure the values are valid.
- Finally, we create windows and show the images, the usual way.
imshow(
"Original Image", image);
imshow(
"New Image", new_image);
- Note
- Instead of using the for loops to access each pixel, we could have simply used this command:
image.convertTo(new_image, -1, alpha, beta);
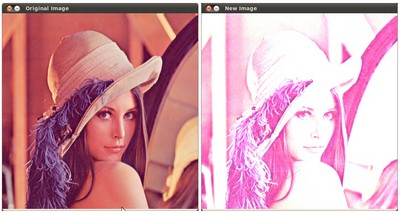
Result
- Running our code and using \(\alpha = 2.2\) and \(\beta = 50\)
$ ./BasicLinearTransforms lena.jpg
Basic Linear Transforms
-------------------------
* Enter the alpha value [1.0-3.0]: 2.2
* Enter the beta value [0-100]: 50
We get this:


 1.8.7
1.8.7