Table of Contents
Whenever you hear the term face recognition, you instantly think of surveillance in videos. So performing face recognition in videos (e.g. webcam) is one of the most requested features I have got. I have heard your cries, so here it is. An application, that shows you how to do face recognition in videos! For the face detection part we’ll use the awesome CascadeClassifier and we’ll use FaceRecognizer for face recognition. This example uses the Fisherfaces method for face recognition, because it is robust against large changes in illumination.
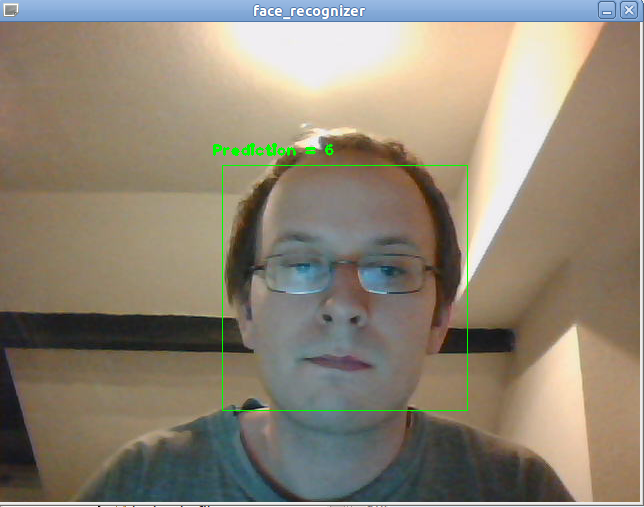
Here is what the final application looks like. As you can see I am only writing the id of the recognized person above the detected face (by the way this id is Arnold Schwarzenegger for my data set):

This demo is a basis for your research and it shows you how to implement face recognition in videos. You probably want to extend the application and make it more sophisticated: You could combine the id with the name, then show the confidence of the prediction, recognize the emotion... and and and. But before you send mails, asking what these Haar-Cascade thing is or what a CSV is: Make sure you have read the entire tutorial. It’s all explained in here. If you just want to scroll down to the code, please note:
I encourage you to experiment with the application. Play around with the available FaceRecognizer implementations, try the available cascades in OpenCV and see if you can improve your results!
You want to do face recognition, so you need some face images to learn a FaceRecognizer on. I have decided to reuse the images from the gender classification example: Gender Classification with OpenCV.
I have the following celebrities in my training data set:
In the demo I have decided to read the images from a very simple CSV file. Why? Because it’s the simplest platform-independent approach I can think of. However, if you know a simpler solution please ping me about it. Basically all the CSV file needs to contain are lines composed of a filename followed by a ; followed by the label (as integer number), making up a line like this:
/path/to/image.ext;0
Let’s dissect the line. /path/to/image.ext is the path to an image, probably something like this if you are in Windows: C:/faces/person0/image0.jpg. Then there is the separator ; and finally we assign a label 0 to the image. Think of the label as the subject (the person, the gender or whatever comes to your mind). In the face recognition scenario, the label is the person this image belongs to. In the gender classification scenario, the label is the gender the person has. So my CSV file looks like this:
/home/philipp/facerec/data/c/keanu_reeves/keanu_reeves_01.jpg;0
/home/philipp/facerec/data/c/keanu_reeves/keanu_reeves_02.jpg;0
/home/philipp/facerec/data/c/keanu_reeves/keanu_reeves_03.jpg;0
...
/home/philipp/facerec/data/c/katy_perry/katy_perry_01.jpg;1
/home/philipp/facerec/data/c/katy_perry/katy_perry_02.jpg;1
/home/philipp/facerec/data/c/katy_perry/katy_perry_03.jpg;1
...
/home/philipp/facerec/data/c/brad_pitt/brad_pitt_01.jpg;2
/home/philipp/facerec/data/c/brad_pitt/brad_pitt_02.jpg;2
/home/philipp/facerec/data/c/brad_pitt/brad_pitt_03.jpg;2
...
/home/philipp/facerec/data/c1/crop_arnold_schwarzenegger/crop_08.jpg;6
/home/philipp/facerec/data/c1/crop_arnold_schwarzenegger/crop_05.jpg;6
/home/philipp/facerec/data/c1/crop_arnold_schwarzenegger/crop_02.jpg;6
/home/philipp/facerec/data/c1/crop_arnold_schwarzenegger/crop_03.jpg;6
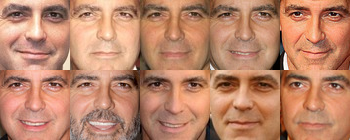
All images for this example were chosen to have a frontal face perspective. They have been cropped, scaled and rotated to be aligned at the eyes, just like this set of George Clooney images:

The source code for the demo is available in the src folder coming with this documentation:
This demo uses the CascadeClassifier:
1 2 3 4 5 6 7 8 9 10 11 12 13 14 15 16 17 18 19 20 21 22 23 24 25 26 27 28 29 30 31 32 33 34 35 36 37 38 39 40 41 42 43 44 45 46 47 48 49 50 51 52 53 54 55 56 57 58 59 60 61 62 63 64 65 66 67 68 69 70 71 72 73 74 75 76 77 78 79 80 81 82 83 84 85 86 87 88 89 90 91 92 93 94 95 96 97 98 99 100 101 102 103 104 105 106 107 108 109 110 111 112 113 114 115 116 117 118 119 120 121 122 123 124 125 126 127 128 129 130 131 132 133 134 135 136 137 138 139 140 141 142 143 144 145 146 147 148 149 150 151 152 153 | /*
* Copyright (c) 2011. Philipp Wagner <bytefish[at]gmx[dot]de>.
* Released to public domain under terms of the BSD Simplified license.
*
* Redistribution and use in source and binary forms, with or without
* modification, are permitted provided that the following conditions are met:
* * Redistributions of source code must retain the above copyright
* notice, this list of conditions and the following disclaimer.
* * Redistributions in binary form must reproduce the above copyright
* notice, this list of conditions and the following disclaimer in the
* documentation and/or other materials provided with the distribution.
* * Neither the name of the organization nor the names of its contributors
* may be used to endorse or promote products derived from this software
* without specific prior written permission.
*
* See <http://www.opensource.org/licenses/bsd-license>
*/
#include "opencv2/core.hpp"
#include "opencv2/face.hpp"
#include "opencv2/highgui.hpp"
#include "opencv2/imgproc.hpp"
#include "opencv2/objdetect.hpp"
#include <iostream>
#include <fstream>
#include <sstream>
using namespace cv;
using namespace cv::face;
using namespace std;
static void read_csv(const string& filename, vector<Mat>& images, vector<int>& labels, char separator = ';') {
std::ifstream file(filename.c_str(), ifstream::in);
if (!file) {
string error_message = "No valid input file was given, please check the given filename.";
CV_Error(CV_StsBadArg, error_message);
}
string line, path, classlabel;
while (getline(file, line)) {
stringstream liness(line);
getline(liness, path, separator);
getline(liness, classlabel);
if(!path.empty() && !classlabel.empty()) {
images.push_back(imread(path, 0));
labels.push_back(atoi(classlabel.c_str()));
}
}
}
int main(int argc, const char *argv[]) {
// Check for valid command line arguments, print usage
// if no arguments were given.
if (argc != 4) {
cout << "usage: " << argv[0] << " </path/to/haar_cascade> </path/to/csv.ext> </path/to/device id>" << endl;
cout << "\t </path/to/haar_cascade> -- Path to the Haar Cascade for face detection." << endl;
cout << "\t </path/to/csv.ext> -- Path to the CSV file with the face database." << endl;
cout << "\t <device id> -- The webcam device id to grab frames from." << endl;
exit(1);
}
// Get the path to your CSV:
string fn_haar = string(argv[1]);
string fn_csv = string(argv[2]);
int deviceId = atoi(argv[3]);
// These vectors hold the images and corresponding labels:
vector<Mat> images;
vector<int> labels;
// Read in the data (fails if no valid input filename is given, but you'll get an error message):
try {
read_csv(fn_csv, images, labels);
} catch (cv::Exception& e) {
cerr << "Error opening file \"" << fn_csv << "\". Reason: " << e.msg << endl;
// nothing more we can do
exit(1);
}
// Get the height from the first image. We'll need this
// later in code to reshape the images to their original
// size AND we need to reshape incoming faces to this size:
int im_width = images[0].cols;
int im_height = images[0].rows;
// Create a FaceRecognizer and train it on the given images:
Ptr<FaceRecognizer> model = createFisherFaceRecognizer();
model->train(images, labels);
// That's it for learning the Face Recognition model. You now
// need to create the classifier for the task of Face Detection.
// We are going to use the haar cascade you have specified in the
// command line arguments:
//
CascadeClassifier haar_cascade;
haar_cascade.load(fn_haar);
// Get a handle to the Video device:
VideoCapture cap(deviceId);
// Check if we can use this device at all:
if(!cap.isOpened()) {
cerr << "Capture Device ID " << deviceId << "cannot be opened." << endl;
return -1;
}
// Holds the current frame from the Video device:
Mat frame;
for(;;) {
cap >> frame;
// Clone the current frame:
Mat original = frame.clone();
// Convert the current frame to grayscale:
Mat gray;
cvtColor(original, gray, CV_BGR2GRAY);
// Find the faces in the frame:
vector< Rect_<int> > faces;
haar_cascade.detectMultiScale(gray, faces);
// At this point you have the position of the faces in
// faces. Now we'll get the faces, make a prediction and
// annotate it in the video. Cool or what?
for(int i = 0; i < faces.size(); i++) {
// Process face by face:
Rect face_i = faces[i];
// Crop the face from the image. So simple with OpenCV C++:
Mat face = gray(face_i);
// Resizing the face is necessary for Eigenfaces and Fisherfaces. You can easily
// verify this, by reading through the face recognition tutorial coming with OpenCV.
// Resizing IS NOT NEEDED for Local Binary Patterns Histograms, so preparing the
// input data really depends on the algorithm used.
//
// I strongly encourage you to play around with the algorithms. See which work best
// in your scenario, LBPH should always be a contender for robust face recognition.
//
// Since I am showing the Fisherfaces algorithm here, I also show how to resize the
// face you have just found:
Mat face_resized;
cv::resize(face, face_resized, Size(im_width, im_height), 1.0, 1.0, INTER_CUBIC);
// Now perform the prediction, see how easy that is:
int prediction = model->predict(face_resized);
// And finally write all we've found out to the original image!
// First of all draw a green rectangle around the detected face:
rectangle(original, face_i, CV_RGB(0, 255,0), 1);
// Create the text we will annotate the box with:
string box_text = format("Prediction = %d", prediction);
// Calculate the position for annotated text (make sure we don't
// put illegal values in there):
int pos_x = std::max(face_i.tl().x - 10, 0);
int pos_y = std::max(face_i.tl().y - 10, 0);
// And now put it into the image:
putText(original, box_text, Point(pos_x, pos_y), FONT_HERSHEY_PLAIN, 1.0, CV_RGB(0,255,0), 2.0);
}
// Show the result:
imshow("face_recognizer", original);
// And display it:
char key = (char) waitKey(20);
// Exit this loop on escape:
if(key == 27)
break;
}
return 0;
}
|
You’ll need:
If you are in Windows, then simply start the demo by running (from command line):
facerec_video.exe <C:/path/to/your/haar_cascade.xml> <C:/path/to/your/csv.ext> <video device>
If you are in Linux, then simply start the demo by running:
./facerec_video </path/to/your/haar_cascade.xml> </path/to/your/csv.ext> <video device>
An example. If the haar-cascade is at C:/opencv/data/haarcascades/haarcascade_frontalface_default.xml, the CSV file is at C:/facerec/data/celebrities.txt and I have a webcam with deviceId 1, then I would call the demo with:
facerec_video.exe C:/opencv/data/haarcascades/haarcascade_frontalface_default.xml C:/facerec/data/celebrities.txt 1
That’s it.
You don’t really want to create the CSV file by hand. I have prepared you a little Python script create_csv.py (you find it at /src/create_csv.py coming with this tutorial) that automatically creates you a CSV file. If you have your images in hierarchie like this (/basepath/<subject>/<image.ext>):
philipp@mango:~/facerec/data/at$ tree
.
|-- s1
|   |-- 1.pgm
|   |-- ...
|   |-- 10.pgm
|-- s2
|   |-- 1.pgm
|   |-- ...
|   |-- 10.pgm
...
|-- s40
|   |-- 1.pgm
|   |-- ...
|   |-- 10.pgm
Then simply call create_csv.py with the path to the folder, just like this and you could save the output:
philipp@mango:~/facerec/data$ python create_csv.py
at/s13/2.pgm;0
at/s13/7.pgm;0
at/s13/6.pgm;0
at/s13/9.pgm;0
at/s13/5.pgm;0
at/s13/3.pgm;0
at/s13/4.pgm;0
at/s13/10.pgm;0
at/s13/8.pgm;0
at/s13/1.pgm;0
at/s17/2.pgm;1
at/s17/7.pgm;1
at/s17/6.pgm;1
at/s17/9.pgm;1
at/s17/5.pgm;1
at/s17/3.pgm;1
[...]
Here is the script, if you can’t find it:
1 2 3 4 5 6 7 8 9 10 11 12 13 14 15 16 17 18 19 20 21 22 23 24 25 26 27 28 29 30 31 32 33 34 35 36 37 38 39 40 41 42 43 | #!/usr/bin/env python
import sys
import os.path
# This is a tiny script to help you creating a CSV file from a face
# database with a similar hierarchie:
#
# philipp@mango:~/facerec/data/at$ tree
# .
# |-- README
# |-- s1
# | |-- 1.pgm
# | |-- ...
# | |-- 10.pgm
# |-- s2
# | |-- 1.pgm
# | |-- ...
# | |-- 10.pgm
# ...
# |-- s40
# | |-- 1.pgm
# | |-- ...
# | |-- 10.pgm
#
if __name__ == "__main__":
if len(sys.argv) != 2:
print "usage: create_csv <base_path>"
sys.exit(1)
BASE_PATH=sys.argv[1]
SEPARATOR=";"
label = 0
for dirname, dirnames, filenames in os.walk(BASE_PATH):
for subdirname in dirnames:
subject_path = os.path.join(dirname, subdirname)
for filename in os.listdir(subject_path):
abs_path = "%s/%s" % (subject_path, filename)
print "%s%s%d" % (abs_path, SEPARATOR, label)
label = label + 1
|
An accurate alignment of your image data is especially important in tasks like emotion detection, were you need as much detail as possible. Believe me... You don’t want to do this by hand. So I’ve prepared you a tiny Python script. The code is really easy to use. To scale, rotate and crop the face image you just need to call CropFace(image, eye_left, eye_right, offset_pct, dest_sz), where:
If you are using the same offset_pct and dest_sz for your images, they are all aligned at the eyes.
1 2 3 4 5 6 7 8 9 10 11 12 13 14 15 16 17 18 19 20 21 22 23 24 25 26 27 28 29 30 31 32 33 34 35 36 37 38 39 40 41 42 43 44 45 46 47 48 49 50 51 52 53 54 55 56 57 58 59 60 61 62 63 64 65 66 67 68 69 70 71 72 73 74 75 76 77 78 79 80 81 82 83 84 85 86 87 88 89 90 91 92 93 94 95 96 97 98 99 100 101 102 103 104 105 106 107 108 109 110 111 112 | #!/usr/bin/env python
# Software License Agreement (BSD License)
#
# Copyright (c) 2012, Philipp Wagner
# All rights reserved.
#
# Redistribution and use in source and binary forms, with or without
# modification, are permitted provided that the following conditions
# are met:
#
# * Redistributions of source code must retain the above copyright
# notice, this list of conditions and the following disclaimer.
# * Redistributions in binary form must reproduce the above
# copyright notice, this list of conditions and the following
# disclaimer in the documentation and/or other materials provided
# with the distribution.
# * Neither the name of the author nor the names of its
# contributors may be used to endorse or promote products derived
# from this software without specific prior written permission.
#
# THIS SOFTWARE IS PROVIDED BY THE COPYRIGHT HOLDERS AND CONTRIBUTORS
# "AS IS" AND ANY EXPRESS OR IMPLIED WARRANTIES, INCLUDING, BUT NOT
# LIMITED TO, THE IMPLIED WARRANTIES OF MERCHANTABILITY AND FITNESS
# FOR A PARTICULAR PURPOSE ARE DISCLAIMED. IN NO EVENT SHALL THE
# COPYRIGHT OWNER OR CONTRIBUTORS BE LIABLE FOR ANY DIRECT, INDIRECT,
# INCIDENTAL, SPECIAL, EXEMPLARY, OR CONSEQUENTIAL DAMAGES (INCLUDING,
# BUT NOT LIMITED TO, PROCUREMENT OF SUBSTITUTE GOODS OR SERVICES;
# LOSS OF USE, DATA, OR PROFITS; OR BUSINESS INTERRUPTION) HOWEVER
# CAUSED AND ON ANY THEORY OF LIABILITY, WHETHER IN CONTRACT, STRICT
# LIABILITY, OR TORT (INCLUDING NEGLIGENCE OR OTHERWISE) ARISING IN
# ANY WAY OUT OF THE USE OF THIS SOFTWARE, EVEN IF ADVISED OF THE
# POSSIBILITY OF SUCH DAMAGE.
import sys, math, Image
def Distance(p1,p2):
dx = p2[0] - p1[0]
dy = p2[1] - p1[1]
return math.sqrt(dx*dx+dy*dy)
def ScaleRotateTranslate(image, angle, center = None, new_center = None, scale = None, resample=Image.BICUBIC):
if (scale is None) and (center is None):
return image.rotate(angle=angle, resample=resample)
nx,ny = x,y = center
sx=sy=1.0
if new_center:
(nx,ny) = new_center
if scale:
(sx,sy) = (scale, scale)
cosine = math.cos(angle)
sine = math.sin(angle)
a = cosine/sx
b = sine/sx
c = x-nx*a-ny*b
d = -sine/sy
e = cosine/sy
f = y-nx*d-ny*e
return image.transform(image.size, Image.AFFINE, (a,b,c,d,e,f), resample=resample)
def CropFace(image, eye_left=(0,0), eye_right=(0,0), offset_pct=(0.2,0.2), dest_sz = (70,70)):
# calculate offsets in original image
offset_h = math.floor(float(offset_pct[0])*dest_sz[0])
offset_v = math.floor(float(offset_pct[1])*dest_sz[1])
# get the direction
eye_direction = (eye_right[0] - eye_left[0], eye_right[1] - eye_left[1])
# calc rotation angle in radians
rotation = -math.atan2(float(eye_direction[1]),float(eye_direction[0]))
# distance between them
dist = Distance(eye_left, eye_right)
# calculate the reference eye-width
reference = dest_sz[0] - 2.0*offset_h
# scale factor
scale = float(dist)/float(reference)
# rotate original around the left eye
image = ScaleRotateTranslate(image, center=eye_left, angle=rotation)
# crop the rotated image
crop_xy = (eye_left[0] - scale*offset_h, eye_left[1] - scale*offset_v)
crop_size = (dest_sz[0]*scale, dest_sz[1]*scale)
image = image.crop((int(crop_xy[0]), int(crop_xy[1]), int(crop_xy[0]+crop_size[0]), int(crop_xy[1]+crop_size[1])))
# resize it
image = image.resize(dest_sz, Image.ANTIALIAS)
return image
def readFileNames():
try:
inFile = open('path_to_created_csv_file.csv')
except:
raise IOError('There is no file named path_to_created_csv_file.csv in current directory.')
return False
picPath = []
picIndex = []
for line in inFile.readlines():
if line != '':
fields = line.rstrip().split(';')
picPath.append(fields[0])
picIndex.append(int(fields[1]))
return (picPath, picIndex)
if __name__ == "__main__":
[images, indexes]=readFileNames()
if not os.path.exists("modified"):
os.makedirs("modified")
for img in images:
image = Image.open(img)
CropFace(image, eye_left=(252,364), eye_right=(420,366), offset_pct=(0.1,0.1), dest_sz=(200,200)).save("modified/"+img.rstrip().split('/')[1]+"_10_10_200_200.jpg")
CropFace(image, eye_left=(252,364), eye_right=(420,366), offset_pct=(0.2,0.2), dest_sz=(200,200)).save("modified/"+img.rstrip().split('/')[1]+"_20_20_200_200.jpg")
CropFace(image, eye_left=(252,364), eye_right=(420,366), offset_pct=(0.3,0.3), dest_sz=(200,200)).save("modified/"+img.rstrip().split('/')[1]+"_30_30_200_200.jpg")
CropFace(image, eye_left=(252,364), eye_right=(420,366), offset_pct=(0.2,0.2)).save("modified/"+img.rstrip().split('/')[1]+"_20_20_70_70.jpg")
|
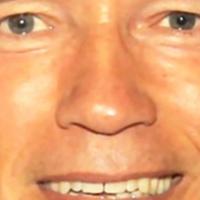
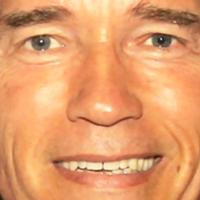
Imagine we are given this photo of Arnold Schwarzenegger, which is under a Public Domain license. The (x,y)-position of the eyes is approximately (252,364) for the left and (420,366) for the right eye. Now you only need to define the horizontal offset, vertical offset and the size your scaled, rotated & cropped face should have.
Here are some examples:
| Configuration | Cropped, Scaled, Rotated Face |
|---|---|
| 0.1 (10%), 0.1 (10%), (200,200) | 
|
| 0.2 (20%), 0.2 (20%), (200,200) | 
|
| 0.3 (30%), 0.3 (30%), (200,200) | 
|
| 0.2 (20%), 0.2 (20%), (70,70) | 
|