Android development with OpenCV
This tutorial is created to help you use OpenCV library within your Android project.
This guide was written with Windows 7 in mind, though it should work with any other OS supported by OpenCV4Android SDK.
This tutorial assumes you have the following installed and configured:
JDK
Android SDK and NDK
Eclipse IDE
ADT and CDT plugins for Eclipse
If you need help with anything of the above, you may refer to our Introduction into Android Development guide.
This tutorial also assumes you have OpenCV4Android SDK already installed on your development machine and OpenCV Manager on your testing device correspondingly. If you need help with any of these, you may consult our OpenCV4Android SDK tutorial.
If you encounter any error after thoroughly following these steps, feel free to contact us via OpenCV4Android discussion group or OpenCV Q&A forum . We’ll do our best to help you out.
Using OpenCV library within your Android project
In this section we will explain how to make some existing project to use OpenCV. Starting with 2.4.2 release for Android, OpenCV Manager is used to provide apps with the best available version of OpenCV. You can get more information here: Android OpenCV Manager and in these slides.
Java
Application development with async initialization
Using async initialization is a recommended way for application development. It uses the OpenCV Manager to access OpenCV libraries externally installed in the target system.
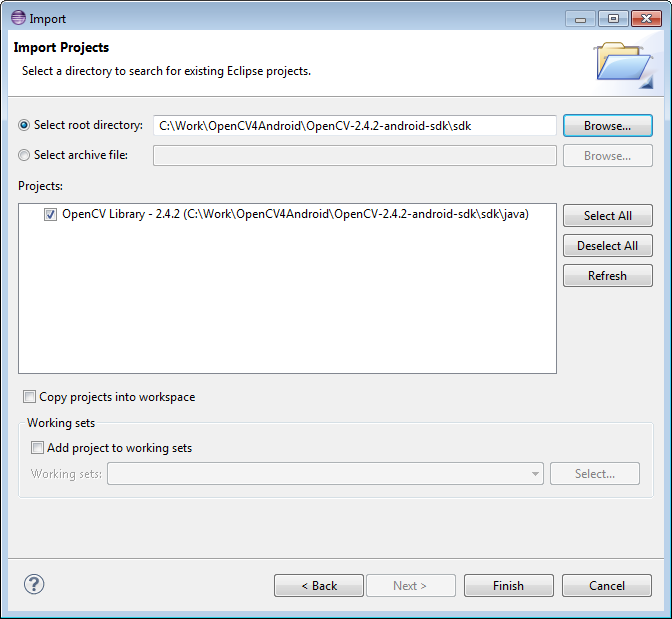
Add OpenCV library project to your workspace. Use menu File -> Import -> Existing project in your workspace, press Browse button and locate OpenCV4Android SDK (OpenCV-2.4.3-android-sdk/sdk).
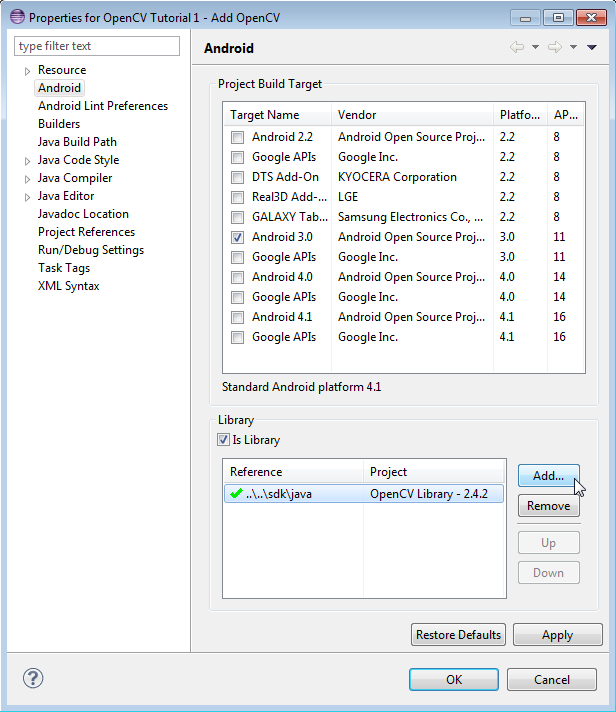
In application project add a reference to the OpenCV Java SDK in Project -> Properties -> Android -> Library -> Add select OpenCV Library - 2.4.3.
To run OpenCV Manager-based application for the first time you need to install package with the OpenCV Manager for your platform. Armeabi, Armeabi-v7a with NEON, x86 and MIPS achitectures supported. You can do it using Google Play Market or manually with adb tool:
1 | <Android SDK path>/platform-tools/adb install <OpenCV4Android SDK path>/apk/OpenCV_2.4.3_Manager.apk
|
For rare cases if NEON instruction set is not supported you need to install aditional OpenCV Library package:
1 | <Android SDK path>/platform-tools/adb install <OpenCV4Android SDK path>/apk/OpenCV_2.4.3_binary_pack_armv7a.apk
|
There is a very base code snippet implementing the async initialization. It shows basic principles. See the “15-puzzle” OpenCV sample for details.
1 2 3 4 5 6 7 8 9 10 11 12 13 14 15 16 17 18 19 20 21 22 23 24 25 26 27 28 29 30 31 32 33 34 | public class MyActivity extends Activity implements HelperCallbackInterface
{
private BaseLoaderCallback mOpenCVCallBack = new BaseLoaderCallback(this) {
@Override
public void onManagerConnected(int status) {
switch (status) {
case LoaderCallbackInterface.SUCCESS:
{
Log.i(TAG, "OpenCV loaded successfully");
// Create and set View
mView = new puzzle15View(mAppContext);
setContentView(mView);
} break;
default:
{
super.onManagerConnected(status);
} break;
}
}
};
/** Call on every application resume **/
@Override
protected void onResume()
{
Log.i(TAG, "called onResume");
super.onResume();
Log.i(TAG, "Trying to load OpenCV library");
if (!OpenCVLoader.initAsync(OpenCVLoader.OPENCV_VERSION_2_4_2, this, mOpenCVCallBack))
{
Log.e(TAG, "Cannot connect to OpenCV Manager");
}
}
|
It this case application works with OpenCV Manager in asynchronous fashion. OnManagerConnected callback will be called in UI thread, when initialization finishes. Please note, that it is not allowed to use OpenCV calls or load OpenCV-dependent native libs before invoking this callback. Load your own native libraries that depend on OpenCV after the successful OpenCV initialization. Default BaseLoaderCallback implementation treat application context as Activity and calls Activity.finish() method to exit in case of initialization failure. To override this behavior you need to override finish() method of BaseLoaderCallback class and implement your own finalization method.
Application development with static initialization
According to this approach all OpenCV binaries are included into your application package. It is designed mostly for development purposes. This approach is deprecated for the production code, release package is recommended to communicate with OpenCV Manager via the async initialization described above.
Add the OpenCV library project to your workspace the same way as for the async initialization above. Use menu File -> Import -> Existing project in your workspace, push Browse button and select OpenCV SDK path (OpenCV-2.4.3-android-sdk/sdk).
In the application project add a reference to the OpenCV4Android SDK in Project -> Properties -> Android -> Library -> Add select OpenCV Library - 2.4.3;
If your application project doesn’t have a JNI part, just copy the corresponding OpenCV native libs from <OpenCV-2.4.3-android-sdk>/sdk/native/libs/<target_arch> to your project directory to folder libs/<target_arch>.
In case of the application project with a JNI part, instead of manual libraries copying you need to modify your Android.mk file: add the following two code lines after the "include $(CLEAR_VARS)" and before "include path_to_OpenCV-2.4.3-android-sdk/sdk/native/jni/OpenCV.mk"
1
2
OPENCV_CAMERA_MODULES:=on
OPENCV_INSTALL_MODULES:=on
The result should look like the following:
1
2
3
4
5
6
include $(CLEAR_VARS)

# OpenCV
OPENCV_CAMERA_MODULES:=on
OPENCV_INSTALL_MODULES:=on
include ../../sdk/native/jni/OpenCV.mk
After that the OpenCV libraries will be copied to your application libs folder during the JNI part build.
Eclipse will automatically include all the libraries from the libs folder to the application package (APK).
The last step of enabling OpenCV in your application is Java initialization code before call to OpenCV API. It can be done, for example, in the static section of the Activity class:
1
2
3
4
5
static {
    if (!OpenCVLoader.initDebug()) {
        // Handle initialization error
    }
}
If you application includes other OpenCV-dependent native libraries you should load them after OpenCV initialization:
1
2
3
4
5
6
7
8
static {
    if (!OpenCVLoader.initDebug()) {
        // Handle initialization error
    } else {
        System.loadLibrary("my_jni_lib1");
        System.loadLibrary("my_jni_lib2");
    }
}
Native/C++
To build your own Android application, which uses OpenCV from native part, the following steps should be done:
You can use an environment variable to specify the location of OpenCV package or just hardcode absolute or relative path in the jni/Android.mk of your projects.
The file jni/Android.mk should be written for the current application using the common rules for this file.
For detailed information see the Android NDK documentation from the Android NDK archive, in the file <path_where_NDK_is_placed>/docs/ANDROID-MK.html
The line
include C:\Work\OpenCV4Android\OpenCV-2.4.3-android-sdk\sdk\native\jni\OpenCV.mkshould be inserted into the jni/Android.mk file after the line
include $(CLEAR_VARS)Several variables can be used to customize OpenCV stuff, but you don’t need to use them when your application uses the async initialization via the OpenCV Manager API.
Note: these variables should be set before the "include .../OpenCV.mk" line:
OPENCV_INSTALL_MODULES:=on
Copies necessary OpenCV dynamic libs to the project libs folder in order to include them into the APK.
OPENCV_CAMERA_MODULES:=off
Skip native OpenCV camera related libs copying to the project libs folder.
OPENCV_LIB_TYPE:=STATIC
Perform static link with OpenCV. By default dynamic link is used and the project JNI lib depends on libopencv_java.so.
The file Application.mk should exist and should contain lines:
APP_STL := gnustl_static
APP_CPPFLAGS := -frtti -fexceptions
Also the line like this one:
APP_ABI := armeabi-v7a
should specify the application target platforms.
In some cases a linkage error (like "In function 'cv::toUtf16(std::basic_string<...>... undefined reference to 'mbstowcs'") happens when building an application JNI library depending on OpenCV. The following line in the Application.mk usually fixes it:
APP_PLATFORM := android-9
Either use manual ndk-build invocation or setup Eclipse CDT Builder to build native JNI lib before Java part [re]build and APK creation.
Hello OpenCV Sample
Here are basic steps to guide you trough the process of creating a simple OpenCV-centric application. It will be capable of accessing camera output, processing it and displaying the result.
Open Eclipse IDE, create a new clean workspace, create a new Android project (File -> New -> Android Project).
Set name, target, package and minSDKVersion accordingly.
Create a new class (File -> New -> Class). Name it for example: HelloOpenCVView.
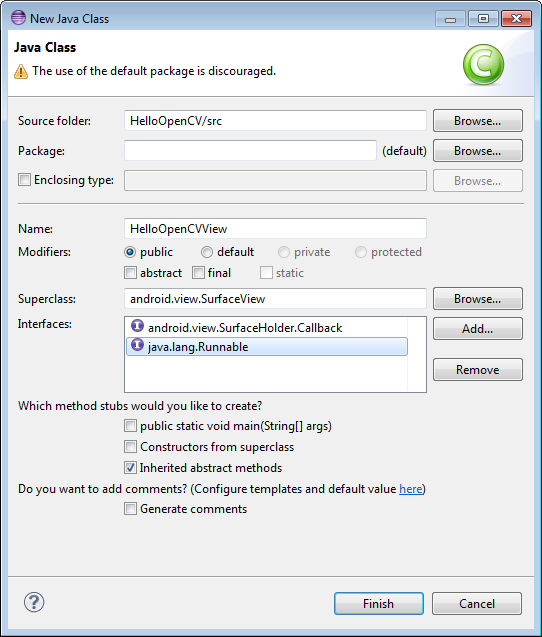
- It should extend SurfaceView class.
- It also should implement SurfaceHolder.Callback, Runnable.
Edit HelloOpenCVView class.
Add an import line for android.content.context.
Modify autogenerated stubs: HelloOpenCVView, surfaceCreated, surfaceDestroyed and surfaceChanged.
 1
 2
 3
 4
 5
 6
 7
 8
 9
10
11
12
13
14
15
16
17
18
19
20
21
22
23
24
package com.hello.opencv.test;

import android.content.Context;

public class HelloOpenCVView extends SurfaceView implements Callback, Runnable {

public HelloOpenCVView(Context context) {
    super(context);
    getHolder().addCallback(this);
}

public void surfaceCreated(SurfaceHolder holder) {
    (new Thread(this)).start();
}

public void surfaceDestroyed(SurfaceHolder holder) {
    cameraRelease();
}

public void surfaceChanged(SurfaceHolder holder, int format, int width, int height) {
    cameraSetup(width, height);
}

//...
Add cameraOpen, cameraRelease and cameraSetup voids as shown below.
Also, don’t forget to add the public void run() as follows:
 1
 2
 3
 4
 5
 6
 7
 8
 9
10
11
12
13
14
15
public void run() {
    // TODO: loop { getFrame(), processFrame(), drawFrame() }
}

public boolean cameraOpen() {
    return false; //TODO: open camera
}

private void cameraRelease() {
    // TODO release camera
}

private void cameraSetup(int width, int height) {
    // TODO setup camera
}
Create a new Activity (New -> Other -> Android -> Android Activity) and name it, for example: HelloOpenCVActivity. For this activity define onCreate, onResume and onPause voids.
 1
 2
 3
 4
 5
 6
 7
 8
 9
10
11
12
13
14
15
16
17
18
19
20
21
22
23
24
25
26
27
 public void onCreate (Bundle savedInstanceState) {
     super.onCreate(savedInstanceState);
     mView = new HelloOpenCVView(this);
     setContentView (mView);
 }

 protected void onPause() {
     super.onPause();
     mView.cameraRelease();
 }

 protected void onResume() {
     super.onResume();
     if( !mView.cameraOpen() ) {
         // MessageBox and exit app
         AlertDialog ad = new AlertDialog.Builder(this).create();
         ad.setCancelable(false); // This blocks the "BACK" button
         ad.setMessage("Fatal error: can't open camera!");
         ad.setButton("OK", new DialogInterface.OnClickListener() {
             public void onClick(DialogInterface dialog, int which) {
                 dialog.dismiss();
                 finish();
             }
         });
         ad.show();
     }
 }
Add the following permissions to the AndroidManifest.xml file:
1
2
3
4
5
</application>

<uses-permission android:name="android.permission.CAMERA" />
<uses-feature android:name="android.hardware.camera" />
<uses-feature android:name="android.hardware.camera.autofocus" />
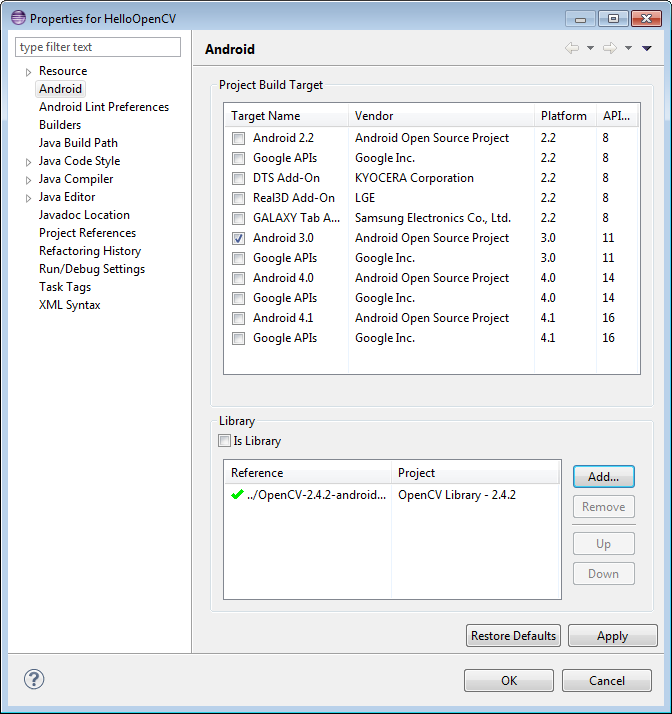
Reference OpenCV library within your project properties.
We now need some code to handle the camera. Update the HelloOpenCVView class as follows:
 1
 2
 3
 4
 5
 6
 7
 8
 9
10
11
12
13
14
15
16
17
18
19
20
21
22
23
24
25
26
27
28
29
30
31
32
33
34
35
36
37
38
39
40
41
42
43
44
45
46
private VideoCapture      mCamera;

public boolean cameraOpen() {
    synchronized (this) {
        cameraRelease();
        mCamera = new VideoCapture(Highgui.CV_CAP_ANDROID);
        if (!mCamera.isOpened()) {
            mCamera.release();
            mCamera = null;
            Log.e("HelloOpenCVView", "Failed to open native camera");
            return false;
        }
    }
    return true;
}

public void cameraRelease() {
    synchronized(this) {
        if (mCamera != null) {
             mCamera.release();
             mCamera = null;
        }
    }
}

private void cameraSetup(int width, int height) {
    synchronized (this) {
        if (mCamera != null && mCamera.isOpened()) {
            List<Size> sizes = mCamera.getSupportedPreviewSizes();
            int mFrameWidth = width;
            int mFrameHeight = height;
            { // selecting optimal camera preview size
                 double minDiff = Double.MAX_VALUE;
                 for (Size size : sizes) {
                     if (Math.abs(size.height - height) < minDiff) {
                         mFrameWidth = (int) size.width;
                         mFrameHeight = (int) size.height;
                         minDiff = Math.abs(size.height - height);
                     }
                 }
             }
             mCamera.set(Highgui.CV_CAP_PROP_FRAME_WIDTH, mFrameWidth);
             mCamera.set(Highgui.CV_CAP_PROP_FRAME_HEIGHT, mFrameHeight);
        }
    }
}
The last step would be to update the run() void in HelloOpenCVView class as follows:
 1
 2
 3
 4
 5
 6
 7
 8
 9
10
11
12
13
14
15
16
17
18
19
20
21
22
23
24
25
26
27
28
29
30
31
32
33
34
35
36
37
38
public void run() {
    while (true) {
        Bitmap bmp = null;
        synchronized (this) {
            if (mCamera == null)
                break;
            if (!mCamera.grab())
                break;

            bmp = processFrame(mCamera);
        }
        if (bmp != null) {
            Canvas canvas = getHolder().lockCanvas();
            if (canvas != null) {
                canvas.drawBitmap(bmp, (canvas.getWidth()  - bmp.getWidth())  / 2,
                                       (canvas.getHeight() - bmp.getHeight()) / 2, null);
                getHolder().unlockCanvasAndPost(canvas);

            }
            bmp.recycle();
        }
    }
}

protected Bitmap processFrame(VideoCapture capture) {
    Mat mRgba = new Mat();
    capture.retrieve(mRgba, Highgui.CV_CAP_ANDROID_COLOR_FRAME_RGBA);
    //process mRgba
    Bitmap bmp = Bitmap.createBitmap(mRgba.cols(), mRgba.rows(), Bitmap.Config.ARGB_8888);
    try {
        Utils.matToBitmap(mRgba, bmp);
    } catch(Exception e) {
        Log.e("processFrame", "Utils.matToBitmap() throws an exception: " + e.getMessage());
        bmp.recycle();
        bmp = null;
    }
    return bmp;
}
Help and Feedback
You did not find what you were looking for?- Ask a question on the Q&A forum.
- If you think something is missing or wrong in the documentation, please file a bug report.